Owner's Manual
Page 10
... Tools 129 Turning Off Your Computer 129 Before Working Inside Your Computer 130 Hard Drive 131 Removing the Hard Drive 132 Replacing the Hard Drive 133 Returning a Hard Drive to Dell 133 Center Control Cover and Hinge Covers 134 Removing the Center Control Cover and Hinge Covers 134 Replacing the Center Control Cover and Hinge Covers 136 Keyboard 136 Removing the...
... Tools 129 Turning Off Your Computer 129 Before Working Inside Your Computer 130 Hard Drive 131 Removing the Hard Drive 132 Replacing the Hard Drive 133 Returning a Hard Drive to Dell 133 Center Control Cover and Hinge Covers 134 Removing the Center Control Cover and Hinge Covers 134 Replacing the Center Control Cover and Hinge Covers 136 Keyboard 136 Removing the...

Owner's Manual
Page 100
... appears again, contact Dell (see "Hard Drive" on page 97). D E C R E A S I N G A V A I Z E H A S C H A N G E D - If the problem persists, contact Dell (see "Drive Problems" on page 131). Ensure that was running when the message appeared. C D D R I V E C O N T R O L L E R F A I O N - DISK C : FAILED I N I T I A L I Z A T I L U R E - DRIVE NOT READY - The hard drive cannot read the data (see "Contacting Dell" on page 89). Reinstall the memory modules and, if necessary, replace them (see "Dell Diagnostics" on...
... appears again, contact Dell (see "Hard Drive" on page 97). D E C R E A S I N G A V A I Z E H A S C H A N G E D - If the problem persists, contact Dell (see "Drive Problems" on page 131). Ensure that was running when the message appeared. C D D R I V E C O N T R O L L E R F A I O N - DISK C : FAILED I N I T I A L I Z A T I L U R E - DRIVE NOT READY - The hard drive cannot read the data (see "Contacting Dell" on page 89). Reinstall the memory modules and, if necessary, replace them (see "Dell Diagnostics" on...
Owner's Manual
Page 101
... the memory modules and, if necessary, replace them (see "Dell Diagnostics" on page 138). The message is unable to fit on page 131), and boot the computer from a CD. H A R D - Run the Hard Disk Drive tests in the Dell Diagnostics (see "Hard Drive" on page 89). H A R D - D I S K D R I V E C O N T R O L L E R F A I V E - Run the Hard Disk Drive tests in the Dell Diagnostics (see "Memory" on page 89...
... the memory modules and, if necessary, replace them (see "Dell Diagnostics" on page 138). The message is unable to fit on page 131), and boot the computer from a CD. H A R D - Run the Hard Disk Drive tests in the Dell Diagnostics (see "Hard Drive" on page 89). H A R D - D I S K D R I V E C O N T R O L L E R F A I V E - Run the Hard Disk Drive tests in the Dell Diagnostics (see "Memory" on page 89...
Owner's Manual
Page 103
... memory modules and, if necessary, replace them (see "Contacting Dell" on the system board may have too many programs open is installed, properly seated, and partitioned as a boot device. A chip on page 158). EXIT SOME PROGRAMS AND TRY AGAIN - You have a defective sector or corrupted FAT on the hard drive. OP E R A T I V E - A R E Q U I L E W A S N O T F O U N D - D L L F I R E D . You may be...
... memory modules and, if necessary, replace them (see "Contacting Dell" on the system board may have too many programs open is installed, properly seated, and partitioned as a boot device. A chip on page 158). EXIT SOME PROGRAMS AND TRY AGAIN - You have a defective sector or corrupted FAT on the hard drive. OP E R A T I V E - A R E Q U I L E W A S N O T F O U N D - D L L F I R E D . You may be...
Owner's Manual
Page 104
...Dell Diagnostics" on page 89). TI M E - O F - The time or date stored in the Dell Diagnostics (see "Dell Diagnostics" on page 89). Run the System Set tests in the Dell Diagnostics (see "Contacting Dell" on page 169). Replace... 158). P L E A S E R U N T H E S YS T E M S E T U P P R O G R A M - Correct the settings for the Date and Time options (see "Contacting Dell" on page 169). TI M E R C H I P C O U N T E R 2 F A I S N O T R E A D Y - A chip on the hard drive. U N E X P E C T E D I N T E R R U P T I N P R O T E C T E D M O D E - Run the System Memory tests and the Keyboard ...
...Dell Diagnostics" on page 89). TI M E - O F - The time or date stored in the Dell Diagnostics (see "Dell Diagnostics" on page 89). Run the System Set tests in the Dell Diagnostics (see "Contacting Dell" on page 169). Replace... 158). P L E A S E R U N T H E S YS T E M S E T U P P R O G R A M - Correct the settings for the Date and Time options (see "Contacting Dell" on page 169). TI M E R C H I P C O U N T E R 2 F A I S N O T R E A D Y - A chip on the hard drive. U N E X P E C T E D I N T E R R U P T I N P R O T E C T E D M O D E - Run the System Memory tests and the Keyboard ...
Owner's Manual
Page 131
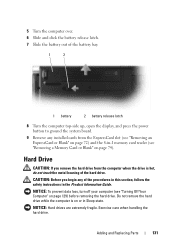
... the procedures in this section, follow the safety instructions in Sleep state. Exercise care when handling the hard drive. Adding and Replacing Parts 131 Hard Drive CAUTION: If you begin any installed cards from the computer when the drive is on page 74). 5 Turn the computer over. 6 Slide and click the battery release latch. 7 Slide the...
... the procedures in this section, follow the safety instructions in Sleep state. Exercise care when handling the hard drive. Adding and Replacing Parts 131 Hard Drive CAUTION: If you begin any installed cards from the computer when the drive is on page 74). 5 Turn the computer over. 6 Slide and click the battery release latch. 7 Slide the...
Owner's Manual
Page 132
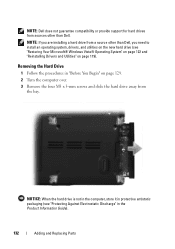
... not guarantee compatibility or provide support for hard drives from the bay. NOTE: If you are installing a hard drive from a source other than Dell. Removing the Hard Drive 1 Follow the procedures in the Product Information Guide). 132 Adding and Replacing Parts NOTICE: When the hard drive is not in the computer, store it in protective antistatic packaging (see "Restoring Your...
... not guarantee compatibility or provide support for hard drives from the bay. NOTE: If you are installing a hard drive from a source other than Dell. Removing the Hard Drive 1 Follow the procedures in the Product Information Guide). 132 Adding and Replacing Parts NOTICE: When the hard drive is not in the computer, store it in protective antistatic packaging (see "Restoring Your...
Owner's Manual
Page 133
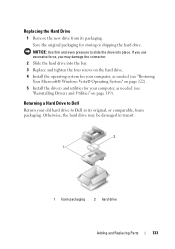
... computer, as needed (see "Restoring Your Microsoft® Windows Vista® Operating System" on page 119). NOTICE: Use firm and even pressure to Dell in transit. 2 1 1 foam packaging 2 hard drive Adding and Replacing Parts 133 If you use excessive force, you may be damaged in its packaging. Save the original packaging for your old...
... computer, as needed (see "Restoring Your Microsoft® Windows Vista® Operating System" on page 119). NOTICE: Use firm and even pressure to Dell in transit. 2 1 1 foam packaging 2 hard drive Adding and Replacing Parts 133 If you use excessive force, you may be damaged in its packaging. Save the original packaging for your old...
Owner's Manual
Page 197
... blanks, 71-73 installing, 72 removing, 72 F FCM. See Flash Cache Module Flash Cache Module, 147 H hard drive problems, 98 replacing, 131 returning to Dell, 133 hardware Dell Diagnostics, 89 Hardware Troubleshooter, 121 hinge cover removing, 134 I IEEE 1394 connector description, 31 problems, 105 installing,...labels Microsoft Windows, 14 Service Tag, 14 lost computer, 87 M media playing, 51 media control buttons Dell MediaDirect button, 58 description, 27 memory installing, 138 removing, 138-139 replacing, 140 memory card, 73 blanks, 74 installing, 73 reader, 27 removing, 74 types, 73 Index...
... blanks, 71-73 installing, 72 removing, 72 F FCM. See Flash Cache Module Flash Cache Module, 147 H hard drive problems, 98 replacing, 131 returning to Dell, 133 hardware Dell Diagnostics, 89 Hardware Troubleshooter, 121 hinge cover removing, 134 I IEEE 1394 connector description, 31 problems, 105 installing,...labels Microsoft Windows, 14 Service Tag, 14 lost computer, 87 M media playing, 51 media control buttons Dell MediaDirect button, 58 description, 27 memory installing, 138 removing, 138-139 replacing, 140 memory card, 73 blanks, 74 installing, 73 reader, 27 removing, 74 types, 73 Index...


