Owner's Manual
Page 3
... Mouse 27 Pairing the Keyboard 27 Keyboard Pairing Failed 28 Pairing the Mouse 29 Mouse Pairing With the Wizard 29 Mouse Pairing Failed 30 Numeric Keypad 31 Key Combinations 31 System Functions 31 Battery 32 Display Functions 32 Wireless Networking Technology Function 32 ...Display Switch 32 Power Management 32 Microsoft Windows Logo Key Functions 32 Touch Pad 33 Customizing the Touch Pad and Mouse 34 Keyboard Battery 34 Dell QuickSet Battery Meter 34 Contents 3
... Mouse 27 Pairing the Keyboard 27 Keyboard Pairing Failed 28 Pairing the Mouse 29 Mouse Pairing With the Wizard 29 Mouse Pairing Failed 30 Numeric Keypad 31 Key Combinations 31 System Functions 31 Battery 32 Display Functions 32 Wireless Networking Technology Function 32 ...Display Switch 32 Power Management 32 Microsoft Windows Logo Key Functions 32 Touch Pad 33 Customizing the Touch Pad and Mouse 34 Keyboard Battery 34 Dell QuickSet Battery Meter 34 Contents 3
Owner's Manual
Page 4
Replacing the Keyboard Battery 35 3 Using Multimedia 37 Playing Media 37 Adjusting the Volume 39 Adjusting the Picture 40 Copying CD, DVD, and BD Media 40 How to Copy a CD, DVD, or BD 40 Using Blank CD, DVD, and BD Media 41 Helpful Tips 42 Using Dell Media Experience and Dell MediaDirect 42 If... the computer is turned on or in standby mode 43 If the computer is turned off or in hibernate mode 43 Dell MediaDirect and Dell Media Experience Help 43 Using Your Computer With a TV or Audio Device 44 Connecting a Composite Video Adapter 44 Connecting a Component Video Adapter 45 ...
Replacing the Keyboard Battery 35 3 Using Multimedia 37 Playing Media 37 Adjusting the Volume 39 Adjusting the Picture 40 Copying CD, DVD, and BD Media 40 How to Copy a CD, DVD, or BD 40 Using Blank CD, DVD, and BD Media 41 Helpful Tips 42 Using Dell Media Experience and Dell MediaDirect 42 If... the computer is turned on or in standby mode 43 If the computer is turned off or in hibernate mode 43 Dell MediaDirect and Dell Media Experience Help 43 Using Your Computer With a TV or Audio Device 44 Connecting a Composite Video Adapter 44 Connecting a Component Video Adapter 45 ...
Owner's Manual
Page 16
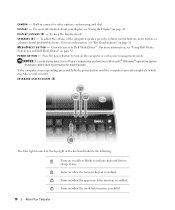
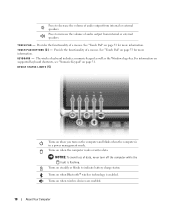
...Dell Media Experience and Dell MediaDirect" on when the uppercase letter function is enabled. KEYBOARD STATUS LIGHTS (4) The blue lights located at the top right of the integrated speaker, press the volume control buttons, mute button, or volume-control keyboard shortcuts. Built-in camera for video capture, conferencing, and chat. Controls access to indicate keyboard battery...: To avoid losing data, turn on page 31. S P E A K E R S ( 8 ) - Turns on when the scroll lock function is enabled. To adjust the volume of the keyboard indicate the following: Turns on steadily or blinks to...
...Dell Media Experience and Dell MediaDirect" on when the uppercase letter function is enabled. KEYBOARD STATUS LIGHTS (4) The blue lights located at the top right of the integrated speaker, press the volume control buttons, mute button, or volume-control keyboard shortcuts. Built-in camera for video capture, conferencing, and chat. Controls access to indicate keyboard battery...: To avoid losing data, turn on page 31. S P E A K E R S ( 8 ) - Turns on when the scroll lock function is enabled. To adjust the volume of the keyboard indicate the following: Turns on steadily or blinks to...
Owner's Manual
Page 18
T O U C H P A D - For information on supported keyboard shortcuts, see "Numeric Keypad" on steadily or blinks to indicate battery charge status. Turns on page 31. Turns on page 33 for more information. See "Touch Pad" on when wireless devices are enabled. 18 ...About Your Computer See "Touch Pad" on when the computer reads or writes data. The wireless keyboard includes a numeric keypad as well...
T O U C H P A D - For information on supported keyboard shortcuts, see "Numeric Keypad" on steadily or blinks to indicate battery charge status. Turns on page 31. Turns on page 33 for more information. See "Touch Pad" on when wireless devices are enabled. 18 ...About Your Computer See "Touch Pad" on when the computer reads or writes data. The wireless keyboard includes a numeric keypad as well...
Owner's Manual
Page 29
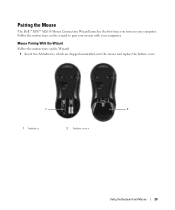
Follow the instructions on the Wizard: 1 Insert two AA batteries, which are shipped uninstalled, into the mouse and replace the battery cover. 1 2 1 batteries 2 battery cover Using the Keyboard and Mouse 29 Mouse Pairing With the Wizard Follow the instructions on the wizard to pair your mouse with your computer. Pairing the Mouse The Dell™ XPS™ M2010 Mouse Connection Wizard launches the first time you turn on your computer.
Follow the instructions on the Wizard: 1 Insert two AA batteries, which are shipped uninstalled, into the mouse and replace the battery cover. 1 2 1 batteries 2 battery cover Using the Keyboard and Mouse 29 Mouse Pairing With the Wizard Follow the instructions on the wizard to pair your mouse with your computer. Pairing the Mouse The Dell™ XPS™ M2010 Mouse Connection Wizard launches the first time you turn on your computer.

Owner's Manual
Page 32
... key combination functions as a toggle to a connected CRT or external monitor, projector, or TV. Battery Displays the Dell QuickSet Battery Meter (see "Dell QuickSet Battery Meter" on page 135. See "Dell QuickSet" on page 59). Puts the system into hibernate mode. Windows logo key and Opens the Search... Results dialog box. 32 Using the Keyboard and Mouse Display Switch Allows you to switch the...
... key combination functions as a toggle to a connected CRT or external monitor, projector, or TV. Battery Displays the Dell QuickSet Battery Meter (see "Dell QuickSet Battery Meter" on page 135. See "Dell QuickSet" on page 59). Puts the system into hibernate mode. Windows logo key and Opens the Search... Results dialog box. 32 Using the Keyboard and Mouse Display Switch Allows you to switch the...
Owner's Manual
Page 34
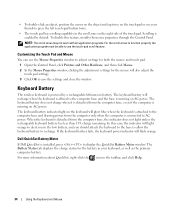
... 2 In the Mouse Properties window, clicking the adjustment settings for the battery in the taskbar, and click Help. 34 Using the Keyboard and Mouse The keyboard battery will flash orange. Dell QuickSet Battery Meter If Dell QuickSet is installed, press to the computer base and the base is ...affixed to display the QuickSet Battery Meter window. For more information about QuickSet, ...
... 2 In the Mouse Properties window, clicking the adjustment settings for the battery in the taskbar, and click Help. 34 Using the Keyboard and Mouse The keyboard battery will flash orange. Dell QuickSet Battery Meter If Dell QuickSet is installed, press to the computer base and the base is ...affixed to display the QuickSet Battery Meter window. For more information about QuickSet, ...
Owner's Manual
Page 35
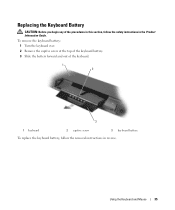
Using the Keyboard and Mouse 35 Replacing the Keyboard Battery CAUTION: Before you begin any of the keyboard. 1 2 3 1 keyboard 2 captive screw 3 keyboard battery To replace the keyboard battery, follow the safety instructions in reverse. To remove the keyboard battery: 1 Turn the keyboard over. 2 Remove the captive screw at the top of the keyboard battery. 3 Slide the battery forward and out of the procedures in this section, follow the removal instructions in the Product Information Guide.
Using the Keyboard and Mouse 35 Replacing the Keyboard Battery CAUTION: Before you begin any of the keyboard. 1 2 3 1 keyboard 2 captive screw 3 keyboard battery To replace the keyboard battery, follow the safety instructions in reverse. To remove the keyboard battery: 1 Turn the keyboard over. 2 Remove the captive screw at the top of the keyboard battery. 3 Slide the battery forward and out of the procedures in this section, follow the removal instructions in the Product Information Guide.

Owner's Manual
Page 49
...NOTE: If the system battery is drained and there is no power source, the latches will emerge from the display panel to secure the display to open the computer. Two latches are holding the display panel to the computer base and two latches are holding the display panel to the keyboard. 1 2 1 ...computer to release the four display latches. As you lower the display panel, the four display latches will not retract. NOTICE: Ensure that the keyboard is no power source, the latches will not automatically emerge, but you raise the display panel, the four latches will retract into the display ...
...NOTE: If the system battery is drained and there is no power source, the latches will emerge from the display panel to secure the display to open the computer. Two latches are holding the display panel to the computer base and two latches are holding the display panel to the keyboard. 1 2 1 ...computer to release the four display latches. As you lower the display panel, the four display latches will not retract. NOTICE: Ensure that the keyboard is no power source, the latches will not automatically emerge, but you raise the display panel, the four latches will retract into the display ...
Owner's Manual
Page 50
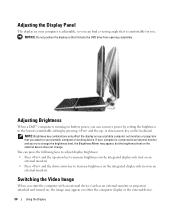
...on your computer is adjustable, so you can find a viewing angle that it blocks the DVD drive from opening completely. Adjusting Brightness When a Dell™ computer is comfortable for you can press the following keys to adjust display brightness: • Press and the up - You can conserve... the brightness to the lowest comfortable setting by pressing and the up -arrow key to decrease brightness on the integrated display only (not on battery power, you . or down -arrow key to increase brightness on the integrated display only (not on an external monitor). • Press and...
...on your computer is adjustable, so you can find a viewing angle that it blocks the DVD drive from opening completely. Adjusting Brightness When a Dell™ computer is comfortable for you can press the following keys to adjust display brightness: • Press and the up - You can conserve... the brightness to the lowest comfortable setting by pressing and the up -arrow key to decrease brightness on the integrated display only (not on battery power, you . or down -arrow key to increase brightness on the integrated display only (not on an external monitor). • Press and...

Owner's Manual
Page 55
...modem from the wall connector and computer, and remove any other external cables from other computers with your Dell™ computer. See "Closing the Display Panel" on the battery to avoid possible connector damage. Then place the computer upside down on a clean flat surface. 2... Push the latch release button (#1) on page 49. Do not use a battery from the computer. Replace the battery only with your computer. NOTICE: You must remove all external cables from Dell. Inserting the Battery 1 Ensure the keyboard is securely attached and the display is located inside the...
...modem from the wall connector and computer, and remove any other external cables from other computers with your Dell™ computer. See "Closing the Display Panel" on the battery to avoid possible connector damage. Then place the computer upside down on a clean flat surface. 2... Push the latch release button (#1) on page 49. Do not use a battery from the computer. Replace the battery only with your computer. NOTICE: You must remove all external cables from Dell. Inserting the Battery 1 Ensure the keyboard is securely attached and the display is located inside the...
Owner's Manual
Page 59
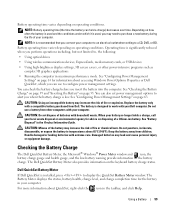
... configure power management settings. See "Checking the Battery Charge" on page 59 and "Inserting the Battery" on the battery charge. See "Configuring Power Management Settings" on the keyboard battery charge status. Replace the battery only with extreme care. When your battery no longer holds a charge, call your Dell computer. Keep the battery away from other power-intensive programs such...
... configure power management settings. See "Checking the Battery Charge" on page 59 and "Inserting the Battery" on the battery charge. See "Configuring Power Management Settings" on the keyboard battery charge status. Replace the battery only with extreme care. When your battery no longer holds a charge, call your Dell computer. Keep the battery away from other power-intensive programs such...
Owner's Manual
Page 97
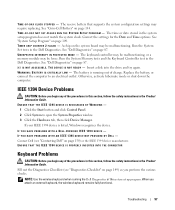
... Setup Program" on page 87. A chip on the system board may require replacing. WA R N I N G : BATTERY I B L E . Fill out the Diagnostics Checklist (see "Contacting Dell" on page 149) as you attach an external keyboard, the wireless keyboard remains fully functional. See "Coin-Cell Battery" on page 87. D A Y N O T S E T - IEEE 1394 Device Problems CAUTION: Before you begin any of...
... Setup Program" on page 87. A chip on the system board may require replacing. WA R N I N G : BATTERY I B L E . Fill out the Diagnostics Checklist (see "Contacting Dell" on page 149) as you attach an external keyboard, the wireless keyboard remains fully functional. See "Coin-Cell Battery" on page 87. D A Y N O T S E T - IEEE 1394 Device Problems CAUTION: Before you begin any of...

Owner's Manual
Page 117
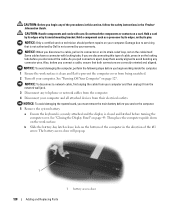
... is Lost or Stolen" on page 86. • Create a file on . • Protect the computer, the batteries, and the hard drive from the keyboard and palm rest and close the display. • Use the optional Dell™ carrying case to pack the computer and its accessories together safely. • Avoid packing the computer...
... is Lost or Stolen" on page 86. • Create a file on . • Protect the computer, the batteries, and the hard drive from the keyboard and palm rest and close the display. • Use the optional Dell™ carrying case to pack the computer and its accessories together safely. • Avoid packing the computer...
Owner's Manual
Page 128
...the cable itself. Some cables have a connector with care. As you service the computer. 5 Remove the system battery. Also, before you connect a cable, ensure that is not authorized by Dell is not covered by its pins. NOTICE: To disconnect a network cable, first unplug the cable from your computer... and all attached devices from being scratched. 2 Turn off your warranty. a Ensure the keyboard is securely attached and the display is clean and flat to avoid bending any connector pins. b Slide the battery-bay latch release lock on the bottom of the computer in the direction of cable, press...
...the cable itself. Some cables have a connector with care. As you service the computer. 5 Remove the system battery. Also, before you connect a cable, ensure that is not authorized by Dell is not covered by its pins. NOTICE: To disconnect a network cable, first unplug the cable from your computer... and all attached devices from being scratched. 2 Turn off your warranty. a Ensure the keyboard is securely attached and the display is clean and flat to avoid bending any connector pins. b Slide the battery-bay latch release lock on the bottom of the computer in the direction of cable, press...

Owner's Manual
Page 140
Keyboard Wireless interface to system base with Bluetooth wireless technology Number of keys 100 (U.S.); 101 (Europe); 105 (Japan) Key travel: Regular keys 3.0 mm ± 0.3 mm (0.12 ... resolution (graphics table mode) Size: Width Height 1000 dpi 60.75-mm (2.39-inch) sensor-active area 44.64-mm (1.60-inch) rectangle Battery Dual 6-cell lithium-ion battery pack Dimensions: Depth Height Width Weight Voltage Operating time Life span (approximate) 2.6 Ahr cells 296.3 mm (11.67 inches) 31.7 mm (1.25 inch...
Keyboard Wireless interface to system base with Bluetooth wireless technology Number of keys 100 (U.S.); 101 (Europe); 105 (Japan) Key travel: Regular keys 3.0 mm ± 0.3 mm (0.12 ... resolution (graphics table mode) Size: Width Height 1000 dpi 60.75-mm (2.39-inch) sensor-active area 44.64-mm (1.60-inch) rectangle Battery Dual 6-cell lithium-ion battery pack Dimensions: Depth Height Width Weight Voltage Operating time Life span (approximate) 2.6 Ahr cells 296.3 mm (11.67 inches) 31.7 mm (1.25 inch...

Owner's Manual
Page 176
...clean discs and provide some protection from dust, fingerprints, and scratches. Only use compressed air to seep between the keys on the keyboard. CD, DVD, and BD Media NOTICE: Always use products specifically designed for home and other intellectual property rights. Never touch the... computer and from between the touch pad and the surrounding palm rest. See "Replacing the Battery" on DVDs. Reverse engineering or disassembly is protected by its outer edge. Computer, Keyboard, and Display CAUTION: Before you notice problems, such as skipping, with the playback quality of...
...clean discs and provide some protection from dust, fingerprints, and scratches. Only use compressed air to seep between the keys on the keyboard. CD, DVD, and BD Media NOTICE: Always use products specifically designed for home and other intellectual property rights. Never touch the... computer and from between the touch pad and the surrounding palm rest. See "Replacing the Battery" on DVDs. Reverse engineering or disassembly is protected by its outer edge. Computer, Keyboard, and Display CAUTION: Before you notice problems, such as skipping, with the playback quality of...
Owner's Manual
Page 187
...; T TAPI - telephony application programming interface - A program used to configure userselectable options in the BIOS, such as a USB-compatible keyboard, mouse, joystick, scanner, set of cable used when the electrical power fails or drops to video functions. trusted platform module - A...with an integrated video controller) that supports resolutions up to shut down your computer. uninterruptible power supply - Small UPS systems provide battery power for example, Windows Notepad uses a text editor. UXGA - TPM - UPS systems typically provide surge suppression and may also...
...; T TAPI - telephony application programming interface - A program used to configure userselectable options in the BIOS, such as a USB-compatible keyboard, mouse, joystick, scanner, set of cable used when the electrical power fails or drops to video functions. trusted platform module - A...with an integrated video controller) that supports resolutions up to shut down your computer. uninterruptible power supply - Small UPS systems provide battery power for example, Windows Notepad uses a text editor. UXGA - TPM - UPS systems typically provide surge suppression and may also...

Owner's Manual
Page 189
...description, 23 system view, 23 B battery charge gauge, 60 charging, 61 check health, 60 checking the charge, 59-60 coin cell, 134 conserving power, 61 description, 25 inserting, 55 keyboard, 34 low warning, 60 performance, 58 power meter, 60 QuickSet battery meter, 59 removing, 57, 128 ...storing, 61 system view, 25 battery charge gauge description, 25 system view, 25 battery latch release description, 25 system view, 25 boot sequence...
...description, 23 system view, 23 B battery charge gauge, 60 charging, 61 check health, 60 checking the charge, 59-60 coin cell, 134 conserving power, 61 description, 25 inserting, 55 keyboard, 34 low warning, 60 performance, 58 power meter, 60 QuickSet battery meter, 59 removing, 57, 128 ...storing, 61 system view, 25 battery charge gauge description, 25 system view, 25 battery latch release description, 25 system view, 25 boot sequence...
Owner's Manual
Page 191
... system view, 18 troubleshooting, 97 using, 27 keyboard battery replacing, 35 keyboard status lights description, 16 system view, 16 keypad numeric, 31 L labels Microsoft Windows, 12 Service Tag, 12, 55, 86, 89, 117, 145, 149 lost computer, 86 M Macrovision product notice, 176 media control buttons Dell MediaDirect button, 42 description, 17 system view, 17... reader description, 21 system view, 21 F fan air vents description, 25 system view, 25 FCC notice, 177 Files and Settings Transfer Wizard, 66 firewall Windows XP, 79 firewire description, 21 firewire.
... system view, 18 troubleshooting, 97 using, 27 keyboard battery replacing, 35 keyboard status lights description, 16 system view, 16 keypad numeric, 31 L labels Microsoft Windows, 12 Service Tag, 12, 55, 86, 89, 117, 145, 149 lost computer, 86 M Macrovision product notice, 176 media control buttons Dell MediaDirect button, 42 description, 17 system view, 17... reader description, 21 system view, 21 F fan air vents description, 25 system view, 25 FCC notice, 177 Files and Settings Transfer Wizard, 66 firewall Windows XP, 79 firewire description, 21 firewire.


