Service Manual
Page 11
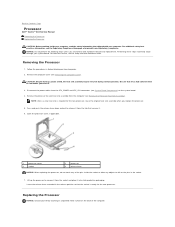
NOTICE: Do not perform the following steps unless you are familiar with your computer. Remove the processor fan and heat sink assembly from the tab that shipped with hardware removal and replacement. Press and push the release lever down and out to ... and place it . 3. Follow the procedures in the release position so that it has had sufficient time to cool before you replace the processor. 5. Back to Contents Page Processor Dell™ Vostro™ 410 Service Manual Removing the Processor Replacing the Processor CAUTION: Before working inside the socket or allow any objects to...
NOTICE: Do not perform the following steps unless you are familiar with your computer. Remove the processor fan and heat sink assembly from the tab that shipped with hardware removal and replacement. Press and push the release lever down and out to ... and place it . 3. Follow the procedures in the release position so that it has had sufficient time to cool before you replace the processor. 5. Back to Contents Page Processor Dell™ Vostro™ 410 Service Manual Removing the Processor Replacing the Processor CAUTION: Before working inside the socket or allow any objects to...

Service Manual
Page 19
... drive 4 data cable 10. Removing the FlexBay Break-Away Metal Plate 1 break-away metal plate Align the tip of a Phillips screwdriver with Dell Diagnostics. Replace the bezel (see Entering System Setup). 15. Check all cable connections, and fold cables out of the insert from the chassis....break-away metal plate and rotate the screwdriver outwards to avoid blocking airflow between the fan and cooling vents. 11. Removing the Drive Panel Insert Release the drive panel insert by running the Dell Diagnostics. See your computer works correctly by pushing out the left side of the...
... drive 4 data cable 10. Removing the FlexBay Break-Away Metal Plate 1 break-away metal plate Align the tip of a Phillips screwdriver with Dell Diagnostics. Replace the bezel (see Entering System Setup). 15. Check all cable connections, and fold cables out of the insert from the chassis....break-away metal plate and rotate the screwdriver outwards to avoid blocking airflow between the fan and cooling vents. 11. Removing the Drive Panel Insert Release the drive panel insert by running the Dell Diagnostics. See your computer works correctly by pushing out the left side of the...
Service Manual
Page 25
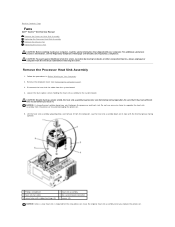
... cover (see the Regulatory Compliance Homepage at www.dell.com/regulatory_compliance. NOTICE: A strong thermal solution bond may become very hot during normal operation. Back to Contents Page Fans Dell™ Vostro™ 410 Service Manual Remove the Processor Heat Sink Assembly Replacing... the Processor Heat Sink Assembly Remove the Chassis Fan Replacing the Chassis Fan CAUTION: Before working inside your computer, read the safety information that it has had sufficient time to cool...
... cover (see the Regulatory Compliance Homepage at www.dell.com/regulatory_compliance. NOTICE: A strong thermal solution bond may become very hot during normal operation. Back to Contents Page Fans Dell™ Vostro™ 410 Service Manual Remove the Processor Heat Sink Assembly Replacing... the Processor Heat Sink Assembly Remove the Chassis Fan Replacing the Chassis Fan CAUTION: Before working inside your computer, read the safety information that it has had sufficient time to cool...


