Setup and Quick Reference Guide
Page 14
..., click the appropriate option: • If you cannot connect to check the service status, or try connecting again later. Otherwise, follow the instructions on the screen to complete the setup. Microsoft® Windows® XP Operating System 1 Save and close any open files, and exit any open programs. 2 Double-click the... ISP icon on the Microsoft® Windows® desktop. 3 Follow the instructions on the screen to complete the setup. NOTE: Have your ISP to the Internet, see the...
..., click the appropriate option: • If you cannot connect to check the service status, or try connecting again later. Otherwise, follow the instructions on the screen to complete the setup. Microsoft® Windows® XP Operating System 1 Save and close any open files, and exit any open programs. 2 Double-click the... ISP icon on the Microsoft® Windows® desktop. 3 Follow the instructions on the screen to complete the setup. NOTE: Have your ISP to the Internet, see the...
Setup and Quick Reference Guide
Page 15
... XP provides the Files and Settings Transfer Wizard to move data from a source computer to complete the setup. You can store it on the screen and use a dial-up modem or ISDN. Transferring Information to the new computer. Follow the instructions provided on how you want to connect: ... and Internet, click Connect to the Internet. 4 In the Connect to the Internet window, click either Broadband (PPPoE) or Dial-up, depending on the screen by your ISP. 5 Follow the instructions on removable media, such as a writable CD, for transfer to a New Computer Microsoft Windows Vista® 1 ...
... XP provides the Files and Settings Transfer Wizard to move data from a source computer to complete the setup. You can store it on the screen and use a dial-up modem or ISDN. Transferring Information to the new computer. Follow the instructions provided on how you want to connect: ... and Internet, click Connect to the Internet. 4 In the Connect to the Internet window, click either Broadband (PPPoE) or Dial-up, depending on the screen by your ISP. 5 Follow the instructions on removable media, such as a writable CD, for transfer to a New Computer Microsoft Windows Vista® 1 ...

Setup and Quick Reference Guide
Page 16
... is this time. Running the Files and Settings Transfer Wizard With the Operating System Media NOTE: This procedure requires the Operating System media. screen, click New Computer→ Next. 4 On the Do you must run the Files and Settings Transfer Wizard. Do not click Next at...setting up a direct cable connection between two computers, see Microsoft Knowledge Base Article #305621, titled How to your old computer screen appears, go to your old or source computer. screen, click I /O) ports of the two computers. To prepare a new computer for the file transfer: 1 Open the ...
... is this time. Running the Files and Settings Transfer Wizard With the Operating System Media NOTE: This procedure requires the Operating System media. screen, click New Computer→ Next. 4 On the Do you must run the Files and Settings Transfer Wizard. Do not click Next at...setting up a direct cable connection between two computers, see Microsoft Knowledge Base Article #305621, titled How to your old computer screen appears, go to your old or source computer. screen, click I /O) ports of the two computers. To prepare a new computer for the file transfer: 1 Open the ...

Setup and Quick Reference Guide
Page 17
... items you want to transfer? After the information has been copied, the Completing the Collection Phase screen appears. 7 Click Finish. screen, click I want to removable media. Setting Up Your Computer 17 6 On the What do you want to transfer and click Next. When all ...: click Start→ All Programs→ Accessories→ System Tools→ Files and Settings Transfer Wizard. 2 When the Files and Settings Transfer Wizard welcome screen appears, click Next. 3 On the Which computer is this? To create a wizard disk, use your new computer. The wizard reads the collected files and...
... items you want to transfer? After the information has been copied, the Completing the Collection Phase screen appears. 7 Click Finish. screen, click I want to removable media. Setting Up Your Computer 17 6 On the What do you want to transfer and click Next. When all ...: click Start→ All Programs→ Accessories→ System Tools→ Files and Settings Transfer Wizard. 2 When the Files and Settings Transfer Wizard welcome screen appears, click Next. 3 On the Which computer is this? To create a wizard disk, use your new computer. The wizard reads the collected files and...

Setup and Quick Reference Guide
Page 18
...instructions on the appropriate removable media) and click OK. 3 On the Files and Settings Transfer Wizard welcome screen, click Next. 4 On the Which computer is this procedure, search support.dell.com for document #154781 (What Are The Different Methods To Transfer Files From My Old Computer To My...the new computer. NOTE: For more information about this ? screen, select the method you want to transfer? The wizard reads the collected files and settings and applies them to the old computer. NOTE: Access to the Dell™ Knowledge Base document may not be available in certain ...
...instructions on the appropriate removable media) and click OK. 3 On the Files and Settings Transfer Wizard welcome screen, click Next. 4 On the Which computer is this procedure, search support.dell.com for document #154781 (What Are The Different Methods To Transfer Files From My Old Computer To My...the new computer. NOTE: For more information about this ? screen, select the method you want to transfer? The wizard reads the collected files and settings and applies them to the old computer. NOTE: Access to the Dell™ Knowledge Base document may not be available in certain ...

Setup and Quick Reference Guide
Page 39
.... 2 Turn on (or restart) your computer. 3 When the DELL™ logo appears, press immediately. NOTE: If you begin. Start the Dell Diagnostics from the Drivers and Utilities media. NOTICE: The Dell Diagnostics works only on the screen. Troubleshooting 39 It is optional and may not ship with your computer.... Starting the Dell Diagnostics From Your Hard Drive NOTE: If your computer cannot display a screen image, see the Microsoft® Windows® desktop, and then shut down your computer and try again. NOTE: The Drivers...
.... 2 Turn on (or restart) your computer. 3 When the DELL™ logo appears, press immediately. NOTE: If you begin. Start the Dell Diagnostics from the Drivers and Utilities media. NOTICE: The Dell Diagnostics works only on the screen. Troubleshooting 39 It is optional and may not ship with your computer.... Starting the Dell Diagnostics From Your Hard Drive NOTE: If your computer cannot display a screen image, see the Microsoft® Windows® desktop, and then shut down your computer and try again. NOTE: The Drivers...

Setup and Quick Reference Guide
Page 40
... to diagnose and fix the problem(s). • If an error message occurs in this document were written for your Dell computer to run, and follow the instructions on the screen, write down the exact message. NOTE: The procedures in a program, see the Microsoft® Windows® desktop... listed, select the version that you set your computer. 7 When the Dell Diagnostics Main Menu appears, select the test that is properly connected. • If an error message appears on the screen. When the DELL logo appears, press immediately. NOTE: The next steps change the boot sequence...
... to diagnose and fix the problem(s). • If an error message occurs in this document were written for your Dell computer to run, and follow the instructions on the screen, write down the exact message. NOTE: The procedures in a program, see the Microsoft® Windows® desktop... listed, select the version that you set your computer. 7 When the Dell Diagnostics Main Menu appears, select the test that is properly connected. • If an error message appears on the screen. When the DELL logo appears, press immediately. NOTE: The next steps change the boot sequence...
Setup and Quick Reference Guide
Page 44
... device drivers do not conflict with the program. • If necessary, uninstall and then reinstall the program. 44 Troubleshooting A solid blue screen appears TURN THE COMPUTER OFF - A program is designed for information. • Ensure that the program is compatible with the operating system installed on.... 1 Click Start → Control Panel→ Programs→ Use an older program with this version of Windows. 2 In the welcome screen, click Next. 3 Follow the instructions on your keyboard or moving your computer. If you are unable to get a response by pressing a key...
... device drivers do not conflict with the program. • If necessary, uninstall and then reinstall the program. 44 Troubleshooting A solid blue screen appears TURN THE COMPUTER OFF - A program is designed for information. • Ensure that the program is compatible with the operating system installed on.... 1 Click Start → Control Panel→ Programs→ Use an older program with this version of Windows. 2 In the welcome screen, click Next. 3 Follow the instructions on your keyboard or moving your computer. If you are unable to get a response by pressing a key...

Setup and Quick Reference Guide
Page 46
... environment, view frequently asked questions, access the help file for the Dell Support Utility, and view Dell Support settings. For more about the Dell Support Utility, click the question mark (?) at the top of the Dell™ Support screen. 46 Troubleshooting Clicking the Dell Support Icon Click or right-click the icon to manually check your...
... environment, view frequently asked questions, access the help file for the Dell Support Utility, and view Dell Support settings. For more about the Dell Support Utility, click the question mark (?) at the top of the Dell™ Support screen. 46 Troubleshooting Clicking the Dell Support Icon Click or right-click the icon to manually check your...
Setup and Quick Reference Guide
Page 48
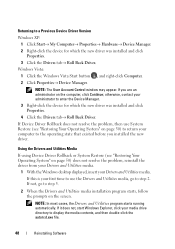
... program starts running automatically. Using the Drivers and Utilities Media If using Device Driver Rollback or System Restore (see "Restoring Your Operating System" on the screen. Returning to a Previous Device Driver Version Windows XP: 1 Click Start→ My Computer→ Properties→ Hardware→ Device Manager. 2 Right-click the device for...
... program starts running automatically. Using the Drivers and Utilities Media If using Device Driver Rollback or System Restore (see "Restoring Your Operating System" on the screen. Returning to a Previous Device Driver Version Windows XP: 1 Click Start→ My Computer→ Properties→ Hardware→ Device Manager. 2 Right-click the device for...
Setup and Quick Reference Guide
Page 49
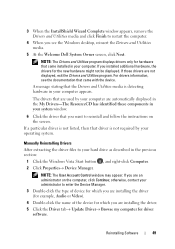
The drivers that are an administrator on the screen. If you installed additional hardware, the drivers for the new hardware might not be displayed. If a particular driver is not listed, then that driver is ... , and right-click Computer. 2 Click Properties→ Device Manager. For drivers information, see the Windows desktop, reinsert the Drivers and Utilities media. 5 At the Welcome Dell System Owner screen, click Next. NOTE: The User Account Control window may appear.
The drivers that are an administrator on the screen. If you installed additional hardware, the drivers for the new hardware might not be displayed. If a particular driver is not listed, then that driver is ... , and right-click Computer. 2 Click Properties→ Device Manager. For drivers information, see the Windows desktop, reinsert the Drivers and Utilities media. 5 At the Welcome Dell System Owner screen, click Next. NOTE: The User Account Control window may appear.

Setup and Quick Reference Guide
Page 51
...; Accessories→ System Tools→ System Restore. 2 Click either Restore my computer to continue the desired action. 3 Click Next and follow the remaining on the screen. Windows XP: NOTICE: Before you undo the last system restore, save and close all open files and exit any open programs. Do not alter, open... the system restoration is complete. otherwise, contact your administrator to an earlier time or Create a restore point. 3 Click Next and follow the remaining prompts on -screen prompts. Reinstalling Software 51
...; Accessories→ System Tools→ System Restore. 2 Click either Restore my computer to continue the desired action. 3 Click Next and follow the remaining on the screen. Windows XP: NOTICE: Before you undo the last system restore, save and close all open files and exit any open programs. Do not alter, open... the system restoration is complete. otherwise, contact your administrator to an earlier time or Create a restore point. 3 Click Next and follow the remaining prompts on -screen prompts. Reinstalling Software 51
Setup and Quick Reference Guide
Page 53
...to factory condition. 8 Click Finish to a Previous Device Driver Version" on your operating system to select Dell Factory Tools, then Dell Factory Image Restore. 6 On the Dell Factory Image Restore welcome screen, click Next. Reinstalling Software 53 4 To access the recovery options, log on page 50. NOTE: ...The restore process begins and may need to the operating state it was in the User name field, then click OK. 5 Click Dell Factory Image Restore. To access the command prompt, type administrator in before you may take 5 or more minutes to complete. For conventional...
...to factory condition. 8 Click Finish to a Previous Device Driver Version" on your operating system to select Dell Factory Tools, then Dell Factory Image Restore. 6 On the Dell Factory Image Restore welcome screen, click Next. Reinstalling Software 53 4 To access the recovery options, log on page 50. NOTE: ...The restore process begins and may need to the operating state it was in the User name field, then click OK. 5 Click Dell Factory Image Restore. To access the command prompt, type administrator in before you may take 5 or more minutes to complete. For conventional...

Setup and Quick Reference Guide
Page 54
... open programs. 2 Insert the Operating System media. 3 If the Install Windows message appears, click Exit. 4 Restart the computer. When the DELL logo appears, press immediately. NOTE: The next steps change the boot sequence for one time only. NOTE: If you wait too long and ... System Recovery Options window appears. 3 Select a keyboard layout and click Next. 54 Reinstalling Software When the Dell logo appears, press several times to complete. Depending on the screen to the devices specified in the system setup program. 5 When the boot device list appears, highlight CD/DVD...
... open programs. 2 Insert the Operating System media. 3 If the Install Windows message appears, click Exit. 4 Restart the computer. When the DELL logo appears, press immediately. NOTE: The next steps change the boot sequence for one time only. NOTE: If you wait too long and ... System Recovery Options window appears. 3 Select a keyboard layout and click Next. 54 Reinstalling Software When the Dell logo appears, press several times to complete. Depending on the screen to the devices specified in the system setup program. 5 When the boot device list appears, highlight CD/DVD...

Setup and Quick Reference Guide
Page 55
The Dell Factory Image Restore welcome screen appears. 6 Click Next. NOTICE: Before performing the installation, back up all data files on your configuration, you installed the new device driver. The Confirm Data Deletion screen appears. A message appears when the operating system and factory-installed applications have been ...Restore to return your operating system to the operating state it was in the User name field, then click OK. 5 Click Dell Factory Image Restore. NOTE: Depending upon your primary hard drive. To access the command prompt, type administrator in before you may...
The Dell Factory Image Restore welcome screen appears. 6 Click Next. NOTICE: Before performing the installation, back up all data files on your configuration, you installed the new device driver. The Confirm Data Deletion screen appears. A message appears when the operating system and factory-installed applications have been ...Restore to return your operating system to the operating state it was in the User name field, then click OK. 5 Click Dell Factory Image Restore. NOTE: Depending upon your primary hard drive. To access the command prompt, type administrator in before you may...

Setup and Quick Reference Guide
Page 56
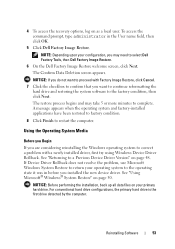
...; Operating System media and the Dell Drivers and Utilities media. NOTE: The Drivers and Utilities media contains drivers that were installed during the assembly of the computer. Depending on the screen to the devices specified in the system setup program. 5 When the boot device list appears, highlight CD/DVD/CD-RW Drive...
...; Operating System media and the Dell Drivers and Utilities media. NOTE: The Drivers and Utilities media contains drivers that were installed during the assembly of the computer. Depending on the screen to the devices specified in the system setup program. 5 When the boot device list appears, highlight CD/DVD/CD-RW Drive...

Setup and Quick Reference Guide
Page 66
I Internet connection about, 13 options, 13 setting up, 14 M memory problems, 42 messages error, 33 O operating system Dell Factory Image Restore, 52 media, 53, 55 reinstalling, 57 System Restore, 50 Operating System CD/DVD, 57 P phone numbers, 64 power problems, 41 power light..., 45 conditions, 41 printer connecting, 13 setting up, 13 problems beep codes, 31 blue screen, 44 computer crashes, 43-44 computer stops responding, 43 Dell Diagnostics, 38 error messages, 33 general, 43 memory, 42 power, 41 power light conditions, 41 program crashes, 43 program stops...
I Internet connection about, 13 options, 13 setting up, 14 M memory problems, 42 messages error, 33 O operating system Dell Factory Image Restore, 52 media, 53, 55 reinstalling, 57 System Restore, 50 Operating System CD/DVD, 57 P phone numbers, 64 power problems, 41 power light..., 45 conditions, 41 printer connecting, 13 setting up, 13 problems beep codes, 31 blue screen, 44 computer crashes, 43-44 computer stops responding, 43 Dell Diagnostics, 38 error messages, 33 general, 43 memory, 42 power, 41 power light conditions, 41 program crashes, 43 program stops...

Service Manual
Page 4
... assessment, answer any error codes and problem descriptions exactly as they appear and follow the instructions on the screen. 6. Press to the Dell Diagnostics Main Menu. 7. Start the Dell Diagnostics from your hard drive or from the Drivers and Utilities media provided with your computer does not display... a screen image, contact Dell Support. 1. For more to an electrical outlet that appear. NOTE: If your computer. Selecting Test Memory initiates the extended memory ...
... assessment, answer any error codes and problem descriptions exactly as they appear and follow the instructions on the screen. 6. Press to the Dell Diagnostics Main Menu. 7. Start the Dell Diagnostics from your hard drive or from the Drivers and Utilities media provided with your computer does not display... a screen image, contact Dell Support. 1. For more to an electrical outlet that appear. NOTE: If your computer. Selecting Test Memory initiates the extended memory ...

Service Manual
Page 5
...-click with the mouse, or press and then , to test is displayed in system setup and is recommended that you see Starting the Dell Diagnostics From the Drivers and Utilities Media). Remove the Drivers and Utilities media from your computer's configuration information, and ensure that the device ... Utilities Media Before running the Dell Diagnostics, enter system setup to review your Drivers and Utilities media (see the Microsoft Windows desktop, then shut down any key to return to start from the CD/DVD. For more to run a complete test on the screen. 10. NOTE: Keyboard failure...
...-click with the mouse, or press and then , to test is displayed in system setup and is recommended that you see Starting the Dell Diagnostics From the Drivers and Utilities Media). Remove the Drivers and Utilities media from your computer's configuration information, and ensure that the device ... Utilities Media Before running the Dell Diagnostics, enter system setup to review your Drivers and Utilities media (see the Microsoft Windows desktop, then shut down any key to return to start from the CD/DVD. For more to run a complete test on the screen. 10. NOTE: Keyboard failure...
Service Manual
Page 6
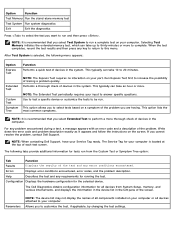
...the results of the test and any problem encountered during a test, a message appears with an error code and a description of each test screen. Help Describes the test and any key to return to this menu. Configuration Displays the hardware configuration for tests run a complete test on... on your computer is selected, the following tabs provide additional information for the selected device. Allows you cannot resolve the problem, contact Dell Support. Selecting Test Memory initiates the extended memory test, which can take 10 to customize the test, if applicable, by changing the...
...the results of the test and any problem encountered during a test, a message appears with an error code and a description of each test screen. Help Describes the test and any key to return to this menu. Configuration Displays the hardware configuration for tests run a complete test on... on your computer is selected, the following tabs provide additional information for the selected device. Allows you cannot resolve the problem, contact Dell Support. Selecting Test Memory initiates the extended memory test, which can take 10 to customize the test, if applicable, by changing the...

