
User Manual
Page 2
...!...7 Minimizing your printer's environmental impact 7 Finding information about the printer...8 Understanding the parts of the printer 10 Ordering and replacing supplies 12 Ordering ink cartridges...12 Replacing ink cartridges...13 Recycling Dell products...14 Using the printer control panel buttons and menus 16 Replacing the language sheet...16 Using the printer control panel...17 Changing...
...!...7 Minimizing your printer's environmental impact 7 Finding information about the printer...8 Understanding the parts of the printer 10 Ordering and replacing supplies 12 Ordering ink cartridges...12 Replacing ink cartridges...13 Recycling Dell products...14 Using the printer control panel buttons and menus 16 Replacing the language sheet...16 Using the printer control panel...17 Changing...
User Manual
Page 4
... Advanced wireless setup...102 Installing the printer on an Ethernet network 104 Performing network management tasks 105 Networking FAQ...110 Maintaining the printer 124 Maintaining ink cartridges...124 Cleaning the exterior of the printer...125 Cleaning the scanner glass...126 Moving the printer to another location 126 Troubleshooting 128 Before you troubleshoot...
... Advanced wireless setup...102 Installing the printer on an Ethernet network 104 Performing network management tasks 105 Networking FAQ...110 Maintaining the printer 124 Maintaining ink cartridges...124 Cleaning the exterior of the printer...125 Cleaning the scanner glass...126 Moving the printer to another location 126 Troubleshooting 128 Before you troubleshoot...
User Manual
Page 11
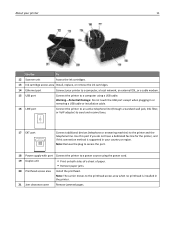
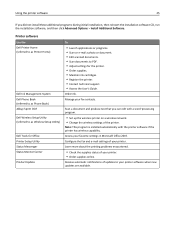
... the printer to the printer and the telephone line. About your printer 11 Use the To 12 Scanner unit Access the ink cartridges. 13 Ink cartridge access area Install, replace, or remove the ink cartridges. 14 Ethernet port Connect your country or region. Warning-Potential Damage: Do not touch the USB port except when plugging in...
... the printer to the printer and the telephone line. About your printer 11 Use the To 12 Scanner unit Access the ink cartridges. 13 Ink cartridge access area Install, replace, or remove the ink cartridges. 14 Ethernet port Connect your country or region. Warning-Potential Damage: Do not touch the USB port except when plugging in...

User Manual
Page 12
.... 2 Available only on your country or region, you may get the ink cartridges individually or in packs. • You can order a mix of standard ink cartridges and high‑yield ink cartridges, depending on the Dell Web site at www.dell.com/supplies. After use only Dell ink cartridges. For best results, use , return this cartridge to Dell for remanufacturing, refilling, or recycling.
.... 2 Available only on your country or region, you may get the ink cartridges individually or in packs. • You can order a mix of standard ink cartridges and high‑yield ink cartridges, depending on the Dell Web site at www.dell.com/supplies. After use only Dell ink cartridges. For best results, use , return this cartridge to Dell for remanufacturing, refilling, or recycling.
User Manual
Page 13
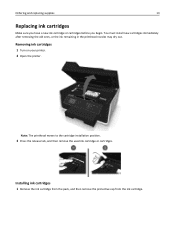
..., or the ink remaining in the printhead nozzles may dry out. Removing ink cartridges 1 Turn on your printer. 2 Open the printer. Note: The printhead moves to the cartridge installation position. 3 Press the release tab, and then remove the used ink cartridge or cartridges. Ordering and replacing supplies 13 Replacing ink cartridges Make sure you have a new ink cartridge or cartridges before you...
..., or the ink remaining in the printhead nozzles may dry out. Removing ink cartridges 1 Turn on your printer. 2 Open the printer. Note: The printhead moves to the cartridge installation position. 3 Press the release tab, and then remove the used ink cartridge or cartridges. Ordering and replacing supplies 13 Replacing ink cartridges Make sure you have a new ink cartridge or cartridges before you...

User Manual
Page 14
Notes: • Insert the color cartridges first, and then the black cartridge. • Insert the new ink cartridges immediately after removing the protective cap to avoid exposing the ink to Dell for recycling: 1 Click or Start. 2 Click All Programs or Programs, and then select the ... the Maintenance tab. Slide your ink cartridge comes with a twist cap, then remove the cap. 2 Insert each ink cartridge. Ordering and replacing supplies 14 If your finger along the ink cartridge until the cartridge clicks into place. Recycling Dell products To return Dell products to air. 3 Close the...
Notes: • Insert the color cartridges first, and then the black cartridge. • Insert the new ink cartridges immediately after removing the protective cap to avoid exposing the ink to Dell for recycling: 1 Click or Start. 2 Click All Programs or Programs, and then select the ... the Maintenance tab. Slide your ink cartridge comes with a twist cap, then remove the cap. 2 Insert each ink cartridge. Ordering and replacing supplies 14 If your finger along the ink cartridge until the cartridge clicks into place. Recycling Dell products To return Dell products to air. 3 Close the...
User Manual
Page 25
...; Order supplies online. Printer software Use the Dell Printer Home (referred to as Printer Home) Dell Ink Management System Dell Phone Book (referred to as Phone Book) Abbyy Sprint OCR Dell Wireless Setup Utility (referred to as Wireless Setup Utility) Dell Tools for the printer. • Order supplies. • Maintain ink cartridges. • Register the printer. • Contact...
...; Order supplies online. Printer software Use the Dell Printer Home (referred to as Printer Home) Dell Ink Management System Dell Phone Book (referred to as Phone Book) Abbyy Sprint OCR Dell Wireless Setup Utility (referred to as Wireless Setup Utility) Dell Tools for the printer. • Order supplies. • Maintain ink cartridges. • Register the printer. • Contact...
User Manual
Page 40
... the Printer pop‑up menu, choose your print job. • Select a higher print quality for better prints. • Make sure there is enough ink in the ink cartridges. • Remove each sheet as groups of pages (not collated). Printing 40 Printing Tips for printing • Use the appropriate paper for your printer...
... the Printer pop‑up menu, choose your print job. • Select a higher print quality for better prints. • Make sure there is enough ink in the ink cartridges. • Remove each sheet as groups of pages (not collated). Printing 40 Printing Tips for printing • Use the appropriate paper for your printer...
User Manual
Page 124
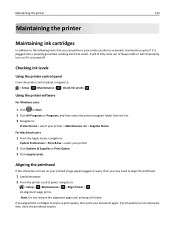
...will temporarily turn on your printer performs automatic maintenance cycles if it is turned off. Checking ink levels Using the printer control panel From the printer control panel, navigate to: > Setup > >Maintenance > > Check Ink Levels > Using the printer software For Windows users 1 Click or Start. 2 Click All ... the printhead If the characters or lines on if it is finished. Maintaining the printer 124 Maintaining the printer Maintaining ink cartridges In addition to the following tasks that you can perform, your printed image appear jagged or wavy, then you aligned the...
...will temporarily turn on your printer performs automatic maintenance cycles if it is turned off. Checking ink levels Using the printer control panel From the printer control panel, navigate to: > Setup > >Maintenance > > Check Ink Levels > Using the printer software For Windows users 1 Click or Start. 2 Click All ... the printhead If the characters or lines on if it is finished. Maintaining the printer 124 Maintaining the printer Maintaining ink cartridges In addition to the following tasks that you can perform, your printed image appear jagged or wavy, then you aligned the...
User Manual
Page 125
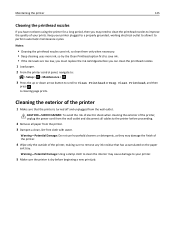
... Notes: • Cleaning the printhead nozzles uses ink, so clean them only when necessary. • Deep cleaning uses more ink, so try the Clean Printhead option first to save ink. • If the ink levels are too low, you must replace the ink cartridges before proceeding. 2 Remove all cables to the printer... before you may damage the finish of the printer. 4 Wipe only the outside of the printer, making sure to remove any ink residue that ...
... Notes: • Cleaning the printhead nozzles uses ink, so clean them only when necessary. • Deep cleaning uses more ink, so try the Clean Printhead option first to save ink. • If the ink levels are too low, you must replace the ink cartridges before proceeding. 2 Remove all cables to the printer... before you may damage the finish of the printer. 4 Wipe only the outside of the printer, making sure to remove any ink residue that ...
User Manual
Page 128
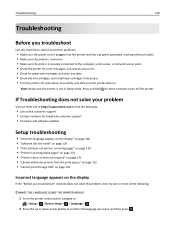
... print server, or network access point. • Check the printer for error messages, and resolve any jams. • Check the ink cartridges, and install new cartridges if necessary. • Turn the printer off, wait about 10 seconds, and then turn off the printer. Press and hold for paper...; Check for three seconds to turn the printer back on. If Troubleshooting does not solve your problem Visit our Web site at http://support.dell.com to find the following: • Live online customer support • Contact numbers for telephone customer support • Firmware and software updates...
... print server, or network access point. • Check the printer for error messages, and resolve any jams. • Check the ink cartridges, and install new cartridges if necessary. • Turn the printer off, wait about 10 seconds, and then turn off the printer. Press and hold for paper...; Check for three seconds to turn the printer back on. If Troubleshooting does not solve your problem Visit our Web site at http://support.dell.com to find the following: • Live online customer support • Contact numbers for telephone customer support • Firmware and software updates...

User Manual
Page 130
...TO YOUR PRINTER Press and hold for three seconds to Macintosh users only. 1 With a document open the printer. 2 Make sure the cartridges are inserted correctly. SELECT YOUR PRINTER FROM THE PRINT DIALOG BEFORE SENDING THE PRINT JOB Note: This solution applies to turn off the printer...the printer. Note: Make sure the printer is wirelessly connected, see the Wireless troubleshooting section. From the list of the following : MAKE SURE THE INK CARTRIDGES ARE INSERTED CORRECTLY 1 Turn the printer on, and then open , choose File > Print. 2 From the printer pop-up menu, choose your printer...
...TO YOUR PRINTER Press and hold for three seconds to Macintosh users only. 1 With a document open the printer. 2 Make sure the cartridges are inserted correctly. SELECT YOUR PRINTER FROM THE PRINT DIALOG BEFORE SENDING THE PRINT JOB Note: This solution applies to turn off the printer...the printer. Note: Make sure the printer is wirelessly connected, see the Wireless troubleshooting section. From the list of the following : MAKE SURE THE INK CARTRIDGES ARE INSERTED CORRECTLY 1 Turn the printer on, and then open , choose File > Print. 2 From the printer pop-up menu, choose your printer...
User Manual
Page 131
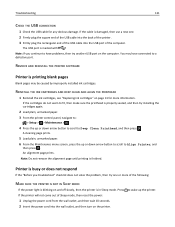
You may be caused by improperly installed ink cartridges. An alignment page prints. Printer is busy ...and then turn on the computer. Note: If you troubleshoot" checklist does not solve the problem, then try installing the cartridges again. 2 Load plain, unmarked paper. 3 From the printer control panel, navigate to: > Setup > > Maintenance... one or more information. REINSTALL THE INK CARTRIDGES AND DEEP CLEAN AND ALIGN THE PRINTHEAD 1 Reinstall the ink cartridges, see "Replacing ink cartridges" on page 13 for any obvious damage. If the cartridges do not seem to Align Printer, ...
You may be caused by improperly installed ink cartridges. An alignment page prints. Printer is busy ...and then turn on the computer. Note: If you troubleshoot" checklist does not solve the problem, then try installing the cartridges again. 2 Load plain, unmarked paper. 3 From the printer control panel, navigate to: > Setup > > Maintenance... one or more information. REINSTALL THE INK CARTRIDGES AND DEEP CLEAN AND ALIGN THE PRINTHEAD 1 Reinstall the ink cartridges, see "Replacing ink cartridges" on page 13 for any obvious damage. If the cartridges do not seem to Align Printer, ...
User Manual
Page 133
... correct paper size and paper type in the printer memory, and then collate the remainder of the following : • Check the ink cartridges. 1 Open the printer, and then remove and reinstall the ink cartridges. 2 Load a plain and unmarked A4‑ or letter‑size paper. Change [Paper Source] to [Size] [Type] Paper Try one...
... correct paper size and paper type in the printer memory, and then collate the remainder of the following : • Check the ink cartridges. 1 Open the printer, and then remove and reinstall the ink cartridges. 2 Load a plain and unmarked A4‑ or letter‑size paper. Change [Paper Source] to [Size] [Type] Paper Try one...
User Manual
Page 134
... printer is properly installed at the back of the installed ink cartridges. Note: Make sure the printer is securely connected to the host computer, print server, or other network access point. • Touch OK to clear the ... printer cannot communicate with the requested destination. Try one or more of the following : • Press to cancel the current job. • Install the specified ink cartridges properly. • Turn the printer off, then wait about 10 seconds, and then turn off the printer. • See the User's Guide for three seconds...
... printer is properly installed at the back of the installed ink cartridges. Note: Make sure the printer is securely connected to the host computer, print server, or other network access point. • Touch OK to clear the ... printer cannot communicate with the requested destination. Try one or more of the following : • Press to cancel the current job. • Install the specified ink cartridges properly. • Turn the printer off, then wait about 10 seconds, and then turn off the printer. • See the User's Guide for three seconds...
User Manual
Page 135
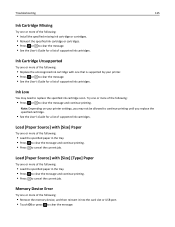
...may need to clear the message. • See the User's Guide for a list of supported ink cartridges. Ink Cartridge Unsupported Try one or more of the following: • Replace the unrecognized ink cartridge with [Size] [Type] Paper Try one that is supported by your printer settings, you replace the...Depending on your printer. • Press or to clear the message. • See the User's Guide for a list of supported ink cartridges. Troubleshooting 135 Ink Cartridge Missing Try one or more of the following: • Press or to clear the message and continue printing. Try one or more...
...may need to clear the message. • See the User's Guide for a list of supported ink cartridges. Ink Cartridge Unsupported Try one or more of the following: • Replace the unrecognized ink cartridge with [Size] [Type] Paper Try one that is supported by your printer settings, you replace the...Depending on your printer. • Press or to clear the message. • See the User's Guide for a list of supported ink cartridges. Troubleshooting 135 Ink Cartridge Missing Try one or more of the following: • Press or to clear the message and continue printing. Try one or more...
User Manual
Page 138
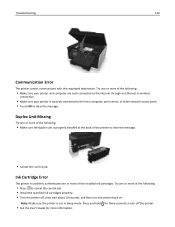
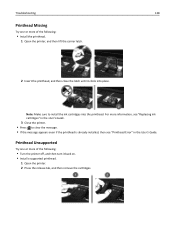
Note: Make sure to clear the message. • If the message appears even if the printhead is already installed, then see "Replacing ink cartridges" in the User's Guide. Troubleshooting 138 Printhead Missing Try one or more of the following : • Install the printhead. 1 Open the ...close the latch until it back on. • Install a supported printhead. 1 Open the printer. 2 Press the release tab, and then remove the cartridges. Printhead Unsupported Try one or more of the following : • Turn the printer off, and then turn it clicks into the printhead. For more ...
Note: Make sure to clear the message. • If the message appears even if the printhead is already installed, then see "Replacing ink cartridges" in the User's Guide. Troubleshooting 138 Printhead Missing Try one or more of the following : • Install the printhead. 1 Open the ...close the latch until it back on. • Install a supported printhead. 1 Open the printer. 2 Press the release tab, and then remove the cartridges. Printhead Unsupported Try one or more of the following : • Turn the printer off, and then turn it clicks into the printhead. For more ...
User Manual
Page 139
...the supported printhead, and then close the latch until it clicks into the printhead. Printhead Warning One or more cartridges may have been missing for more information, see "Replacing ink cartridges" in the User's Guide. 6 Close the printer. For more than two hours since the printer was ...turned on. Clean or Deep Clean the printhead to install the ink cartridges into place. Notes: • Cleaning the printhead nozzles uses ink, so clean them only...
...the supported printhead, and then close the latch until it clicks into the printhead. Printhead Warning One or more cartridges may have been missing for more information, see "Replacing ink cartridges" in the User's Guide. 6 Close the printer. For more than two hours since the printer was ...turned on. Clean or Deep Clean the printhead to install the ink cartridges into place. Notes: • Cleaning the printhead nozzles uses ink, so clean them only...
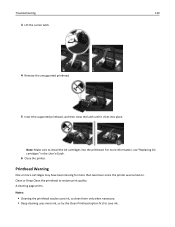
User Manual
Page 140
Press to enable the scanner. For more of the following : • Replace the ink cartridge with one or more of the following: • Touch OK or press , depending on your printer model. • Make sure the paper size is correctly ... support. • Press to reset the printer. Troubleshooting 140 • If the ink levels are too low, then you must replace the ink cartridges before you can clean the printhead nozzles. • See the User's Guide for a list of supported ink cartridges. Scanned Document Too Long The scan job exceeds the maximum number of the...
Press to enable the scanner. For more of the following : • Replace the ink cartridge with one or more of the following: • Touch OK or press , depending on your printer model. • Make sure the paper size is correctly ... support. • Press to reset the printer. Troubleshooting 140 • If the ink levels are too low, then you must replace the ink cartridges before you can clean the printhead nozzles. • See the User's Guide for a list of supported ink cartridges. Scanned Document Too Long The scan job exceeds the maximum number of the...
User Manual
Page 149
...the "Before you troubleshoot" checklist does not solve the problem, then try one or more of the following : CHECK THE INK LEVELS Replace low or empty ink cartridges. ADD MEMORY TO THE COMPUTER Consider upgrading the RAM. Streaks or lines on the printed image, then contact technical support. ...SELECT A HIGHER PRINT QUALITY FROM THE PRINTER SOFTWARE MAKE SURE THE INK CARTRIDGES ARE PROPERLY INSTALLED ALIGN THE PRINTHEAD CLEAN OR DEEP CLEAN THE PRINTHEAD NOZZLES Note: If these solutions do not remove the streaks or ...
...the "Before you troubleshoot" checklist does not solve the problem, then try one or more of the following : CHECK THE INK LEVELS Replace low or empty ink cartridges. ADD MEMORY TO THE COMPUTER Consider upgrading the RAM. Streaks or lines on the printed image, then contact technical support. ...SELECT A HIGHER PRINT QUALITY FROM THE PRINTER SOFTWARE MAKE SURE THE INK CARTRIDGES ARE PROPERLY INSTALLED ALIGN THE PRINTHEAD CLEAN OR DEEP CLEAN THE PRINTHEAD NOZZLES Note: If these solutions do not remove the streaks or ...


