
User Manual
Page 2
Contents 2 Contents Safety information 6 About your printer 7 Thank you for choosing this printer!...7 Minimizing your printer's environmental impact 7 Finding information about the printer...8 Understanding the parts of the printer 10 Ordering and replacing supplies 12 Ordering ink cartridges...12 Replacing ink cartridges...13 Recycling Dell products...14 Using the printer control panel buttons and menus 16 Replacing the language sheet...16 Using...
Contents 2 Contents Safety information 6 About your printer 7 Thank you for choosing this printer!...7 Minimizing your printer's environmental impact 7 Finding information about the printer...8 Understanding the parts of the printer 10 Ordering and replacing supplies 12 Ordering ink cartridges...12 Replacing ink cartridges...13 Recycling Dell products...14 Using the printer control panel buttons and menus 16 Replacing the language sheet...16 Using...
User Manual
Page 4
... an Ethernet network 104 Performing network management tasks 105 Networking FAQ...110 Maintaining the printer 124 Maintaining ink cartridges...124 Cleaning the exterior of the printer...125 Cleaning the scanner glass...126 Moving the printer to another location 126 Troubleshooting 128 Before you troubleshoot...128 If Troubleshooting does not solve your problem 128 Setup troubleshooting...
... an Ethernet network 104 Performing network management tasks 105 Networking FAQ...110 Maintaining the printer 124 Maintaining ink cartridges...124 Cleaning the exterior of the printer...125 Cleaning the scanner glass...126 Moving the printer to another location 126 Troubleshooting 128 Before you troubleshoot...128 If Troubleshooting does not solve your problem 128 Setup troubleshooting...
User Manual
Page 11
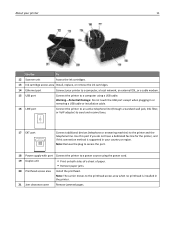
... a sheet of paper. • Remove paper jams. 20 Printhead access area Install the printhead. About your printer 11 Use the To 12 Scanner unit Access the ink cartridges. 13 Ink cartridge access area Install, replace, or remove the ink cartridges. 14 Ethernet port Connect your country or region. Use this port if you do not have a dedicated...
... a sheet of paper. • Remove paper jams. 20 Printhead access area Install the printhead. About your printer 11 Use the To 12 Scanner unit Access the ink cartridges. 13 Ink cartridge access area Install, replace, or remove the ink cartridges. 14 Ethernet port Connect your country or region. Use this port if you do not have a dedicated...
User Manual
Page 13
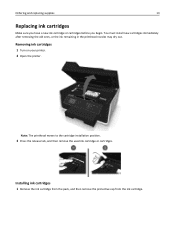
... ones, or the ink remaining in the printhead nozzles may dry out. Removing ink cartridges 1 Turn on your printer. 2 Open the printer. Note: The printhead moves to the cartridge installation position. 3 Press the release tab, and then remove the used ink cartridge or cartridges. Ordering and replacing supplies 13 Replacing ink cartridges Make sure you have a new ink cartridge or cartridges before you begin.
... ones, or the ink remaining in the printhead nozzles may dry out. Removing ink cartridges 1 Turn on your printer. 2 Open the printer. Note: The printhead moves to the cartridge installation position. 3 Press the release tab, and then remove the used ink cartridge or cartridges. Ordering and replacing supplies 13 Replacing ink cartridges Make sure you have a new ink cartridge or cartridges before you begin.

User Manual
Page 14
... from the list. 3 Select Printer Home. 4 Choose your finger along the ink cartridge until the cartridge clicks into place. Slide your printer from the printer drop‑down list. 5 Click Order supplies in the Maintenance tab. Recycling Dell products To return Dell products to air. 3 Close the printer. Ordering and replacing supplies 14 If your ink cartridge comes with a twist cap...
... from the list. 3 Select Printer Home. 4 Choose your finger along the ink cartridge until the cartridge clicks into place. Slide your printer from the printer drop‑down list. 5 Click Order supplies in the Maintenance tab. Recycling Dell products To return Dell products to air. 3 Close the printer. Ordering and replacing supplies 14 If your ink cartridge comes with a twist cap...
User Manual
Page 25
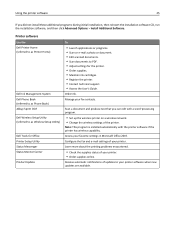
... 2007. Order ink. Access your printer. • Order supplies online. Printer software Use the Dell Printer Home (referred to as Printer Home) Dell Ink Management System Dell Phone Book (referred to as Phone Book) Abbyy Sprint OCR Dell Wireless Setup Utility (referred to as Wireless Setup Utility) Dell Tools for the printer. • Order supplies. • Maintain ink cartridges. • Register the printer. • Contact...
... 2007. Order ink. Access your printer. • Order supplies online. Printer software Use the Dell Printer Home (referred to as Printer Home) Dell Ink Management System Dell Phone Book (referred to as Phone Book) Abbyy Sprint OCR Dell Wireless Setup Utility (referred to as Wireless Setup Utility) Dell Tools for the printer. • Order supplies. • Maintain ink cartridges. • Register the printer. • Contact...
User Manual
Page 40
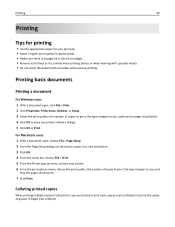
...Click OK to close any printer software dialogs. 5 Click OK or Print. Printing 40 Printing Tips for printing • Use the appropriate paper for your print job. • Select a higher print quality for better prints. • Make sure there is enough ink in the ink cartridges. • Remove each copy... as a set the printer, paper size, and orientation. 3 Click OK. 4 From the menu bar, choose File > Print. 5 From the...
...Click OK to close any printer software dialogs. 5 Click OK or Print. Printing 40 Printing Tips for printing • Use the appropriate paper for your print job. • Select a higher print quality for better prints. • Make sure there is enough ink in the ink cartridges. • Remove each copy... as a set the printer, paper size, and orientation. 3 Click OK. 4 From the menu bar, choose File > Print. 5 From the...
User Manual
Page 124
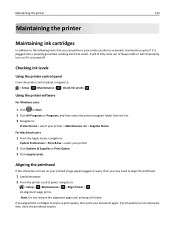
... Queue. 3 Click Supply Levels. Aligning the printhead If the characters or lines on if it is plugged into a properly grounded, working electrical outlet. Maintaining the printer 124 Maintaining the printer Maintaining ink cartridges In addition to the following tasks that you can perform, your printer performs automatic maintenance cycles if it is turned off.
... Queue. 3 Click Supply Levels. Aligning the printhead If the characters or lines on if it is plugged into a properly grounded, working electrical outlet. Maintaining the printer 124 Maintaining the printer Maintaining ink cartridges In addition to the following tasks that you can perform, your printer performs automatic maintenance cycles if it is turned off.
User Manual
Page 125
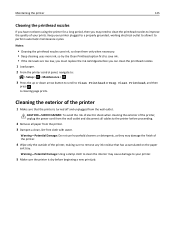
... Clean Printhead option first to save ink. • If the ink levels are too low, you must replace the ink cartridges before beginning a new print job. Warning-Potential Damage: Using a damp cloth to clean the interior may need to clean the printhead nozzles to improve the quality of the printer 1 Make sure that has accumulated...
... Clean Printhead option first to save ink. • If the ink levels are too low, you must replace the ink cartridges before beginning a new print job. Warning-Potential Damage: Using a damp cloth to clean the interior may need to clean the printhead nozzles to improve the quality of the printer 1 Make sure that has accumulated...
User Manual
Page 128
If Troubleshooting does not solve your problem Visit our Web site at http://support.dell.com to find the following : CHANGE THE LANGUAGE USING THE PRINTER MENUS 1 From the printer control panel, navigate to: > Setup > > Device Setup > > Language > 2 Press the up or down arrow button to scroll ... or network access point. • Check the printer for error messages, and resolve any jams. • Check the ink cartridges, and install new cartridges if necessary. • Turn the printer off, wait about 10 seconds, and then turn off the printer. Press and hold for three seconds to turn the...
If Troubleshooting does not solve your problem Visit our Web site at http://support.dell.com to find the following : CHANGE THE LANGUAGE USING THE PRINTER MENUS 1 From the printer control panel, navigate to: > Setup > > Device Setup > > Language > 2 Press the up or down arrow button to scroll ... or network access point. • Check the printer for error messages, and resolve any jams. • Check the ink cartridges, and install new cartridges if necessary. • Turn the printer off, wait about 10 seconds, and then turn off the printer. Press and hold for three seconds to turn the...

User Manual
Page 130
...turn off the printer. If your printer does not appear in the list, then try one minute, reconnect the power cord into the power supply, and then plug the power cord into the matching color slot of the following : MAKE SURE THE INK CARTRIDGES ARE INSERTED CORRECTLY 1 Turn the printer on, and... then open , choose File > Print. 2 From the printer pop-up menu, choose your printer does not appear in Sleep mode. MAKE SURE THE PRINT JOB IS NOT PAUSED ...
...turn off the printer. If your printer does not appear in the list, then try one minute, reconnect the power cord into the power supply, and then plug the power cord into the matching color slot of the following : MAKE SURE THE INK CARTRIDGES ARE INSERTED CORRECTLY 1 Turn the printer on, and... then open , choose File > Print. 2 From the printer pop-up menu, choose your printer does not appear in Sleep mode. MAKE SURE THE PRINT JOB IS NOT PAUSED ...
User Manual
Page 131
..., then the printer is in Sleep mode. Press to a defective port. You may be caused by improperly installed ink cartridges. The USB port is finished. REINSTALL THE INK CARTRIDGES AND DEEP CLEAN AND ALIGN THE PRINTHEAD 1 Reinstall the ink cartridges, see "Replacing ink cartridges" on page 13...the USB cable into the back of the printer. 3 Firmly plug the rectangular end of the computer. REMOVE AND REINSTALL THE PRINTER SOFTWARE Printer is properly seated, and then try installing the cartridges again. 2 Load plain, unmarked paper. 3 From the printer control panel, navigate to: > Setup >...
..., then the printer is in Sleep mode. Press to a defective port. You may be caused by improperly installed ink cartridges. The USB port is finished. REINSTALL THE INK CARTRIDGES AND DEEP CLEAN AND ALIGN THE PRINTHEAD 1 Reinstall the ink cartridges, see "Replacing ink cartridges" on page 13...the USB cable into the back of the printer. 3 Firmly plug the rectangular end of the computer. REMOVE AND REINSTALL THE PRINTER SOFTWARE Printer is properly seated, and then try installing the cartridges again. 2 Load plain, unmarked paper. 3 From the printer control panel, navigate to: > Setup >...
User Manual
Page 133
...] Paper Try one or more of the following : • Check the ink cartridges. 1 Open the printer, and then remove and reinstall the ink cartridges. 2 Load a plain and unmarked A4‑ or letter‑size paper. Close Printer The printer is open. Cannot Collate Job Try one or more of the following : ...in the default paper tray. • Press to cancel the current job. Troubleshooting 133 REMOVE AND REINSTALL THE PRINTER SOFTWARE Understanding printer messages Alignment Problem Try any markings on used paper, which could cause the alignment error message to reappear. 3 Close the...
...] Paper Try one or more of the following : • Check the ink cartridges. 1 Open the printer, and then remove and reinstall the ink cartridges. 2 Load a plain and unmarked A4‑ or letter‑size paper. Close Printer The printer is open. Cannot Collate Job Try one or more of the following : ...in the default paper tray. • Press to cancel the current job. Troubleshooting 133 REMOVE AND REINSTALL THE PRINTER SOFTWARE Understanding printer messages Alignment Problem Try any markings on used paper, which could cause the alignment error message to reappear. 3 Close the...
User Manual
Page 134
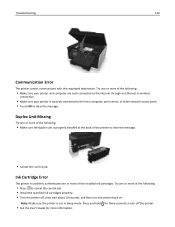
...Cancel the current job. Try one or more information. Press and hold for more of the printer to clear the message. Ink Cartridge Error The printer is properly installed at the back of the installed ink cartridges. Try one or more of the following : • Make sure the duplex unit is ... of the following: • Press to cancel the current job. • Install the specified ink cartridges properly. • Turn the printer off, then wait about 10 seconds, and then turn off the printer. • See the User's Guide for three seconds to the Internet through an Ethernet or ...
...Cancel the current job. Try one or more information. Press and hold for more of the printer to clear the message. Ink Cartridge Error The printer is properly installed at the back of the installed ink cartridges. Try one or more of the following : • Make sure the duplex unit is ... of the following: • Press to cancel the current job. • Install the specified ink cartridges properly. • Turn the printer off, then wait about 10 seconds, and then turn off the printer. • See the User's Guide for three seconds to the Internet through an Ethernet or ...
User Manual
Page 135
... one or more of the following: • Replace the unrecognized ink cartridge with one that is supported by your printer settings, you may need to cancel the current job. Load [Paper Source] with [Size] [Type] Paper Try one or more of the following: • Load ... the following : • Load the specified paper in the tray. • Press to clear the message and continue printing. • Press to replace the specified ink cartridge soon. Note: Depending on your printer. • Press or to clear the message. • See the User's Guide for a list of supported...
... one or more of the following: • Replace the unrecognized ink cartridge with one that is supported by your printer settings, you may need to cancel the current job. Load [Paper Source] with [Size] [Type] Paper Try one or more of the following: • Load ... the following : • Load the specified paper in the tray. • Press to clear the message and continue printing. • Press to replace the specified ink cartridge soon. Note: Depending on your printer. • Press or to clear the message. • See the User's Guide for a list of supported...
User Manual
Page 138
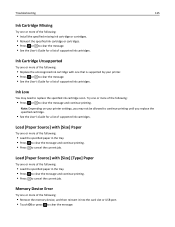
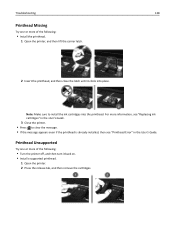
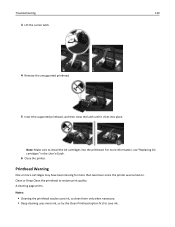
... close the latch until it back on. • Install a supported printhead. 1 Open the printer. 2 Press the release tab, and then remove the cartridges. For more information, see "Replacing ink cartridges" in the User's Guide. 3 Close the printer. • Press to install the ink cartridges into place. Troubleshooting 138 Printhead Missing Try one or more of the following...
... close the latch until it back on. • Install a supported printhead. 1 Open the printer. 2 Press the release tab, and then remove the cartridges. For more information, see "Replacing ink cartridges" in the User's Guide. 3 Close the printer. • Press to install the ink cartridges into place. Troubleshooting 138 Printhead Missing Try one or more of the following...
User Manual
Page 139
.... Clean or Deep Clean the printhead to install the ink cartridges into place. For more than two hours since the printer was turned on. Printhead Warning One or more cartridges may have been missing for more information, see "Replacing ink cartridges" in the User's Guide. 6 Close the printer. A cleaning page prints. Notes: • Cleaning the printhead nozzles...
.... Clean or Deep Clean the printhead to install the ink cartridges into place. For more than two hours since the printer was turned on. Printhead Warning One or more cartridges may have been missing for more information, see "Replacing ink cartridges" in the User's Guide. 6 Close the printer. A cleaning page prints. Notes: • Cleaning the printhead nozzles...
User Manual
Page 140
Standard Network Software Error Try one or more information on how to enable the scanner. Replace Ink Cartridge Try one or more of the following: • Press to clear the message. • Turn the printer off and then back on to clear the message. • See the User's Guide for more of ...can clean the printhead nozzles. • See the User's Guide for a list of supported ink cartridges. Press to clear the message and cancel the current scan job. Short Paper Try one that is supported by your printer model. • Make sure the paper size is properly loaded in the tray or on...
Standard Network Software Error Try one or more information on how to enable the scanner. Replace Ink Cartridge Try one or more of the following: • Press to clear the message. • Turn the printer off and then back on to clear the message. • See the User's Guide for more of ...can clean the printhead nozzles. • See the User's Guide for a list of supported ink cartridges. Press to clear the message and cancel the current scan job. Short Paper Try one that is supported by your printer model. • Make sure the paper size is properly loaded in the tray or on...
User Manual
Page 149
ADD MEMORY TO THE COMPUTER Consider upgrading the RAM. SELECT A HIGHER PRINT QUALITY FROM THE PRINTER SOFTWARE MAKE SURE THE INK CARTRIDGES ARE PROPERLY INSTALLED ALIGN THE PRINTHEAD CLEAN OR DEEP CLEAN THE PRINTHEAD NOZZLES Note: If these solutions do not remove the streaks ... TYPE OF PAPER YOU ARE USING REMOVE AND REINSTALL THE PRINTER SOFTWARE MAXIMIZE COMPUTER PROCESSING SPEED • Close all applications not in use. • Minimize the number and size of the following : CHECK THE INK LEVELS Replace low or empty ink cartridges. Print speed is slow If the "Before you troubleshoot"...
ADD MEMORY TO THE COMPUTER Consider upgrading the RAM. SELECT A HIGHER PRINT QUALITY FROM THE PRINTER SOFTWARE MAKE SURE THE INK CARTRIDGES ARE PROPERLY INSTALLED ALIGN THE PRINTHEAD CLEAN OR DEEP CLEAN THE PRINTHEAD NOZZLES Note: If these solutions do not remove the streaks ... TYPE OF PAPER YOU ARE USING REMOVE AND REINSTALL THE PRINTER SOFTWARE MAXIMIZE COMPUTER PROCESSING SPEED • Close all applications not in use. • Minimize the number and size of the following : CHECK THE INK LEVELS Replace low or empty ink cartridges. Print speed is slow If the "Before you troubleshoot"...
User Manual
Page 181
... 37 information finding 8 information needed for setting up printer on Ethernet network 104 information you will need during wireless setup 96 infrastructure network 116 ink conserving 7 ink cartridge access area location 11 Ink Cartridge Error 134 Ink Cartridge Missing 135 ink cartridges installing 13 ordering 12 removing 13 replacing 13 ink levels checking 124 Ink Low 135 inserting a flash drive 46 installation...
... 37 information finding 8 information needed for setting up printer on Ethernet network 104 information you will need during wireless setup 96 infrastructure network 116 ink conserving 7 ink cartridge access area location 11 Ink Cartridge Error 134 Ink Cartridge Missing 135 ink cartridges installing 13 ordering 12 removing 13 replacing 13 ink levels checking 124 Ink Low 135 inserting a flash drive 46 installation...


