User Guide
Page 16
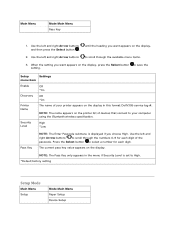
When the setting you want appears on the printer list of the passcode. Setup Settings menu item Enable Off *On Discovery Off *On Printer Name The name of your computer using the Bluetooth wireless specification. Use the left and right Arrow buttons to save the setting. Use the .... Press the Select button to High. *Default factory setting Setup Mode Main Menu Setup Mode Main Menu Paper Setup Device Setup Main Menu Mode Main Menu Pass Key 1. Use the left and right Arrow buttons to your printer appears on the display in the menu if Security Level is...
When the setting you want appears on the printer list of the passcode. Setup Settings menu item Enable Off *On Discovery Off *On Printer Name The name of your computer using the Bluetooth wireless specification. Use the left and right Arrow buttons to save the setting. Use the .... Press the Select button to High. *Default factory setting Setup Mode Main Menu Setup Mode Main Menu Paper Setup Device Setup Main Menu Mode Main Menu Pass Key 1. Use the left and right Arrow buttons to your printer appears on the display in the menu if Security Level is...
User Guide
Page 17
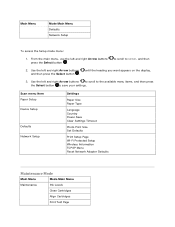
... the heading you want appears on the display, 3. Scan menu item Paper Setup Device Setup Defaults Network Setup Settings Paper Size Paper Type Language Country Power Save Clear Settings Timeout Photo Print Size Set Defaults Print Setup Page Wi-Fi Protected Setup Wireless Information TCP/IP Menu Reset Network Adapter Defaults Maintenance Mode Main Menu Mode... to save your settings. Use the left and right Arrow buttons to scroll to the available menu items, and then press the Select button to SETUP, and then 2.
... the heading you want appears on the display, 3. Scan menu item Paper Setup Device Setup Defaults Network Setup Settings Paper Size Paper Type Language Country Power Save Clear Settings Timeout Photo Print Size Set Defaults Print Setup Page Wi-Fi Protected Setup Wireless Information TCP/IP Menu Reset Network Adapter Defaults Maintenance Mode Main Menu Mode... to save your settings. Use the left and right Arrow buttons to scroll to the available menu items, and then press the Select button to SETUP, and then 2.
User Guide
Page 74
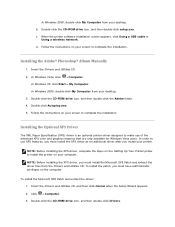
...printer software installation screen appears, click Using a USB cable or Using a wireless network. Installing the Adobe® Photoshop® Album Manually 1. In Windows XP, click Start My Computer. Follow the instructions on your screen to complete the installation. Insert the Drivers and Utilities CD, and then click Cancel when the Setup...-click My Computer from the Drivers and Utilities CD. b. In order to install the printer on the Setting Up Your Printer poster to use of the advanced XPS color and graphics features that are only available for Windows Vista users.
...printer software installation screen appears, click Using a USB cable or Using a wireless network. Installing the Adobe® Photoshop® Album Manually 1. In Windows XP, click Start My Computer. Follow the instructions on your screen to complete the installation. Insert the Drivers and Utilities CD, and then click Cancel when the Setup...-click My Computer from the Drivers and Utilities CD. b. In order to install the printer on the Setting Up Your Printer poster to use of the advanced XPS color and graphics features that are only available for Windows Vista users.
User Guide
Page 75
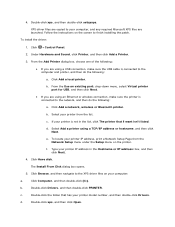
...printer IP address, print a Network Setup Page from the list. To locate your printer from the Network Setup menu under the Setup menu on your printer model number, and then double-click Drivers. Click Control Panel. 2. Click Add a network, wireless or Bluetooth printer. b. c. If your printer...the printer. Under Hardware and Sound, click Printer, and then click Add a Printer. 3. From the Add Printer dialog box, choose one of the following: If you are launched. b. d. Select Add a printer using a USB connection, make sure the printer is ...
...printer IP address, print a Network Setup Page from the list. To locate your printer from the Network Setup menu under the Setup menu on your printer model number, and then double-click Drivers. Click Control Panel. 2. Click Add a network, wireless or Bluetooth printer. b. c. If your printer...the printer. Under Hardware and Sound, click Printer, and then click Add a Printer. 3. From the Add Printer dialog box, choose one of the following: If you are launched. b. d. Select Add a printer using a USB connection, make sure the printer is ...

User Guide
Page 77
... WEP with a wireless adapter. Minimum Requirements for Setup NOTE: This section is applicable only to configure the adapter that you use-Ad-Hoc or Infrastructure) Wireless Channel Number Network Authentication and encryption type Security Key(s) Wireless Encryption The following operating... provider. The Dell™ Printer An existing wireless network The Drivers and Utilities CD that shipped with your printer A computer running one of wireless network you may be needed to the Dell V305w printer, which is equipped with...
... WEP with a wireless adapter. Minimum Requirements for Setup NOTE: This section is applicable only to configure the adapter that you use-Ad-Hoc or Infrastructure) Wireless Channel Number Network Authentication and encryption type Security Key(s) Wireless Encryption The following operating... provider. The Dell™ Printer An existing wireless network The Drivers and Utilities CD that shipped with your printer A computer running one of wireless network you may be needed to the Dell V305w printer, which is equipped with...

User Guide
Page 78
... keys. From the Welcome screen, click Next. 4. The wireless network may use anywhere from one to step 5. Using USB Cable to Configure the Printer on a Wireless Network (recommended for most users) Before configuring the printer on your printer with a new Dell computer: Connect the USB cable between the port on the back...; The computer you are using is connected to the same wireless network where you want to the terms of the printer and the port on , and then insert the Drivers and Utilities CD. 3. Select I Agree to set up the printer. 1. If you are using your screen to the next ...
... keys. From the Welcome screen, click Next. 4. The wireless network may use anywhere from one to step 5. Using USB Cable to Configure the Printer on a Wireless Network (recommended for most users) Before configuring the printer on your printer with a new Dell computer: Connect the USB cable between the port on the back...; The computer you are using is connected to the same wireless network where you want to the terms of the printer and the port on , and then insert the Drivers and Utilities CD. 3. Select I Agree to set up the printer. 1. If you are using your screen to the next ...

User Guide
Page 79
If you are using your printer with a new Dell computer: Connect the USB cable between the port on the back of the printer and the port on the back of this license agreement, and then click Next. 5. If you are using your printer with an existing computer: Go to ...with your new wireless network settings. Using WiFi Protected Setup to Configure the Printer on a Wireless Network (for advanced users only) Wi-Fi Protected Setup (WPS) is only available if you do not enable your wireless network security, configuring your printer using WPS may change your wireless network settings. ...
If you are using your printer with a new Dell computer: Connect the USB cable between the port on the back of the printer and the port on the back of this license agreement, and then click Next. 5. If you are using your printer with an existing computer: Go to ...with your new wireless network settings. Using WiFi Protected Setup to Configure the Printer on a Wireless Network (for advanced users only) Wi-Fi Protected Setup (WPS) is only available if you do not enable your wireless network security, configuring your printer using WPS may change your wireless network settings. ...
User Guide
Page 84
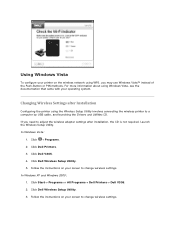
... Vista: 1. Click Dell Wireless Setup Utility. 3. Launch the Wireless Setup Utility. In Windows XP and Windows 2000: 1. Click Dell Printers. 3. If you may use Windows Vista™ instead of the Push-Button or PIN methods. Follow the instructions on your screen to change wireless settings. Click Dell V305. 4. For more information about using the Wireless Setup Utility involves connecting the wireless printer to a computer...
... Vista: 1. Click Dell Wireless Setup Utility. 3. Launch the Wireless Setup Utility. In Windows XP and Windows 2000: 1. Click Dell Printers. 3. If you may use Windows Vista™ instead of the Push-Button or PIN methods. Follow the instructions on your screen to change wireless settings. Click Dell V305. 4. For more information about using the Wireless Setup Utility involves connecting the wireless printer to a computer...

User Guide
Page 85
The Wireless Setup Utility steps you to manually enter the network configuration settings. The wizard can automatically detect wireless network settings or allow you through the configuration process.
The Wireless Setup Utility steps you to manually enter the network configuration settings. The wizard can automatically detect wireless network settings or allow you through the configuration process.
User Guide
Page 96
...appear automatically, install the software manually. 1. When the printer software installation screen appears, click Using a USB cable or Using a wireless network. 5. Follow the instructions on your screen to check the latest information on both your printer and your desktop. 3. Check the USB cable. ...outlet and computer, if using a computer. Ensure that your printer, please visit http://support.dell.com/support. In Windows Vista, click Computer. Double-click the CD-ROM drive icon, and then double-click setup.exe. 4. In Windows XP, click Start My Computer...
...appear automatically, install the software manually. 1. When the printer software installation screen appears, click Using a USB cable or Using a wireless network. 5. Follow the instructions on your screen to check the latest information on both your printer and your desktop. 3. Check the USB cable. ...outlet and computer, if using a computer. Ensure that your printer, please visit http://support.dell.com/support. In Windows Vista, click Computer. Double-click the CD-ROM drive icon, and then double-click setup.exe. 4. In Windows XP, click Start My Computer...


