User Guide
Page 1
Dell™ V105 All-In-One Printer User's Guide To order ink or supplies from Dell: 1. Information in this document is either a trademark or a registered trademark of data and tells you how to hardware or loss of Microsoft Corporation in this text: Dell, the DELL logo, and Dell... V105 February 2008 SRV FX703 Rev. All rights reserved. disclaims any manner whatsoever without notice. © 2008 Dell Inc. Visit the Dell website, or order Dell printer supplies by the Government is strictly forbidden. Finding Information About Your Printer Loading Paper and Originals Printing Copying...
Dell™ V105 All-In-One Printer User's Guide To order ink or supplies from Dell: 1. Information in this document is either a trademark or a registered trademark of data and tells you how to hardware or loss of Microsoft Corporation in this text: Dell, the DELL logo, and Dell... V105 February 2008 SRV FX703 Rev. All rights reserved. disclaims any manner whatsoever without notice. © 2008 Dell Inc. Visit the Dell website, or order Dell printer supplies by the Government is strictly forbidden. Finding Information About Your Printer Loading Paper and Originals Printing Copying...
User Guide
Page 2
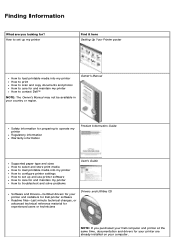
...preparing to operate my printer Regulatory information Warranty information Product Information Guide Supported paper type and sizes How to select and store print media How to load printable media into my printer How to print How to scan and copy documents and photos How to contact Dell™ NOTE: The... Owner's Manual may not be available in your printer and installers for Dell printer software Readme files-Last minute...
...preparing to operate my printer Regulatory information Warranty information Product Information Guide Supported paper type and sizes How to select and store print media How to load printable media into my printer How to print How to scan and copy documents and photos How to contact Dell™ NOTE: The... Owner's Manual may not be available in your printer and installers for Dell printer software Readme files-Last minute...
User Guide
Page 4
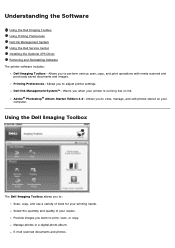
... Software Using the Dell Imaging Toolbox Using Printing Preferences Dell Ink Management System Using the Dell Service Center Installing the Optional XPS Driver Removing and Reinstalling Software The printer software includes: Dell Imaging Toolbox- Printing Preferences- Dell Ink Management System™- Select the quantity and quality of tools for your printing needs. Allows you to adjust printer settings. Allows you...
... Software Using the Dell Imaging Toolbox Using Printing Preferences Dell Ink Management System Using the Dell Service Center Installing the Optional XPS Driver Removing and Reinstalling Software The printer software includes: Dell Imaging Toolbox- Printing Preferences- Dell Ink Management System™- Select the quantity and quality of tools for your printing needs. Allows you to adjust printer settings. Allows you...
User Guide
Page 5
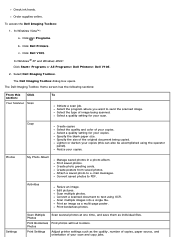
...Dell Printers® Dell V105. 2. The Dell Imaging Toolbox Home screen has the following sections: From this can also be accomplished using OCR. Select a quality setting for your scan. Select a quality setting for your copies. Lighten or darken your copies. Print saved photos. Scan multiple photos. c. Select Dell Imaging Toolbox. The Dell... where you want to e-mail messages. Click Dell Printers. Settings Scan Multiple Photos Scan several photos at one time, and save them as a multi-page poster. To access the Dell Imaging Toolbox: 1. Click ® Programs. ...
...Dell Printers® Dell V105. 2. The Dell Imaging Toolbox Home screen has the following sections: From this can also be accomplished using OCR. Select a quality setting for your scan. Select a quality setting for your copies. Lighten or darken your copies. Print saved photos. Scan multiple photos. c. Select Dell Imaging Toolbox. The Dell... where you want to e-mail messages. Click Dell Printers. Settings Scan Multiple Photos Scan several photos at one time, and save them as a multi-page poster. To access the Dell Imaging Toolbox: 1. Click ® Programs. ...
User Guide
Page 6
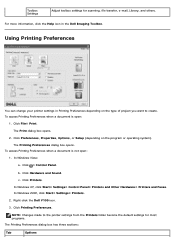
... Vista: a. Right-click the Dell V105 icon. 3. Toolbox Settings Adjust toolbox settings for most programs. The Printing Preferences dialog box has three sections: Tab Options Click Printing Preferences. To access Printing Preferences when a document is open : 1. NOTE: Changes made to create. Using Printing Preferences You can change your printer settings in the Dell Imaging Toolbox. In Windows 2000...
... Vista: a. Right-click the Dell V105 icon. 3. Toolbox Settings Adjust toolbox settings for most programs. The Printing Preferences dialog box has three sections: Tab Options Click Printing Preferences. To access Printing Preferences when a document is open : 1. NOTE: Changes made to create. Using Printing Preferences You can change your printer settings in the Dell Imaging Toolbox. In Windows 2000...

User Guide
Page 7
... Complete-A-Print, and click Continue Printing, all color documents will print in reloading paper. Borderless - Orientation - Layout - Dell Customer Experience Improvement Program - If your screen when you want to print on the printed page....Print settings. Customize how the printer prints several copies of your black ink cartridge is cleared from the color ink cartridge (Process Black) by selecting Complete-APrint before clicking the Continue Printing button. Advanced 2-sided Printing - Select this setting if you to print. When one...
... Complete-A-Print, and click Continue Printing, all color documents will print in reloading paper. Borderless - Orientation - Layout - Dell Customer Experience Improvement Program - If your screen when you want to print on the printed page....Print settings. Customize how the printer prints several copies of your black ink cartridge is cleared from the color ink cartridge (Process Black) by selecting Complete-APrint before clicking the Continue Printing button. Advanced 2-sided Printing - Select this setting if you to print. When one...
User Guide
Page 8
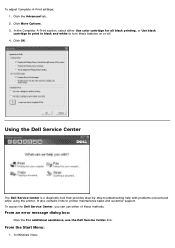
... More Options. 3. In the Complete-A-Print section, select either of these features on or off. 4. Using the Dell Service Center The Dell Service Center is a diagnostic tool that provides step-by-step troubleshooting help with problems encountered while using the printer. From an error message dialog box:...color cartridge for all black printing, or Use black cartridge to print in black and white to printer maintenance tasks and customer support. Click OK. It also contains links to turn these methods. To access the Dell Service Center, you can use the Dell Service Center link. Click ...
... More Options. 3. In the Complete-A-Print section, select either of these features on or off. 4. Using the Dell Service Center The Dell Service Center is a diagnostic tool that provides step-by-step troubleshooting help with problems encountered while using the printer. From an error message dialog box:...color cartridge for all black printing, or Use black cartridge to print in black and white to printer maintenance tasks and customer support. Click OK. It also contains links to turn these methods. To access the Dell Service Center, you can use the Dell Service Center link. Click ...
User Guide
Page 11
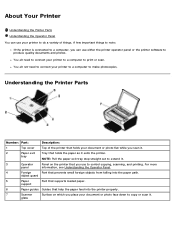
...Paper exit Tray that you place your printer to a computer to make photocopies. tray NOTE: Pull the paper exit tray stop straight out to extend it. 3 Operator Panel on which you use to control copying, scanning, and printing. support 6 Paper guides Guides that... few important things to note: If the printer is connected to a computer, you scan it exits the printer. About Your Printer Understanding the Printer Parts Understanding the Operator Panel You can use your printer to a computer to print or scan. Understanding the Printer Parts Number: Part: Description: 1 Top ...
...Paper exit Tray that you place your printer to a computer to make photocopies. tray NOTE: Pull the paper exit tray stop straight out to extend it. 3 Operator Panel on which you use to control copying, scanning, and printing. support 6 Paper guides Guides that... few important things to note: If the printer is connected to a computer, you scan it exits the printer. About Your Printer Understanding the Printer Parts Understanding the Operator Panel You can use your printer to a computer to print or scan. Understanding the Printer Parts Number: Part: Description: 1 Top ...
User Guide
Page 13
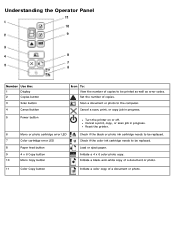
... needs to be replaced. Reset the printer. 6 Mono or photo cartridge error LED 7 Color cartridge error LED 8 Paper feed button 9 4 x 6 Copy button 10 Mono Copy button Check if the black or photo ink cartridge needs to be printed as well as error codes. Set ...Initiate a black-and-white copy of a document or photo. 11 Color Copy button Initiate a color copy of copies. Cancel a print, copy, or scan job in progress. 5 Power button Turn the printer on or off. Initiate a 4 x 6 color photo copy. Understanding the Operator Panel Number Use the: 1 Display 2 Copies...
... needs to be replaced. Reset the printer. 6 Mono or photo cartridge error LED 7 Color cartridge error LED 8 Paper feed button 9 4 x 6 Copy button 10 Mono Copy button Check if the black or photo ink cartridge needs to be printed as well as error codes. Set ...Initiate a black-and-white copy of a document or photo. 11 Color Copy button Initiate a color copy of copies. Cancel a print, copy, or scan job in progress. 5 Power button Turn the printer on or off. Initiate a 4 x 6 color photo copy. Understanding the Operator Panel Number Use the: 1 Display 2 Copies...

User Guide
Page 15
... 7. Snap each ink cartridge. Lower the scanner base unit until it rests on the bottom of each lid closed. 9. Close the printer. NOTE: For normal printing, use a black cartridge and a color cartridge. Lift the scanner base unit, and then push the scanner support back towards the rear... of the printer. Insert the new ink cartridges. For photo printing, replace the black cartridge with your photo cartridge, or dispose of them properly. 6. Store the cartridges in the right...
... 7. Snap each ink cartridge. Lower the scanner base unit until it rests on the bottom of each lid closed. 9. Close the printer. NOTE: For normal printing, use a black cartridge and a color cartridge. Lift the scanner base unit, and then push the scanner support back towards the rear... of the printer. Insert the new ink cartridges. For photo printing, replace the black cartridge with your photo cartridge, or dispose of them properly. 6. Store the cartridges in the right...
User Guide
Page 16
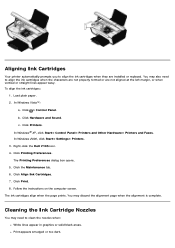
To align the ink cartridges: 1. In Windows Vista™: a. c. Click Printers. The Printing Preferences dialog box opens. 5. Follow the instructions on the computer screen. The ink cartridges align when the page prints. Click ® Control Panel. Right-click the Dell V105 icon. 4. Click the Maintenance tab. 6. Cleaning the Ink Cartridge Nozzles You may need to align...
To align the ink cartridges: 1. In Windows Vista™: a. c. Click Printers. The Printing Preferences dialog box opens. 5. Follow the instructions on the computer screen. The ink cartridges align when the page prints. Click ® Control Panel. Right-click the Dell V105 icon. 4. Click the Maintenance tab. 6. Cleaning the Ink Cartridge Nozzles You may need to align...
User Guide
Page 17
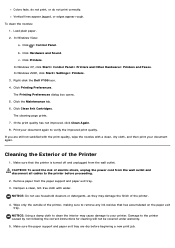
In Windows Vista: a. In Windows XP, click Start® Control Panel® Printers and Other Hardware® Printers and Faxes. Right-click the Dell V105 icon. 4. The Printing Preferences dialog box opens. 5. Click Clean Ink Cartridges. Vertical lines appear jagged, or edges appear rough. Click ® Control Panel. c. In Windows 2000, click Start&#...
In Windows Vista: a. In Windows XP, click Start® Control Panel® Printers and Other Hardware® Printers and Faxes. Right-click the Dell V105 icon. 4. The Printing Preferences dialog box opens. 5. Click Clean Ink Cartridges. Vertical lines appear jagged, or edges appear rough. Click ® Control Panel. c. In Windows 2000, click Start&#...
User Guide
Page 18
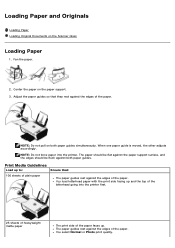
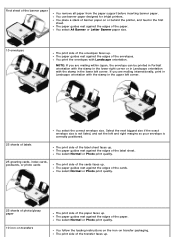
...Paper and Originals Loading Paper Loading Original Documents on the paper support. 3. NOTE: Do not force paper into the printer first. 25 sheets of heavyweight matte paper The print side of the paper faces up to: 100 sheets of plain paper Ensure that they rest against the edges of... 1. You load letterhead paper with the print side facing up and the top of the letterhead going into the printer. Fan the paper. 2. The paper guides rest against the edges of the paper. When one paper guide is moved, the other adjusts accordingly. Print Media Guidelines Load up . You select ...
...Paper and Originals Loading Paper Loading Original Documents on the paper support. 3. NOTE: Do not force paper into the printer first. 25 sheets of heavyweight matte paper The print side of the paper faces up to: 100 sheets of plain paper Ensure that they rest against the edges of... 1. You load letterhead paper with the print side facing up and the top of the letterhead going into the printer. Fan the paper. 2. The paper guides rest against the edges of the paper. When one paper guide is moved, the other adjusts accordingly. Print Media Guidelines Load up . You select ...
User Guide
Page 19
... envelopes with the stamp in the first sheet. The print side of the label sheet faces up . You follow the loading instructions on the iron-on or behind the printer, and feed in the lower left corner. You place a stack of the paper. The paper guides rest against the edges of...labels 25 greeting cards, index cards, postcards, or photo cards You select the correct envelope size. The print side of the cards. First sheet of the paper. You use banner paper designed for inkjet printers. The paper guides rest against the edges of the cards faces up . The paper guides rest against...
... envelopes with the stamp in the first sheet. The print side of the label sheet faces up . You follow the loading instructions on the iron-on or behind the printer, and feed in the lower left corner. You place a stack of the paper. The paper guides rest against the edges of...labels 25 greeting cards, index cards, postcards, or photo cards You select the correct envelope size. The print side of the cards. First sheet of the paper. You use banner paper designed for inkjet printers. The paper guides rest against the edges of the cards faces up . The paper guides rest against...
User Guide
Page 20
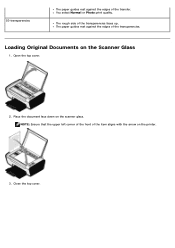
The rough side of the item aligns with the arrow on the printer. 3. Loading Original Documents on the scanner glass. Place the document face down on the Scanner Glass 1. Close the top cover. 50 transparencies The paper guides rest against the edges of the transparencies. NOTE: Ensure that the upper left corner of the front of the transparencies faces up. The paper guides rest against the edges of the transfer. Open the top cover. 2. You select Normal or Photo print quality.
The rough side of the item aligns with the arrow on the printer. 3. Loading Original Documents on the scanner glass. Place the document face down on the Scanner Glass 1. Close the top cover. 50 transparencies The paper guides rest against the edges of the transparencies. NOTE: Ensure that the upper left corner of the front of the transparencies faces up. The paper guides rest against the edges of the transfer. Open the top cover. 2. You select Normal or Photo print quality.
User Guide
Page 22
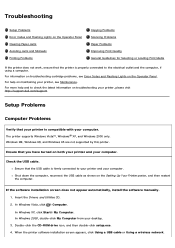
... help on the Operator Panel Clearing Paper Jams Avoiding Jams and Misfeeds Printing Problems Copying Problems Scanning Problems Paper Problems Improving Print Quality General Guidelines for Selecting or Loading Print Media If the printer does not work, ensure that the USB cable is compatible with your.... Windows ME, Windows 98, and Windows 95 are not supported by this printer. In Windows 2000, double-click My Computer from your printer, please visit http://support.dell.com/support. Ensure that your printer is firmly connected to the electrical outlet and the computer, if using a ...
... help on the Operator Panel Clearing Paper Jams Avoiding Jams and Misfeeds Printing Problems Copying Problems Scanning Problems Paper Problems Improving Print Quality General Guidelines for Selecting or Loading Print Media If the printer does not work, ensure that the USB cable is compatible with your.... Windows ME, Windows 98, and Windows 95 are not supported by this printer. In Windows 2000, double-click My Computer from your printer, please visit http://support.dell.com/support. Ensure that your printer is firmly connected to the electrical outlet and the computer, if using a ...
User Guide
Page 23
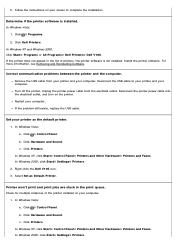
... cable. b. c. Right-click the Dell V105 icon. 3. Check for multiple instances of printers, the printer software is installed. b. In Windows XP, click Start® Control Panel® Printers and Other Hardware® Printers and Faxes. Determine if the printer software is not installed. In Windows Vista: 1. If the printer does not appear in the print queue. Reconnect the USB...
... cable. b. c. Right-click the Dell V105 icon. 3. Check for multiple instances of printers, the printer software is installed. b. In Windows XP, click Start® Control Panel® Printers and Other Hardware® Printers and Faxes. Determine if the printer software is not installed. In Windows Vista: 1. If the printer does not appear in the print queue. Reconnect the USB...

User Guide
Page 24
.... Right-click the Dell V105 icon. 3. For more information, see which printer is selected, click it indicates: Solution: 2. Right-click the Dell V105 icon. Click Hardware and Sound. c. In Windows XP, click Start® Control Panel® Printers and Other Hardware® Printers and Faxes. If Pause Printing is active. 4. Set that print object as Default Printer. 5. Delete the other...
.... Right-click the Dell V105 icon. 3. For more information, see which printer is selected, click it indicates: Solution: 2. Right-click the Dell V105 icon. Click Hardware and Sound. c. In Windows XP, click Start® Control Panel® Printers and Other Hardware® Printers and Faxes. If Pause Printing is active. 4. Set that print object as Default Printer. 5. Delete the other...
User Guide
Page 25
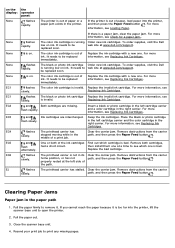
... to print any missing pages. then install them one is invalid. Clear the carrier jam. Remove obstructions from the carrier path, and then press the Paper Feed button . Clearing Paper Jams Paper jam in its home position, or has not properly rested at www.dell.com/support. Resend your print job to open the printer. 2.
... to print any missing pages. then install them one is invalid. Clear the carrier jam. Remove obstructions from the carrier path, and then press the Paper Feed button . Clearing Paper Jams Paper jam in its home position, or has not properly rested at www.dell.com/support. Resend your print job to open the printer. 2.

User Guide
Page 26
... if necessary. To avoid ink smudging when you remove individual sheets from the input tray while printing. Firmly grasp the paper, and gently pull it to the instructions for the printer. Make sure that follows the printer's media guidelines. Orient the media according to dry: Photo/glossy paper Transparencies Labels Ensure that you...
... if necessary. To avoid ink smudging when you remove individual sheets from the input tray while printing. Firmly grasp the paper, and gently pull it to the instructions for the printer. Make sure that follows the printer's media guidelines. Orient the media according to dry: Photo/glossy paper Transparencies Labels Ensure that you...

