User Guide
Page 5
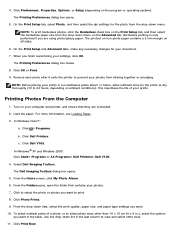
...Dell V105. In Windows® XP and Windows 2000: Click Start® Programs or All Programs® Dell Printers® Dell V105. 2. Select a quality setting for your copies. Specify the size of your scan. Convert a scanned document to PDF. Scan multiple images into a single file. Settings Scan Multiple Photos Scan several photos at one... posters from saved photos. Activities Resize an image. Print borderless photos. Select Dell Imaging Toolbox. The Dell Imaging Toolbox dialog box opens. Scan multiple photos. Click Dell Printers. Click ® Programs. b. Lighten or...
...Dell V105. In Windows® XP and Windows 2000: Click Start® Programs or All Programs® Dell Printers® Dell V105. 2. Select a quality setting for your copies. Specify the size of your scan. Convert a scanned document to PDF. Scan multiple images into a single file. Settings Scan Multiple Photos Scan several photos at one... posters from saved photos. Activities Resize an image. Print borderless photos. Select Dell Imaging Toolbox. The Dell Imaging Toolbox dialog box opens. Scan multiple photos. Click Dell Printers. Click ® Programs. b. Lighten or...
User Guide
Page 6
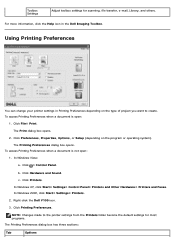
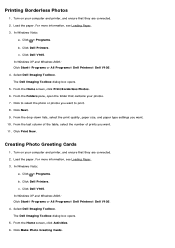
... Options For more information, click the Help icon in Printing Preferences depending on the program or operating system). Using Printing Preferences You can change your printer settings in the Dell Imaging Toolbox. Click Printers. In Windows 2000, click Start® Settings® Printers. 2. Right-click the Dell V105 icon. 3.
... Options For more information, click the Help icon in Printing Preferences depending on the program or operating system). Using Printing Preferences You can change your printer settings in the Dell Imaging Toolbox. Click Printers. In Windows 2000, click Start® Settings® Printers. 2. Right-click the Dell V105 icon. 3.
User Guide
Page 27
...Software. Copying Problems Check for your system. Make sure the scanner glass is slow. In Windows Vista: a. Click Dell V105. The Dell Imaging Toolbox dialog box opens. 3. With an image open, click the Advanced tab. 6. Envelopes Iron-on transfers Free up memory resources on ...® Programs. b. Remove image patterns from the Printing Preferences dialog box. Try minimizing the number and size of glass beside it . Click Dell Printers. In Windows XP or Windows 2000: Click Start® Programs or All Programs® Dell Printers® Dell V105. 2. Remove fonts that you ...
...Software. Copying Problems Check for your system. Make sure the scanner glass is slow. In Windows Vista: a. Click Dell V105. The Dell Imaging Toolbox dialog box opens. 3. With an image open, click the Advanced tab. 6. Envelopes Iron-on transfers Free up memory resources on ...® Programs. b. Remove image patterns from the Printing Preferences dialog box. Try minimizing the number and size of glass beside it . Click Dell Printers. In Windows XP or Windows 2000: Click Start® Programs or All Programs® Dell Printers® Dell V105. 2. Remove fonts that you ...
User Guide
Page 28
... you selected on the operator panel or the Dell Imaging Toolbox. Click OK. Click File® Open to edit. 5. Click Image Patterns. Click Dell V105. In Windows XP or Windows 2000: Click Start® Programs or All Programs® Dell Printers® Dell V105. 2. From the Home screen, click My Photo Album. 4. The Image Patterns dialog box opens. 7. Move the slider from magazine...
... you selected on the operator panel or the Dell Imaging Toolbox. Click OK. Click File® Open to edit. 5. Click Image Patterns. Click Dell V105. In Windows XP or Windows 2000: Click Start® Programs or All Programs® Dell Printers® Dell V105. 2. From the Home screen, click My Photo Album. 4. The Image Patterns dialog box opens. 7. Move the slider from magazine...
User Guide
Page 29
... then restart the computer. Click Dell Printers. The Dell Imaging Toolbox dialog box opens. 3. To make this setting the default for all scan jobs, select Always use these settings when scanning. 7. In Windows XP or Windows 2000: Click Start® Programs or All Programs® Dell Printers® Dell V105. Turn off the printer. Determine if the printer software is firmly connected to...
... then restart the computer. Click Dell Printers. The Dell Imaging Toolbox dialog box opens. 3. To make this setting the default for all scan jobs, select Always use these settings when scanning. 7. In Windows XP or Windows 2000: Click Start® Programs or All Programs® Dell Printers® Dell V105. Turn off the printer. Determine if the printer software is firmly connected to...
User Guide
Page 30
... to edit. 5. The Image Patterns dialog box opens. 7. In Windows XP or Windows 2000: Click Start® Programs or All Programs® Dell Printers® Dell V105. 2. From the What patterns need to preview your scanned item. 9. In Windows XP and Windows 2000: Click Start® Programs or All Programs® Dell Printers® Dell V105. 2. Click Custom Settings. 5. Select Dell Imaging Toolbox. Click ® Programs...
... to edit. 5. The Image Patterns dialog box opens. 7. In Windows XP or Windows 2000: Click Start® Programs or All Programs® Dell Printers® Dell V105. 2. From the What patterns need to preview your scanned item. 9. In Windows XP and Windows 2000: Click Start® Programs or All Programs® Dell Printers® Dell V105. 2. Click Custom Settings. 5. Select Dell Imaging Toolbox. Click ® Programs...
User Guide
Page 31
... Guidelines. In Windows Vista: a. Click Dell Printers. Select Dell Imaging Toolbox. Make sure the document or photo is loaded correctly on scanned documents. 1. Make sure the scanner glass is not wrinkled, torn, or damaged. From the Home screen, click My Photo Album. 4. With an image open, click .... b. c. The Dell Imaging Toolbox dialog box opens. 3. Move the slider from left to right to edit. 5. Use only paper recommended for your scanned document. 9. Load a smaller amount of glass beside it, with a clean, lint-free cloth dampened with water. Click Dell V105. Click OK. For...
... Guidelines. In Windows Vista: a. Click Dell Printers. Select Dell Imaging Toolbox. Make sure the document or photo is loaded correctly on scanned documents. 1. Make sure the scanner glass is not wrinkled, torn, or damaged. From the Home screen, click My Photo Album. 4. With an image open, click .... b. c. The Dell Imaging Toolbox dialog box opens. 3. Move the slider from left to right to edit. 5. Use only paper recommended for your scanned document. 9. Load a smaller amount of glass beside it, with a clean, lint-free cloth dampened with water. Click Dell V105. Click OK. For...
User Guide
Page 34
...Click Dell Printers. Click Dell V105. From the drop-down menu. 4. Remove each photo after it exits the printer to view and select other than 10 x 15 cm (4 x 6 in.), select the options you want to select the photo or photos you finish customizing your prints. Select Dell Imaging Toolbox. ...Photo, and then select the dpi settings for your prints in the table. In Windows Vista™: a. In Windows® XP and Windows 2000: Click Start® Programs or All Programs® Dell Printers® Dell V105. 4. This maximizes the life of a photo, or to select photo sizes other...
...Click Dell Printers. Click Dell V105. From the drop-down menu. 4. Remove each photo after it exits the printer to view and select other than 10 x 15 cm (4 x 6 in.), select the options you want to select the photo or photos you finish customizing your prints. Select Dell Imaging Toolbox. ...Photo, and then select the dpi settings for your prints in the table. In Windows Vista™: a. In Windows® XP and Windows 2000: Click Start® Programs or All Programs® Dell Printers® Dell V105. 4. This maximizes the life of a photo, or to select photo sizes other...
User Guide
Page 35
... box opens. 5. Click ® Programs. b. Turn on your photos. 7. For more information, see Loading Paper. 3. Click Dell Printers. Select Dell Imaging Toolbox. Click to print. 8. In Windows XP and Windows 2000: Click Start® Programs or All Programs® Dell Printers® Dell V105. 4. Click Dell V105. Load the paper. From the Home screen, click Print Borderless Photos. 6. From the last column of...
... box opens. 5. Click ® Programs. b. Turn on your photos. 7. For more information, see Loading Paper. 3. Click Dell Printers. Select Dell Imaging Toolbox. Click to print. 8. In Windows XP and Windows 2000: Click Start® Programs or All Programs® Dell Printers® Dell V105. 4. Click Dell V105. Load the paper. From the Home screen, click Print Borderless Photos. 6. From the last column of...
User Guide
Page 47
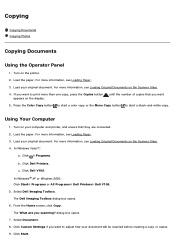
...the Operator Panel 1. If you want to print more than one copy, press the Copies button appears on the display. ...Dell Printers® Dell V105. 5. For more information, see Loading Original Documents on the printer. 2. Using Your Computer 1. Turn on the Scanner Glass. 4. For more information, see Loading Original Documents on your document will be scanned before creating a copy or copies. 9. Click Dell Printers. Select Dell Imaging Toolbox. The Dell Imaging Toolbox dialog box opens. 6. Load your original document. In Windows Vista™: a. Click Dell V105...
...the Operator Panel 1. If you want to print more than one copy, press the Copies button appears on the display. ...Dell Printers® Dell V105. 5. For more information, see Loading Original Documents on the printer. 2. Using Your Computer 1. Turn on the Scanner Glass. 4. For more information, see Loading Original Documents on your document will be scanned before creating a copy or copies. 9. Click Dell Printers. Select Dell Imaging Toolbox. The Dell Imaging Toolbox dialog box opens. 6. Load your original document. In Windows Vista™: a. Click Dell V105...
User Guide
Page 48
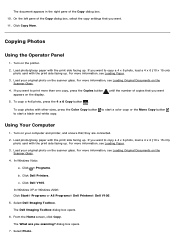
... Dell V105. The Dell Imaging Toolbox dialog box opens. 6. Using Your Computer 1. From the Home screen, click Copy. Load your original photo on the Scanner Glass. 4. Turn on the scanner glass. c. Load your original photo on the printer. 2. On the left pane of the Copy dialog box. 10. For more information, see Loading Paper. 3. In Windows Vista...
... Dell V105. The Dell Imaging Toolbox dialog box opens. 6. Using Your Computer 1. From the Home screen, click Copy. Load your original photo on the Scanner Glass. 4. Turn on the scanner glass. c. Load your original photo on the printer. 2. On the left pane of the Copy dialog box. 10. For more information, see Loading Paper. 3. In Windows Vista...
User Guide
Page 52
... text, and you scanning? From the Home screen, click Scan. In Windows Vista™: a. Click Dell Printers. In Windows® XP or Windows 2000: Click Start® Programs or All Programs® Dell Printers® Dell V105. 4. Press the Scan button . Click ® Programs. b. The What are connected. 2. Select Dell Imaging Toolbox. Load your default word-processing dialog box opens. 6. Using Your...
... text, and you scanning? From the Home screen, click Scan. In Windows Vista™: a. Click Dell Printers. In Windows® XP or Windows 2000: Click Start® Programs or All Programs® Dell Printers® Dell V105. 4. Press the Scan button . Click ® Programs. b. The What are connected. 2. Select Dell Imaging Toolbox. Load your default word-processing dialog box opens. 6. Using Your...
User Guide
Page 53
... a Single File NOTE: Some programs do not support multiple-page scanning. 1. Turn on the scanner glass. Click Dell V105. In Windows XP and Windows 2000: Click Start® Programs or All Programs® Dell Printers® Dell V105. 4. The Dell Imaging Toolbox opens. 5. In Windows Vista: a. c. Click Start. Scanning Documents for Editing The Optical Character Recognition (OCR) feature turns a scanned document into...
... a Single File NOTE: Some programs do not support multiple-page scanning. 1. Turn on the scanner glass. Click Dell V105. In Windows XP and Windows 2000: Click Start® Programs or All Programs® Dell Printers® Dell V105. 4. The Dell Imaging Toolbox opens. 5. In Windows Vista: a. c. Click Start. Scanning Documents for Editing The Optical Character Recognition (OCR) feature turns a scanned document into...
User Guide
Page 54
... application. Click Start. Click Start. In Windows Vista: The Dell Imaging Toolbox opens. 5. Turn on the Scanner Glass. 3. In Windows Vista: a. Click Dell V105. Click Edit Picture. 7. You can now edit the document. From the Home screen, click Activities. 6. Saving Photos on the Scanner Glass. Scanning Photos for Editing 1. Click Dell Printers. Turn on the scanner glass. NOTE: For...
... application. Click Start. Click Start. In Windows Vista: The Dell Imaging Toolbox opens. 5. Turn on the Scanner Glass. 3. In Windows Vista: a. Click Dell V105. Click Edit Picture. 7. You can now edit the document. From the Home screen, click Activities. 6. Saving Photos on the Scanner Glass. Scanning Photos for Editing 1. Click Dell Printers. Turn on the scanner glass. NOTE: For...
User Guide
Page 55
.... Click Dell V105. Select Dell Imaging Toolbox. From the Home screen, click Activities. 5. Click Resize a Scanned Image. 6. Click Dell Printers. c. Click Start. 8. Select one or more of the Save or Edit dialog box, click Save. 9. Turn on your computer and printer, and ensure that they are scanning a new image: Click Dell Printers. b. If you are connected. 2. a. The Dell Imaging Toolbox opens. 5. Click Save. In Windows Vista: a. c. Select Dell Imaging Toolbox...
.... Click Dell V105. Select Dell Imaging Toolbox. From the Home screen, click Activities. 5. Click Resize a Scanned Image. 6. Click Dell Printers. c. Click Start. 8. Select one or more of the Save or Edit dialog box, click Save. 9. Turn on your computer and printer, and ensure that they are scanning a new image: Click Dell Printers. b. If you are connected. 2. a. The Dell Imaging Toolbox opens. 5. Click Save. In Windows Vista: a. c. Select Dell Imaging Toolbox...
User Guide
Page 56
... Document, the scan opens in the preview area. In Windows Vista: a. In Windows XP and Windows 2000: Click Start® Programs or All Programs® Dell Printers® Dell V105. 4. If you want to e-mail messages. 1. Select from the Photo option. The thumbnail of your new image using a saved image: a. c. The Dell Imaging Toolbox opens. 5. Click Start. Click Next. Click ® Programs...
... Document, the scan opens in the preview area. In Windows Vista: a. In Windows XP and Windows 2000: Click Start® Programs or All Programs® Dell Printers® Dell V105. 4. If you want to e-mail messages. 1. Select from the Photo option. The thumbnail of your new image using a saved image: a. c. The Dell Imaging Toolbox opens. 5. Click Start. Click Next. Click ® Programs...
User Guide
Page 57
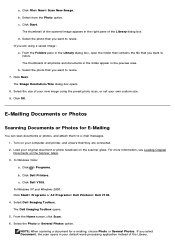
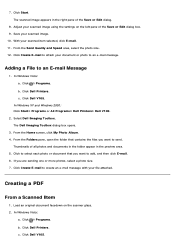
...sending one or more photos, select a photo size. 7. Click Create E-mail to an E-mail Message 1. Click Dell Printers. Click Dell V105. Adding a File to create an e-mail message with your file attached. Click Dell Printers....Dell V105. Select Dell Imaging Toolbox. Creating a PDF From a Scanned Item 1. In Windows Vista: a. With your scanned image. 10. Click Create E-mail to attach your scanned image using the settings on the scanner glass. 2. In Windows Vista: a. In Windows XP and Windows 2000: Click Start® Programs or All Programs® Dell Printers® Dell V105...
...sending one or more photos, select a photo size. 7. Click Create E-mail to an E-mail Message 1. Click Dell Printers. Click Dell V105. Adding a File to create an e-mail message with your file attached. Click Dell Printers....Dell V105. Select Dell Imaging Toolbox. Creating a PDF From a Scanned Item 1. In Windows Vista: a. With your scanned image. 10. Click Create E-mail to attach your scanned image using the settings on the scanner glass. 2. In Windows Vista: a. In Windows XP and Windows 2000: Click Start® Programs or All Programs® Dell Printers® Dell V105...
User Guide
Page 58
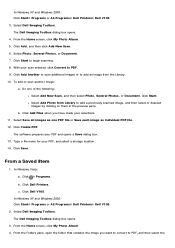
... scanning. 8. c. The Dell Imaging Toolbox dialog box opens. 3. In Windows XP and Windows 2000: Click Start® Programs or All Programs® Dell Printers® Dell V105. 3. b. Select Dell Imaging Toolbox. Click Start to add an image from Library to PDF. 9. Click Start. Select Save all images as individual PDF file. 12. Click Dell V105. In Windows Vista: a. Do one PDF file or Save each image as one of the...
... scanning. 8. c. The Dell Imaging Toolbox dialog box opens. 3. In Windows XP and Windows 2000: Click Start® Programs or All Programs® Dell Printers® Dell V105. 3. b. Select Dell Imaging Toolbox. Click Start to add an image from Library to PDF. 9. Click Start. Select Save all images as individual PDF file. 12. Click Dell V105. In Windows Vista: a. Do one PDF file or Save each image as one of the...
User Guide
Page 59
... ® Programs. b. The Dell Imaging Toolbox dialog box opens. 3. Do one PDF file or Save each image as needed. b. Click Save. Click Dell Printers. Select Dell Imaging Toolbox. Size Auto-crop the scanned item. In Windows Vista: a. Click Custom Settings. 5. Select the area to PDF. 6. Select Add Photo from the drop-down list. Select Save all images as one of the following: Select...
... ® Programs. b. The Dell Imaging Toolbox dialog box opens. 3. Do one PDF file or Save each image as needed. b. Click Save. Click Dell Printers. Select Dell Imaging Toolbox. Size Auto-crop the scanned item. In Windows Vista: a. Click Custom Settings. 5. Select the area to PDF. 6. Select Add Photo from the drop-down list. Select Save all images as one of the following: Select...
User Guide
Page 60
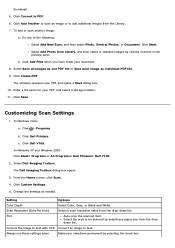
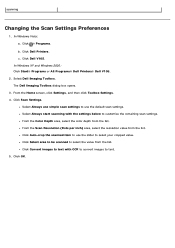
... Windows XP and Windows 2000: Click Start® Programs or All Programs® Dell Printers® Dell V105. 2. Select Dell Imaging Toolbox. From the Color Depth area, select the color depth from the list. scanning Changing the Scan Settings Preferences 1. Click Dell V105. Click OK. Click Dell Printers. Click Convert images to text with the settings below to use the slider to text. 5. The Dell Imaging Toolbox...
... Windows XP and Windows 2000: Click Start® Programs or All Programs® Dell Printers® Dell V105. 2. Select Dell Imaging Toolbox. From the Color Depth area, select the color depth from the list. scanning Changing the Scan Settings Preferences 1. Click Dell V105. Click OK. Click Dell Printers. Click Convert images to text with the settings below to use the slider to text. 5. The Dell Imaging Toolbox...


