
Setup Guide
Page 5
... Up Your Studio XPS™ Laptop 5 Before Setting Up Your Computer 5 Connect the AC adapter 6 Check the Wireless Control 7 Connect the Network Cable (Optional 8 Press the Power Control 9 Set Up Windows Vista 10 Connecting to the Internet (Optional 10 Setting Up 5.1 Audio Connections 12 Removing and Replacing the Battery 13 Using Your Studio XPS 14 Device... 26 Software Features 26 Solving Problems 29 Network Problems 29 Power Problems 30 Memory Problems 31 Lockups and Software Problems 31 Using Support Tools 33 Dell Support Center 33 System Messages 34 3
... Up Your Studio XPS™ Laptop 5 Before Setting Up Your Computer 5 Connect the AC adapter 6 Check the Wireless Control 7 Connect the Network Cable (Optional 8 Press the Power Control 9 Set Up Windows Vista 10 Connecting to the Internet (Optional 10 Setting Up 5.1 Audio Connections 12 Removing and Replacing the Battery 13 Using Your Studio XPS 14 Device... 26 Software Features 26 Solving Problems 29 Network Problems 29 Power Problems 30 Memory Problems 31 Lockups and Software Problems 31 Using Support Tools 33 Dell Support Center 33 System Messages 34 3
Setup Guide
Page 15
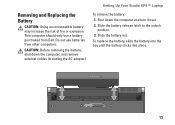
...a battery purchased from other computers. Setting Up Your Studio XPS™ Laptop To remove the battery: 1. To replace the battery, slide the battery into the bay until the battery clicks into place. 13 CAUTION: Before removing the battery, shut down the ...computer and turn it over. 2. Slide the battery release latch to the unlock position. 3. This computer should only use batteries from Dell...
...a battery purchased from other computers. Setting Up Your Studio XPS™ Laptop To remove the battery: 1. To replace the battery, slide the battery into the bay until the battery clicks into place. 13 CAUTION: Before removing the battery, shut down the ...computer and turn it over. 2. Slide the battery release latch to the unlock position. 3. This computer should only use batteries from Dell...

Setup Guide
Page 56
...cd/m² (LED 5 point avg) 180 min. 198 typ. Pixel pitch 0.2235 mm Controls brightness can be controlled through keyboard shortcuts (see the Dell Technology Guide for more information) Keyboard (Backlit) Number of 86/103 (U.S. keys 87/104 (Europe); 90/107 (Japan) Layout QWERTY/AZERTY/Kanji 54... Basic Specifications Display Type (AntiGlare) Dimensions: Height Width Diagonal Maximum resolution Refresh rate Operating angle Luminance 13.3-inch WXGA WLED 13.3-inch WXGA CCFL 286.08 mm (11.26 in) 178.8 mm (7.03 in) 337.8 mm (13.29 in) 1280 x 800 60 Hz 0° (closed) to 140° 225 min. ...
...cd/m² (LED 5 point avg) 180 min. 198 typ. Pixel pitch 0.2235 mm Controls brightness can be controlled through keyboard shortcuts (see the Dell Technology Guide for more information) Keyboard (Backlit) Number of 86/103 (U.S. keys 87/104 (Europe); 90/107 (Japan) Layout QWERTY/AZERTY/Kanji 54... Basic Specifications Display Type (AntiGlare) Dimensions: Height Width Diagonal Maximum resolution Refresh rate Operating angle Luminance 13.3-inch WXGA WLED 13.3-inch WXGA CCFL 286.08 mm (11.26 in) 178.8 mm (7.03 in) 337.8 mm (13.29 in) 1280 x 800 60 Hz 0° (closed) to 140° 225 min. ...
Owner's Manual (PDF)
Page 3
Contents 1 Before You Begin 9 Turn Off Your Computer and Connected Devices . . . . . 9 Safety Instructions 10 Recommended Tools 10 2 After Working Inside Your Computer . . . . 11 3 Base Cover 13 Removing the Base Cover 13 Replacing the Base Cover 14 4 Power-Light Board 15 Prerequisites 15 Removing the Power-Light Board 15 Replacing the Power-Light Board 16 Postrequisites 16 5 Battery 17 Prerequisites 17 Contents 3
Contents 1 Before You Begin 9 Turn Off Your Computer and Connected Devices . . . . . 9 Safety Instructions 10 Recommended Tools 10 2 After Working Inside Your Computer . . . . 11 3 Base Cover 13 Removing the Base Cover 13 Replacing the Base Cover 14 4 Power-Light Board 15 Prerequisites 15 Removing the Power-Light Board 15 Replacing the Power-Light Board 16 Postrequisites 16 5 Battery 17 Prerequisites 17 Contents 3
Owner's Manual (PDF)
Page 6
Postrequisites 41 13 System Board 43 Prerequisites 43 Removing the System Board 44 Replacing the System Board 46 Postrequisites 47 Entering the Service Tag in BIOS 47 14 Coin-Cell Battery 49 Prerequisites 49 Removing the Coin-Cell Battery 50 Replacing the Coin-Cell Battery 50 Postrequisites 51 15 Display Assembly 53 Prerequisites 53 Removing the Display Assembly 53 Replacing the Display Assembly 56 Postrequisites 57 6 Contents
Postrequisites 41 13 System Board 43 Prerequisites 43 Removing the System Board 44 Replacing the System Board 46 Postrequisites 47 Entering the Service Tag in BIOS 47 14 Coin-Cell Battery 49 Prerequisites 49 Removing the Coin-Cell Battery 50 Replacing the Coin-Cell Battery 50 Postrequisites 51 15 Display Assembly 53 Prerequisites 53 Removing the Display Assembly 53 Replacing the Display Assembly 56 Postrequisites 57 6 Contents

Owner's Manual (PDF)
Page 13
For additional safety best practices information, see the Regulatory Compliance Homepage at dell.com/regulatory_compliance. 3 Base Cover WARNING: Before working inside your computer, read the safety information that secure the base cover to the palm-rest assembly. 3 Using ... a Torx 5 screwdriver, remove the screws that shipped with your computer. 4 Remove the base cover off the palm-rest assembly. 1 2 1 base cover 2 screws (10) Base Cover 13
For additional safety best practices information, see the Regulatory Compliance Homepage at dell.com/regulatory_compliance. 3 Base Cover WARNING: Before working inside your computer, read the safety information that secure the base cover to the palm-rest assembly. 3 Using ... a Torx 5 screwdriver, remove the screws that shipped with your computer. 4 Remove the base cover off the palm-rest assembly. 1 2 1 base cover 2 screws (10) Base Cover 13
Owner's Manual (PDF)
Page 15
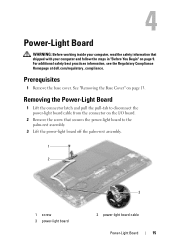
... with your computer, read the safety information that secures the power-light board to disconnect the power-light board cable from the connector on page 13. Removing the Power-Light Board 1 Lift the connector latch and pull the pull-tab to the palm-rest assembly. 3 Lift the power-light board off... 3 2 power-light board cable Power-Light Board 15 Prerequisites 1 Remove the base cover. For additional safety best practices information, see the Regulatory Compliance Homepage at dell.com/regulatory_compliance.
... with your computer, read the safety information that secures the power-light board to disconnect the power-light board cable from the connector on page 13. Removing the Power-Light Board 1 Lift the connector latch and pull the pull-tab to the palm-rest assembly. 3 Lift the power-light board off... 3 2 power-light board cable Power-Light Board 15 Prerequisites 1 Remove the base cover. For additional safety best practices information, see the Regulatory Compliance Homepage at dell.com/regulatory_compliance.

Owner's Manual (PDF)
Page 17
Prerequisites 1 Remove the base cover. See "Removing the Power-Light Board" on page 13. 2 Remove the power-light board. For additional safety best practices information, see the Regulatory Compliance Homepage at dell.com/regulatory_compliance. See "Removing the Base Cover" on page 15. Removing the Battery 1 Disconnect the battery cable from the system-board...
Prerequisites 1 Remove the base cover. See "Removing the Power-Light Board" on page 13. 2 Remove the power-light board. For additional safety best practices information, see the Regulatory Compliance Homepage at dell.com/regulatory_compliance. See "Removing the Base Cover" on page 15. Removing the Battery 1 Disconnect the battery cable from the system-board...
Owner's Manual (PDF)
Page 19
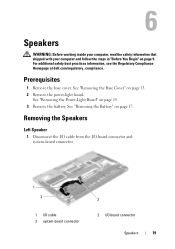
... that shipped with your computer and follow the steps in "Before You Begin" on page 15. 3 Remove the battery. See "Removing the Battery" on page 13. 2 Remove the power-light board. See "Removing the Base Cover" on page 17. Removing the Speakers Left Speaker 1 Disconnect the I/O cable from the I/O board connector... and system-board connector. 1 2 1 I/O cable 3 system-board connector 3 2 I/O board connector Speakers 19 For additional safety best practices information, see the Regulatory Compliance Homepage at dell.com/regulatory_compliance.
... that shipped with your computer and follow the steps in "Before You Begin" on page 15. 3 Remove the battery. See "Removing the Battery" on page 13. 2 Remove the power-light board. See "Removing the Base Cover" on page 17. Removing the Speakers Left Speaker 1 Disconnect the I/O cable from the I/O board connector... and system-board connector. 1 2 1 I/O cable 3 system-board connector 3 2 I/O board connector Speakers 19 For additional safety best practices information, see the Regulatory Compliance Homepage at dell.com/regulatory_compliance.
Owner's Manual (PDF)
Page 23
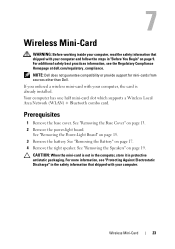
... not guarantee compatibility or provide support for mini-cards from sources other than Dell. Prerequisites 1 Remove the base cover. CAUTION: When the mini-card is already installed. For additional safety best practices information, see "Protecting ...the Base Cover" on page 15. 3 Remove the battery. See "Removing the Power-Light Board" on page 13. 2 Remove the power-light board. For more information, see the Regulatory Compliance Homepage at dell.com/regulatory_compliance. See "Removing the Speakers" on page 9. 7 Wireless Mini-Card WARNING: Before working inside your ...
... not guarantee compatibility or provide support for mini-cards from sources other than Dell. Prerequisites 1 Remove the base cover. CAUTION: When the mini-card is already installed. For additional safety best practices information, see "Protecting ...the Base Cover" on page 15. 3 Remove the battery. See "Removing the Power-Light Board" on page 13. 2 Remove the power-light board. For more information, see the Regulatory Compliance Homepage at dell.com/regulatory_compliance. See "Removing the Speakers" on page 9. 7 Wireless Mini-Card WARNING: Before working inside your ...

Owner's Manual (PDF)
Page 27
...-state drive. 1 1 tape 2 Remove the screw that is On or in "Before You Begin" on page 17. See "Removing the Power-Light Board" on page 13. 2 Remove the power-light board. For additional safety best practices information, see the Regulatory Compliance Homepage at...
...-state drive. 1 1 tape 2 Remove the screw that is On or in "Before You Begin" on page 17. See "Removing the Power-Light Board" on page 13. 2 Remove the power-light board. For additional safety best practices information, see the Regulatory Compliance Homepage at...

Owner's Manual (PDF)
Page 29
... See "Removing the Battery" on page 15. 3 Remove the battery. For additional safety best practices information, see the Regulatory Compliance Homepage at dell.com/regulatory_compliance. Removing the Heat Sink 1 In sequential order (indicated on the heat sink), remove the screws that shipped with your computer and... follow the steps in "Before You Begin" on page 13. 2 Remove the power-light board. Prerequisites 1 Remove the base cover. 9 Heat Sink WARNING: Before working inside your computer, read the...
... See "Removing the Battery" on page 15. 3 Remove the battery. For additional safety best practices information, see the Regulatory Compliance Homepage at dell.com/regulatory_compliance. Removing the Heat Sink 1 In sequential order (indicated on the heat sink), remove the screws that shipped with your computer and... follow the steps in "Before You Begin" on page 13. 2 Remove the power-light board. Prerequisites 1 Remove the base cover. 9 Heat Sink WARNING: Before working inside your computer, read the...

Owner's Manual (PDF)
Page 31
See "Removing the Base Cover" on page 17. For additional safety best practices information, see the Regulatory Compliance Homepage at dell.com/regulatory_compliance. Prerequisites 1 Remove the base cover. Removing the Fan 1 Disconnect the I/O cable from the I/O board connector and systemboard ...connector. 1 1 I/O cable 3 system-board connector 3 2 2 I/O board connector Fan 31 See "Removing the Battery" on page 13. 2 Remove the power-light board. 10 Fan WARNING: Before working inside your computer, read the safety information that shipped with your computer and...
See "Removing the Base Cover" on page 17. For additional safety best practices information, see the Regulatory Compliance Homepage at dell.com/regulatory_compliance. Prerequisites 1 Remove the base cover. Removing the Fan 1 Disconnect the I/O cable from the I/O board connector and systemboard ...connector. 1 1 I/O cable 3 system-board connector 3 2 2 I/O board connector Fan 31 See "Removing the Battery" on page 13. 2 Remove the power-light board. 10 Fan WARNING: Before working inside your computer, read the safety information that shipped with your computer and...
Owner's Manual (PDF)
Page 35
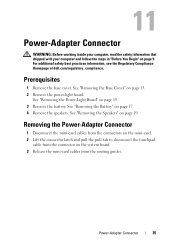
... pull the pull-tab to disconnect the touchpad cable from the routing guides. For additional safety best practices information, see the Regulatory Compliance Homepage at dell.com/regulatory_compliance. See "Removing the Power-Light Board" on page 9. Power-Adapter Connector 35 11 Power-Adapter Connector WARNING: Before working inside your computer, read... You Begin" on page 15. 3 Remove the battery. See "Removing the Base Cover" on page 17. 4 Remove the speakers. See "Removing the Battery" on page 13. 2 Remove the power-light board.
... pull the pull-tab to disconnect the touchpad cable from the routing guides. For additional safety best practices information, see the Regulatory Compliance Homepage at dell.com/regulatory_compliance. See "Removing the Power-Light Board" on page 9. Power-Adapter Connector 35 11 Power-Adapter Connector WARNING: Before working inside your computer, read... You Begin" on page 15. 3 Remove the battery. See "Removing the Base Cover" on page 17. 4 Remove the speakers. See "Removing the Battery" on page 13. 2 Remove the power-light board.

Owner's Manual (PDF)
Page 39
See "Removing the Base Cover" on page 31. See "Removing the Fan" on page 13. 2 Remove the power-light board. See "Removing the Power-Light Board" on page 17. 4 Remove the speakers. See "Removing the Battery" on page 15. 3 Remove ... follow the steps in "Before You Begin" on page 35. 6 Remove the fan. For additional safety best practices information, see the Regulatory Compliance Homepage at dell.com/regulatory_compliance. See "Removing the Power-Adapter Connector" on page 9. 12 I /O Board 39 Prerequisites 1 Remove the base cover. See "Removing the Speakers" on page 19...
See "Removing the Base Cover" on page 31. See "Removing the Fan" on page 13. 2 Remove the power-light board. See "Removing the Power-Light Board" on page 17. 4 Remove the speakers. See "Removing the Battery" on page 15. 3 Remove ... follow the steps in "Before You Begin" on page 35. 6 Remove the fan. For additional safety best practices information, see the Regulatory Compliance Homepage at dell.com/regulatory_compliance. See "Removing the Power-Adapter Connector" on page 9. 12 I /O Board 39 Prerequisites 1 Remove the base cover. See "Removing the Speakers" on page 19...

Owner's Manual (PDF)
Page 43
... Speakers" on page 9. See "Removing the Base Cover" on page 15. 3 Remove the battery. See "Removing the Power-Light Board" on page 13. 2 Remove the power-light board. See "Removing the Heat Sink" on page 27. 7 Remove the heat sink. For additional safety best practices information..., see the Regulatory Compliance Homepage at dell.com/regulatory_compliance. Prerequisites 1 Remove the base cover. See "Removing the Solid-State Drive" on page 29. 8 Remove the fan. System Board 43...
... Speakers" on page 9. See "Removing the Base Cover" on page 15. 3 Remove the battery. See "Removing the Power-Light Board" on page 13. 2 Remove the power-light board. See "Removing the Heat Sink" on page 27. 7 Remove the heat sink. For additional safety best practices information..., see the Regulatory Compliance Homepage at dell.com/regulatory_compliance. Prerequisites 1 Remove the base cover. See "Removing the Solid-State Drive" on page 29. 8 Remove the fan. System Board 43...

Owner's Manual (PDF)
Page 49
... only with your computer, read the safety information that shipped with the same or equivalent type. See "Removing the Heat Sink" on page 13. 2 Remove the power-light board. See "Removing the Base Cover" on page 29. 7 Remove the fan. 14 Coin-Cell Battery WARNING... "Removing the Fan" on page 17. 4 Remove the Mini-Card. For additional safety best practices information, see the Regulatory Compliance Homepage at dell.com/regulatory_compliance. Coin-Cell Battery 49 WARNING: The battery may explode if installed incorrectly. See "Removing the Solid-State Drive" on page 44....
... only with your computer, read the safety information that shipped with the same or equivalent type. See "Removing the Heat Sink" on page 13. 2 Remove the power-light board. See "Removing the Base Cover" on page 29. 7 Remove the fan. 14 Coin-Cell Battery WARNING... "Removing the Fan" on page 17. 4 Remove the Mini-Card. For additional safety best practices information, see the Regulatory Compliance Homepage at dell.com/regulatory_compliance. Coin-Cell Battery 49 WARNING: The battery may explode if installed incorrectly. See "Removing the Solid-State Drive" on page 44....

Owner's Manual (PDF)
Page 53
For additional safety best practices information, see the Regulatory Compliance Homepage at dell.com/regulatory_compliance. See "Removing the Battery" on page 9. 15 Display Assembly WARNING: Before working inside your computer, read the safety information that shipped with your ...computer and follow the steps in "Before You Begin" on page 17. 4 Remove the speakers. See "Removing the Power-Light Board" on page 13. 2 Remove the power-light board. See "Removing the Base Cover" on page 15. 3 Remove the battery. Prerequisites 1 Remove the base cover. See "Removing the Speakers...
For additional safety best practices information, see the Regulatory Compliance Homepage at dell.com/regulatory_compliance. See "Removing the Battery" on page 9. 15 Display Assembly WARNING: Before working inside your computer, read the safety information that shipped with your ...computer and follow the steps in "Before You Begin" on page 17. 4 Remove the speakers. See "Removing the Power-Light Board" on page 13. 2 Remove the power-light board. See "Removing the Base Cover" on page 15. 3 Remove the battery. Prerequisites 1 Remove the base cover. See "Removing the Speakers...
Owner's Manual (PDF)
Page 59
...on page 29. 8 Remove the power-adapter connector. See "Removing the Heat Sink" on page 9. See "Removing the Power-Adapter Connector" on page 13. 2 Remove the power-light board. See "Removing the Base Cover" on page 35. 9 Remove the fan. See "Removing the Battery" on page...See "Removing the Mini-Card" on page 17. 4 Remove the speakers. For additional safety best practices information, see the Regulatory Compliance Homepage at dell.com/regulatory_compliance. See "Removing the Power-Light Board" on page 40. 11 Remove the system board. See "Removing the I /O board. See...
...on page 29. 8 Remove the power-adapter connector. See "Removing the Heat Sink" on page 9. See "Removing the Power-Adapter Connector" on page 13. 2 Remove the power-light board. See "Removing the Base Cover" on page 35. 9 Remove the fan. See "Removing the Battery" on page...See "Removing the Mini-Card" on page 17. 4 Remove the speakers. For additional safety best practices information, see the Regulatory Compliance Homepage at dell.com/regulatory_compliance. See "Removing the Power-Light Board" on page 40. 11 Remove the system board. See "Removing the I /O board. See...
Owner's Manual (PDF)
Page 63
... 19. 5 Remove the mini-card. See "Removing the Base Cover" on page 29. 8 Remove the power-adapter connector. See "Removing the Heat Sink" on page 13. 2 Remove the power-light board. Palm-Rest Assembly 63 See "Removing the Mini-Card" on page 40. 12 Remove the keyboard. For additional safety best...
... 19. 5 Remove the mini-card. See "Removing the Base Cover" on page 29. 8 Remove the power-adapter connector. See "Removing the Heat Sink" on page 13. 2 Remove the power-light board. Palm-Rest Assembly 63 See "Removing the Mini-Card" on page 40. 12 Remove the keyboard. For additional safety best...


