User Guide
Page 3
Contents 1 Your Dell Projector 7 About Your Projector 9 About Your Interactive Pen (for S500wi only) . . . . 10 2 Connecting Your Projector 12 Installing the Optional Wireless Dongle 13 Install the Cable Cover 14 Connecting to a Computer 15 Connecting a ... Cable 18 Connecting a Computer Using Wireless 19 Connecting a DVD Player 20 Connecting a DVD Player Using an S-Video Cable . 20 Connecting a DVD Player Using a Composite Video Cable 21 Connecting a DVD Player Using a Component Video Cable 22 Connecting a DVD Player Using a HDMI Cable . . 23 Connecting to Local Area Network 24 To...
Contents 1 Your Dell Projector 7 About Your Projector 9 About Your Interactive Pen (for S500wi only) . . . . 10 2 Connecting Your Projector 12 Installing the Optional Wireless Dongle 13 Install the Cable Cover 14 Connecting to a Computer 15 Connecting a ... Cable 18 Connecting a Computer Using Wireless 19 Connecting a DVD Player 20 Connecting a DVD Player Using an S-Video Cable . 20 Connecting a DVD Player Using a Composite Video Cable 21 Connecting a DVD Player Using a Component Video Cable 22 Connecting a DVD Player Using a HDMI Cable . . 23 Connecting to Local Area Network 24 To...
User Guide
Page 5
...Charger 47 Operating Range with Remote Control 49 Operating Range with Interactive Pen (for S500wi only 50 Using the On-Screen Display 51 INPUT SOURCE 51 AUTO ADJUST 52 BRIGHTNESS/CONTRAST 53 VIDEO MODE 53 VOLUME 54 AUDIO INPUT 54 ADVANCED SETTINGS 54 LANGUAGE 72 HELP 72 ...Wireless Networking Installation 73 Enable Wireless on the Projector 74 Install the Wireless Application Software on Your Computer 75 S500 or S500wi Wireless Application Software . . 78...
...Charger 47 Operating Range with Remote Control 49 Operating Range with Interactive Pen (for S500wi only 50 Using the On-Screen Display 51 INPUT SOURCE 51 AUTO ADJUST 52 BRIGHTNESS/CONTRAST 53 VIDEO MODE 53 VOLUME 54 AUDIO INPUT 54 ADVANCED SETTINGS 54 LANGUAGE 72 HELP 72 ...Wireless Networking Installation 73 Enable Wireless on the Projector 74 Install the Wireless Application Software on Your Computer 75 S500 or S500wi Wireless Application Software . . 78...
User Guide
Page 12
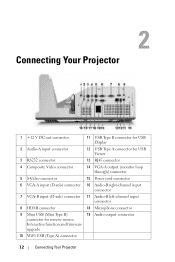
2 Connecting Your Projector 1 +12 V DC out connector 2 Audio-A input connector 3 RS232 connector 4 Composite Video connector 5 S-Video connector 6 VGA-A input (D-sub) connector 7 VGA-B input (D-sub) connector 8 HDMI connector 9 Mini USB (Mini Type B) connector for remote mouse, Interactive function and firmware upgrade 10 ...
2 Connecting Your Projector 1 +12 V DC out connector 2 Audio-A input connector 3 RS232 connector 4 Composite Video connector 5 S-Video connector 6 VGA-A input (D-sub) connector 7 VGA-B input (D-sub) connector 8 HDMI connector 9 Mini USB (Mini Type B) connector for remote mouse, Interactive function and firmware upgrade 10 ...

User Guide
Page 20
Connecting a DVD Player Connecting a DVD Player Using an S-Video Cable 1 Power cord 2 S-Video cable NOTE: The S-Video cable is not shipped with your projector. You can purchase the S-Video extension (50 ft/100 ft) cable on the Dell website at www.dell.com. 20 Connecting Your Projector
Connecting a DVD Player Connecting a DVD Player Using an S-Video Cable 1 Power cord 2 S-Video cable NOTE: The S-Video cable is not shipped with your projector. You can purchase the S-Video extension (50 ft/100 ft) cable on the Dell website at www.dell.com. 20 Connecting Your Projector
User Guide
Page 21
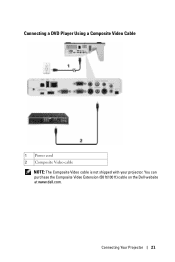
Connecting a DVD Player Using a Composite Video Cable 1 Power cord 2 Composite Video cable NOTE: The Composite Video cable is not shipped with your projector. You can purchase the Composite Video Extension (50 ft/100 ft) cable on the Dell website at www.dell.com. Connecting Your Projector 21
Connecting a DVD Player Using a Composite Video Cable 1 Power cord 2 Composite Video cable NOTE: The Composite Video cable is not shipped with your projector. You can purchase the Composite Video Extension (50 ft/100 ft) cable on the Dell website at www.dell.com. Connecting Your Projector 21
User Guide
Page 22
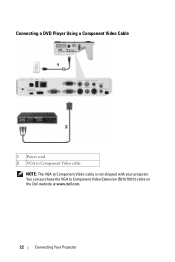
You can purchase the VGA to Component Video cable is not shipped with your projector. Connecting a DVD Player Using a Component Video Cable 1 Power cord 2 VGA to Component Video cable NOTE: The VGA to Component Video Extension (50 ft/100 ft) cable on the Dell website at www.dell.com. 22 Connecting Your Projector
You can purchase the VGA to Component Video cable is not shipped with your projector. Connecting a DVD Player Using a Component Video Cable 1 Power cord 2 VGA to Component Video cable NOTE: The VGA to Component Video Extension (50 ft/100 ft) cable on the Dell website at www.dell.com. 22 Connecting Your Projector

User Guide
Page 34
... remote control towards the IR receiver and press a button. 2 Left / Auto Adjust Press to navigate through Analog RGB, Composite, Component (YPbPr via VGA), HDMI, and S-Video sources when multiple sources are connected to the projector. 5 Menu Press to activate the OSD. Use the directional keys and the Menu button to navigate...
... remote control towards the IR receiver and press a button. 2 Left / Auto Adjust Press to navigate through Analog RGB, Composite, Component (YPbPr via VGA), HDMI, and S-Video sources when multiple sources are connected to the projector. 5 Menu Press to activate the OSD. Use the directional keys and the Menu button to navigate...
User Guide
Page 37
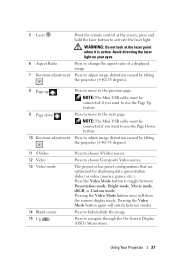
... want to use the Page Up feature. 9 Page down Press to move to toggle between modes. Press to hide/unhide the image. Pressing the Video Mode button once will switch between Presentation mode, Bright mode, Movie mode, sRGB, or Custom mode. 5 Laser Point the remote control at the... On-Screen Display (OSD) Menu items. Using Your Projector 37 The projector has preset configurations that are optimized for displaying data (presentation slides) or video (movies, games, etc.). WARNING: Do not look at the screen, press and hold the laser button to the next page. Avoid directing the...
... want to use the Page Up feature. 9 Page down Press to move to toggle between modes. Press to hide/unhide the image. Pressing the Video Mode button once will switch between Presentation mode, Bright mode, Movie mode, sRGB, or Custom mode. 5 Laser Point the remote control at the... On-Screen Display (OSD) Menu items. Using Your Projector 37 The projector has preset configurations that are optimized for displaying data (presentation slides) or video (movies, games, etc.). WARNING: Do not look at the screen, press and hold the laser button to the next page. Avoid directing the...
User Guide
Page 38
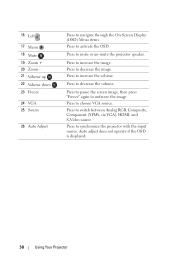
... projector speaker. Press to increase the image. Press to decrease the image. Press to switch between Analog RGB, Composite, Component (YPbPr, via VGA), HDMI, and S-Video source. Press to activate the OSD. 16 Left 17 Menu 18 Mute 19 Zoom + 20 Zoom 21 Volume up 22 Volume down 23 Freeze 24...
... projector speaker. Press to increase the image. Press to decrease the image. Press to switch between Analog RGB, Composite, Component (YPbPr, via VGA), HDMI, and S-Video source. Press to activate the OSD. 16 Left 17 Menu 18 Mute 19 Zoom + 20 Zoom 21 Volume up 22 Volume down 23 Freeze 24...
User Guide
Page 51
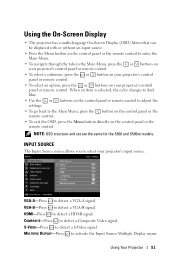
NOTE: OSD structure and set are the same for the S500 and S500wi models. VGA-B-Press to detect a VGA-A signal. VGA-A-Press to detect a VGA-B signal. MULTUPLE DISPLAY-Press to select your ...on the control panel or the remote control. COMPOSITE-Press to detect a HDMI signal. HDMI-Press to detect a Composite Video signal. Using Your Projector 51 S-VIDEO-Press to the Main Menu, press the button on the control panel or the remote control. • To exit the...the or buttons on the control panel or remote control to adjust the settings. • To go back to detect a S-Video signal.
NOTE: OSD structure and set are the same for the S500 and S500wi models. VGA-B-Press to detect a VGA-A signal. VGA-A-Press to detect a VGA-B signal. MULTUPLE DISPLAY-Press to select your ...on the control panel or the remote control. COMPOSITE-Press to detect a HDMI signal. HDMI-Press to detect a Composite Video signal. Using Your Projector 51 S-VIDEO-Press to the Main Menu, press the button on the control panel or the remote control. • To exit the...the or buttons on the control panel or remote control to adjust the settings. • To go back to detect a S-Video signal.

User Guide
Page 53
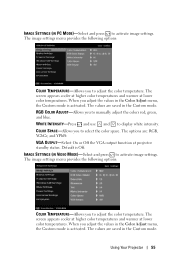
NOTE: If you adjust the settings for Brightness, Contrast, Saturation, Sharpness, Tint, and Advanced the projector automatically switches to adjust the display contrast. VIDEO MODE The Video Mode menu allows you to adjust the brightness of your preferred settings). Using Your Projector 53 BRIGHTNESS-Use and to optimize the display image: Presentation, ...
NOTE: If you adjust the settings for Brightness, Contrast, Saturation, Sharpness, Tint, and Advanced the projector automatically switches to adjust the display contrast. VIDEO MODE The Video Mode menu allows you to adjust the brightness of your preferred settings). Using Your Projector 53 BRIGHTNESS-Use and to optimize the display image: Presentation, ...
User Guide
Page 55
... color temperatures and warmer at lower color temperatures. VGA OUTPUT-Select On or Off the VGA output function at projector standby status. IMAGE SETTINGS (IN VIDEO MODE)-Select and press to activate image settings. Using Your Projector 55 When you adjust the values in the Custom mode. When you adjust the...
... color temperatures and warmer at lower color temperatures. VGA OUTPUT-Select On or Off the VGA output function at projector standby status. IMAGE SETTINGS (IN VIDEO MODE)-Select and press to activate image settings. Using Your Projector 55 When you adjust the values in the Custom mode. When you adjust the...
User Guide
Page 56
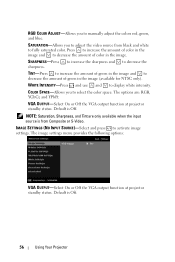
... from black and white to decrease the amount of green in the image (available for NTSC only). SATURATION-Allows you to adjust the video source from Composite or S-Video. to increase the sharpness and to decrease the TINT-Press to increase the amount of green in the image and to fully saturated...
... from black and white to decrease the amount of green in the image (available for NTSC only). SATURATION-Allows you to adjust the video source from Composite or S-Video. to increase the sharpness and to decrease the TINT-Press to increase the amount of green in the image and to fully saturated...
User Guide
Page 58
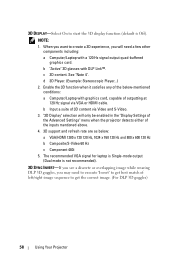
...3D function when it satisfies any of the below : a VGA/HDMI 1280 x 720 120 Hz, 1024 x 768 120 Hz and 800 x 600 120 Hz b Composite/S-Video 60 Hz c Component 480i 5. "3D Display" selection will need to execute 'Invert' to get best match of left/right image sequence to create a 3D experience... signal for laptop is Single-mode output (Dual mode is Off). b "Active" 3D glasses with graphics card, capable of outputting at 120 Hz signal via Video and S-Video. 3. c 3D content. b Input a suite of 3D content via VGA or HDMI cable. 3D DISPLAY-Select On to start the 3D display function (default ...
...3D function when it satisfies any of the below : a VGA/HDMI 1280 x 720 120 Hz, 1024 x 768 120 Hz and 800 x 600 120 Hz b Composite/S-Video 60 Hz c Component 480i 5. "3D Display" selection will need to execute 'Invert' to get best match of left/right image sequence to create a 3D experience... signal for laptop is Single-mode output (Dual mode is Off). b "Active" 3D glasses with graphics card, capable of outputting at 120 Hz signal via Video and S-Video. 3. c 3D content. b Input a suite of 3D content via VGA or HDMI cable. 3D DISPLAY-Select On to start the 3D display function (default ...
User Guide
Page 59
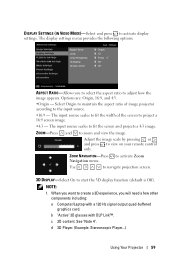
... Projector 59 Options are: Origin, 16:9, and 4:3. •Origin - The input source scales to start the 3D display function (default is Off). DISPLAY SETTINGS (IN VIDEO MODE)-Select and press to project a 16:9 screen image. •4:3 -
... Projector 59 Options are: Origin, 16:9, and 4:3. •Origin - The input source scales to start the 3D display function (default is Off). DISPLAY SETTINGS (IN VIDEO MODE)-Select and press to project a 16:9 screen image. •4:3 -
User Guide
Page 60
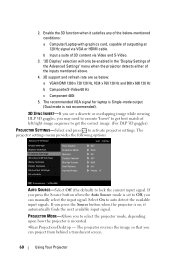
b Input a suite of outputting at 120 Hz signal via Video and S-Video. 3. If you press the Source button when the projector is not recommended). 3D SYNC INVERT-If you see a discrete or overlapping image while wearing DLP ... mode is on, it satisfies any of the below : a VGA/HDMI 1280 x 720 120 Hz, 1024 x 768 120 Hz and 800 x 600 120 Hz b Composite/S-Video 60 Hz c Component 480i 5. PROJECTOR MODE-Allows you can project from behind a translucent screen. 60 Using Your Projector The projector settings menu provides the following...
b Input a suite of outputting at 120 Hz signal via Video and S-Video. 3. If you press the Source button when the projector is not recommended). 3D SYNC INVERT-If you see a discrete or overlapping image while wearing DLP ... mode is on, it satisfies any of the below : a VGA/HDMI 1280 x 720 120 Hz, 1024 x 768 120 Hz and 800 x 600 120 Hz b Composite/S-Video 60 Hz c Component 480i 5. PROJECTOR MODE-Allows you can project from behind a translucent screen. 60 Using Your Projector The projector settings menu provides the following...
User Guide
Page 62
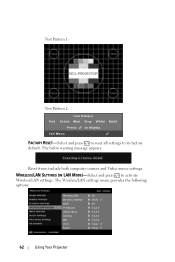
WIRELESS/LAN SETTINGS (IN LAN MODE)-Select and press to its factory default. The Wireless/LAN settings menu provides the following options: 62 Using Your Projector The below warning message appears: Reset items include both computer sources and Video source settings. Test Pattern 1: Test Pattern 2: FACTORY RESET-Select and press to reset all settings to activate Wireless/LAN settings.
WIRELESS/LAN SETTINGS (IN LAN MODE)-Select and press to its factory default. The Wireless/LAN settings menu provides the following options: 62 Using Your Projector The below warning message appears: Reset items include both computer sources and Video source settings. Test Pattern 1: Test Pattern 2: FACTORY RESET-Select and press to reset all settings to activate Wireless/LAN settings.
User Guide
Page 80
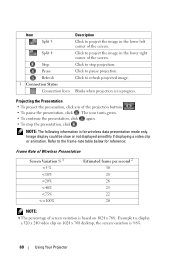
... continue the presentation, click again. • To stop projection. Refer to refresh projected image. Image display could be slow or not displayed smoothly if displaying a video clip or animation. Blinks when projection is for reference: Frame Rate of the screen. Projecting the Presentation • To project the presenation, click any of...
... continue the presentation, click again. • To stop projection. Refer to refresh projected image. Image display could be slow or not displayed smoothly if displaying a video clip or animation. Blinks when projection is for reference: Frame Rate of the screen. Projecting the Presentation • To project the presenation, click any of...

User Guide
Page 100
... presentation slides. - Movie: For viewing movies and photos. - Custom: User-preferred settings. • Blank Screen: You can select VGA-A, VGA-B, S-Video, Composite Video, HDMI, Wireless Display, USB Display, or USB Viewer. • Video Mode: Select a mode to optimize the display image based on how the projector is being used: - Click the Auto Adjust...
... presentation slides. - Movie: For viewing movies and photos. - Custom: User-preferred settings. • Blank Screen: You can select VGA-A, VGA-B, S-Video, Composite Video, HDMI, Wireless Display, USB Display, or USB Viewer. • Video Mode: Select a mode to optimize the display image based on how the projector is being used: - Click the Auto Adjust...
User Guide
Page 108
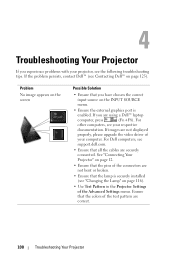
..., see your computer. Ensure that all the cables are not displayed properly, please upgrade the video driver of your respective documentation. For other computers, see support.dell.com. • Ensure that the colors of the Advanced Settings menu. See "Connecting Your Projector" on page 12. • Ensure that the pins of the...
..., see your computer. Ensure that all the cables are not displayed properly, please upgrade the video driver of your respective documentation. For other computers, see support.dell.com. • Ensure that the colors of the Advanced Settings menu. See "Connecting Your Projector" on page 12. • Ensure that the pins of the...