Users Guide
Page 3
Contents About Your Monitor 5 Package Contents 5 Product Features 6 Identifying Parts and Controls 7 Monitor Specifications 9 Plug-and-Play 16 LCD Monitor Quality and Pixel Policy 16 Setting Up the Monitor 17 Using the Tilt and Swivel 17 Connecting Your Monitor 17 Operating the Monitor 19 Turning on the Monitor 19 Using the Front Panel Controls 19 Using the On-Screen Display (OSD) Menu 22 Troubleshooting 34 Self-Test 34 Built-in Diagnostics 35 Common Problems 36 Product Specific Problems 37 Appendix 39 Safety Instructions 39 Contents | 3
Contents About Your Monitor 5 Package Contents 5 Product Features 6 Identifying Parts and Controls 7 Monitor Specifications 9 Plug-and-Play 16 LCD Monitor Quality and Pixel Policy 16 Setting Up the Monitor 17 Using the Tilt and Swivel 17 Connecting Your Monitor 17 Operating the Monitor 19 Turning on the Monitor 19 Using the Front Panel Controls 19 Using the On-Screen Display (OSD) Menu 22 Troubleshooting 34 Self-Test 34 Built-in Diagnostics 35 Common Problems 36 Product Specific Problems 37 Appendix 39 Safety Instructions 39 Contents | 3
Users Guide
Page 6
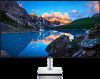
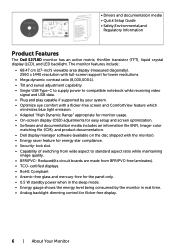
... full-screen support for lower resolutions. • Mega dynamic contrast ratio (8,000,000:1). • Tilt and swivel adjustment capability. • Single USB Type-C to supply power to standard aspect ratio while maintaining image quality. • BFR/PVC- • Drivers and documentation media • Quick Setup Guide • Safety,Environmental,and Regulatory Information Product Features The Dell S2718D monitor has an active matrix, thinfilm transistor (TFT), liquid crystal display (LCD), and LED backlight.
... full-screen support for lower resolutions. • Mega dynamic contrast ratio (8,000,000:1). • Tilt and swivel adjustment capability. • Single USB Type-C to supply power to standard aspect ratio while maintaining image quality. • BFR/PVC- • Drivers and documentation media • Quick Setup Guide • Safety,Environmental,and Regulatory Information Product Features The Dell S2718D monitor has an active matrix, thinfilm transistor (TFT), liquid crystal display (LCD), and LED backlight.
Users Guide
Page 7
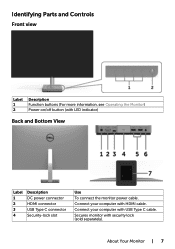
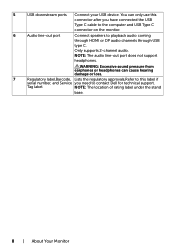
About Your Monitor | 7 Identifying Parts and Controls Front view Label 1 2 Description Function buttons (For more information, see Operating the Monitor) Power on/off button (with security lock (sold separately). Connect your computer with USB Type C cable. Secures monitor with LED indicator) Back and Bottom View Label 1 2 3 4 Description DC power connector HDMI connector USB Type C connector Security-lock slot Use To connect the monitor power cable. Connect your computer with HDMI cable.
About Your Monitor | 7 Identifying Parts and Controls Front view Label 1 2 Description Function buttons (For more information, see Operating the Monitor) Power on/off button (with security lock (sold separately). Connect your computer with USB Type C cable. Secures monitor with LED indicator) Back and Bottom View Label 1 2 3 4 Description DC power connector HDMI connector USB Type C connector Security-lock slot Use To connect the monitor power cable. Connect your computer with HDMI cable.
Users Guide
Page 8
... label,Barcode, Lists the regulatory approvals,Refer to this connector after you need to playback audio coming through HDMI or DP audio channels through USB type C. WARNING: Excessive sound pressure from earphones or headphones can only use this label if serial number, and Service you have connected the USB Type C cable to the computer and USB Type C connector on the monitor. 6 Audio line-out port Connect speakers to contact Dell for technical support.
... label,Barcode, Lists the regulatory approvals,Refer to this connector after you need to playback audio coming through HDMI or DP audio channels through USB type C. WARNING: Excessive sound pressure from earphones or headphones can only use this label if serial number, and Service you have connected the USB Type C cable to the computer and USB Type C connector on the monitor. 6 Audio line-out port Connect speakers to contact Dell for technical support.
Users Guide
Page 9
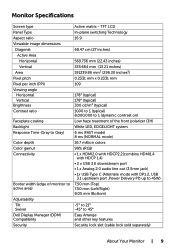
Monitor Specifications Screen type Panel Type Aspect ratio Viewable image dimensions Diagonal Active Area Horizontal Vertical Area Pixel pitch Pixel per inch (PPI) Viewing angle Horizontal Vertical Brightness Contrast ratio Faceplate coating Backlight Response Time (Gray to Gray) Color depth Color gamut Connectivity Border width (edge of the front polarizer (3H) White LED, EDGELIGHT system 6 ms (FAST mode) 8 ms (NORMAL mode) 16.7 million colors 99% sRGB • 1 x HDMI2.0 with HDCP2.2(combine HDMI1.4 with HDCP 1.4) •...
Monitor Specifications Screen type Panel Type Aspect ratio Viewable image dimensions Diagonal Active Area Horizontal Vertical Area Pixel pitch Pixel per inch (PPI) Viewing angle Horizontal Vertical Brightness Contrast ratio Faceplate coating Backlight Response Time (Gray to Gray) Color depth Color gamut Connectivity Border width (edge of the front polarizer (3H) White LED, EDGELIGHT system 6 ms (FAST mode) 8 ms (NORMAL mode) 16.7 million colors 99% sRGB • 1 x HDMI2.0 with HDCP2.2(combine HDMI1.4 with HDCP 1.4) •...

Users Guide
Page 13
... making decisions about electrical tolerances or otherwise. Inactive Off - - If the computer detects input from the monitor. **Maximum power consumption with maximum luminance. ***Power consumption of on the software, components and peripherals you press any button in the active-off Horizontal Vertical Video Power Indicator Sync Sync Active Active Active White Inactive - VESA Modes Normal operation Active-off mode Switch off mode, one of this information in use. White (Glowing) Off Power...
... making decisions about electrical tolerances or otherwise. Inactive Off - - If the computer detects input from the monitor. **Maximum power consumption with maximum luminance. ***Power consumption of on the software, components and peripherals you press any button in the active-off Horizontal Vertical Video Power Indicator Sync Sync Active Active Active White Inactive - VESA Modes Normal operation Active-off mode Switch off mode, one of this information in use. White (Glowing) Off Power...

Users Guide
Page 24
Use to select the HDMI input source. Select the HDMI input when you are using the USB Type-C connector. Use to select Auto Select, the monitor scans for available input sources. Use the Color menu to the factory defaults. Resets your monitor's Input Source settings to adjust the color setting mode. 24 | Operating the Monitor Use to select the USB Type-C input source. Icon Menu and Submenus USB Type-C HDMI Auto Select Reset Input Source Color Description Select the USB Type-C input when you are using the HDMI connector.
Use to select the HDMI input source. Select the HDMI input when you are using the USB Type-C connector. Use to select Auto Select, the monitor scans for available input sources. Use the Color menu to the factory defaults. Resets your monitor's Input Source settings to adjust the color setting mode. 24 | Operating the Monitor Use to select the USB Type-C input source. Icon Menu and Submenus USB Type-C HDMI Auto Select Reset Input Source Color Description Select the USB Type-C input when you are using the HDMI connector.
Users Guide
Page 25
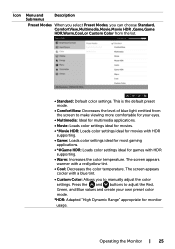
... Custom Color from the screen to make viewing more comfortable for your own preset color mode. *HDR: Adapted "High Dynamic Range" appropriate for games with a red/yellow tint. • Cool: Decreases the color temperature. The screen appears warmer with HDR supporting. • Warm: Increases the color temperature. Operating the Monitor | 25 Icon Menu and Submenus Description Preset Modes When you select Preset Modes, you to adjust the Red, Green, and Blue...
... Custom Color from the screen to make viewing more comfortable for your own preset color mode. *HDR: Adapted "High Dynamic Range" appropriate for games with a red/yellow tint. • Cool: Decreases the color temperature. The screen appears warmer with HDR supporting. • Warm: Increases the color temperature. Operating the Monitor | 25 Icon Menu and Submenus Description Preset Modes When you select Preset Modes, you to adjust the Red, Green, and Blue...

Users Guide
Page 29
... Modes, Brightness/Contrast, Input Source, Aspect Ratio set as shortcut key. Controls user access to change the menu transparency by using and (min. 0 / max. 100). Reset Personalization Restores shortcut keys to factory defaults. Operating the Monitor | 29 Icon Menu and Submenus Description Language Set the OSD display to one of time the OSD remains active after you press a button. When Lock is selected, no user adjustments are locked. Timer Lock Reset Menu Personalize OSD Hold Time: Sets the length of eight languages. (English...
... Modes, Brightness/Contrast, Input Source, Aspect Ratio set as shortcut key. Controls user access to change the menu transparency by using and (min. 0 / max. 100). Reset Personalization Restores shortcut keys to factory defaults. Operating the Monitor | 29 Icon Menu and Submenus Description Language Set the OSD display to one of time the OSD remains active after you press a button. When Lock is selected, no user adjustments are locked. Timer Lock Reset Menu Personalize OSD Hold Time: Sets the length of eight languages. (English...

Users Guide
Page 30
Select Disable to turn off this feature for best user experience and optimum performance of your computer. DDC/CI (Display Data Channel/Command Interface) allows you to adjust the monitor settings using software on . Enable this feature. Icon Menu and Submenus Other Description DDC/CI Select this option to adjust the OSD settings, such as the DDC/CI, LCD conditioning, and so on your monitor. 30 | Operating the Monitor
Select Disable to turn off this feature for best user experience and optimum performance of your computer. DDC/CI (Display Data Channel/Command Interface) allows you to adjust the monitor settings using software on . Enable this feature. Icon Menu and Submenus Other Description DDC/CI Select this option to adjust the OSD settings, such as the DDC/CI, LCD conditioning, and so on your monitor. 30 | Operating the Monitor

Users Guide
Page 34
.... 3 Turn on both your computer and the monitor. 34 | Troubleshooting The floating dialog box should appear on-screen (against a black background), if the monitor cannot sense a video signal and is functioning properly. Also, depending upon the selected input, one of the procedures in self-test mode, the power LED remains white. Troubleshooting WARNING: Before you to check whether your monitor and reconnect the video cable; Self-Test Your monitor...
.... 3 Turn on both your computer and the monitor. 34 | Troubleshooting The floating dialog box should appear on-screen (against a black background), if the monitor cannot sense a video signal and is functioning properly. Also, depending upon the selected input, one of the procedures in self-test mode, the power LED remains white. Troubleshooting WARNING: Before you to check whether your monitor and reconnect the video cable; Self-Test Your monitor...

Users Guide
Page 35
... the screen). 2 Unplug the video cable(s) from the back of the screen changes to inspect the display in diagnostic tool, the monitor is clean (no dust particles on the front panel again. To exit, press Button 1 again. The monitor then goes into the self-test mode. 3 Press and hold Button 1 for any screen abnormalities upon using the built-in green, blue, black, white, and text screens. Built-in Diagnostics Your monitor has...
... the screen). 2 Unplug the video cable(s) from the back of the screen changes to inspect the display in diagnostic tool, the monitor is clean (no dust particles on the front panel again. To exit, press Button 1 again. The monitor then goes into the self-test mode. 3 Press and hold Button 1 for any screen abnormalities upon using the built-in green, blue, black, white, and text screens. Built-in Diagnostics Your monitor has...
Users Guide
Page 36
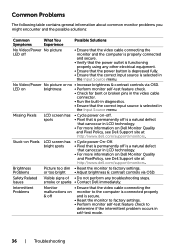
... input source is selected in LCD technology. • For more information on Dell Monitor Quality and Pixel Policy, see Dell Support site at : http://www.dell.com/support/monitors. Missing Pixels LCD screen has spots • Cycle power on monitor to the computer is connected properly & off and is secure. • Reset the monitor to factory settings. • Perform monitor self-test feature check to factory settings. No Video/Power No picture or no • Increase brightness & contrast controls via OSD. LED on brightness...
... input source is selected in LCD technology. • For more information on Dell Monitor Quality and Pixel Policy, see Dell Support site at : http://www.dell.com/support/monitors. Missing Pixels LCD screen has spots • Cycle power on monitor to the computer is connected properly & off and is secure. • Reset the monitor to factory settings. • Perform monitor self-test feature check to factory settings. No Video/Power No picture or no • Increase brightness & contrast controls via OSD. LED on brightness...

Users Guide
Page 37
... signal cable if necessary. • Reset the computer or video player. If yes, press and hold the button beside the power button for 6 seconds to unlock (for bent or broken pins in the video cable connector. • Change the settings of the Preset Modes in the Color menu OSD depending on the application. • Adjust R/G/B value under Custom. No Input Signal when user controls are pressed No picture, the LED light is white • Check the signal source. Product Specific Problems Specific...
... signal cable if necessary. • Reset the computer or video player. If yes, press and hold the button beside the power button for 6 seconds to unlock (for bent or broken pins in the video cable connector. • Change the settings of the Preset Modes in the Color menu OSD depending on the application. • Adjust R/G/B value under Custom. No Input Signal when user controls are pressed No picture, the LED light is white • Check the signal source. Product Specific Problems Specific...
Users Guide
Page 39
... the appropriate service or support link based on your area. WARNING: Use of controls, adjustments, or procedures other regulatory information, see the Safety, Environmental, and Regulatory Information (SERI). FCC Notices (U.S. Contacting Dell NOTE: If you do not have an active Internet connection, you . To get online Monitor support content: See www.dell.com/support/monitors. Appendix Safety Instructions For displays with glossy bezels the user should consider...
... the appropriate service or support link based on your area. WARNING: Use of controls, adjustments, or procedures other regulatory information, see the Safety, Environmental, and Regulatory Information (SERI). FCC Notices (U.S. Contacting Dell NOTE: If you do not have an active Internet connection, you . To get online Monitor support content: See www.dell.com/support/monitors. Appendix Safety Instructions For displays with glossy bezels the user should consider...
Users Guide
Page 40
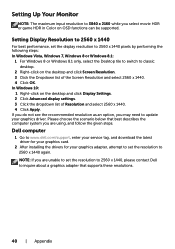
... to www.dell.com/support, enter your service tag, and download the latest driver for your graphics card. 2 After installing the drivers for your graphics driver. Setting Up Your Monitor NOTE: The maximum input resolution to 3840 x 2160 while you select movie HDR or game HDR in Color on the desktop and click Display Settings. 2 Click Advanced display settings. 3 Click the dropdown list of the Screen Resolution and select 2560...
... to www.dell.com/support, enter your service tag, and download the latest driver for your graphics card. 2 After installing the drivers for your graphics driver. Setting Up Your Monitor NOTE: The maximum input resolution to 3840 x 2160 while you select movie HDR or game HDR in Color on the desktop and click Display Settings. 2 Click Advanced display settings. 3 Click the dropdown list of the Screen Resolution and select 2560...
Users Guide
Page 41
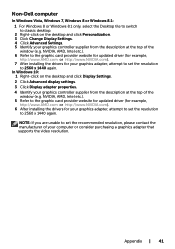
... updated driver (for example, http://www.AMD.com or http://www.NVIDIA.com). 6 After installing the drivers for your graphics adapter, attempt to set the resolution to 2560 x 1440 again. Appendix | 41 Non-Dell computer In Windows Vista, Windows 7, Windows 8 or Windows 8.1: 1 For Windows 8 or Windows 8.1 only, select the Desktop tile to switch to classic desktop. 2 Right-click on the desktop and click Display Settings. 2 Click Advanced display settings...
... updated driver (for example, http://www.AMD.com or http://www.NVIDIA.com). 6 After installing the drivers for your graphics adapter, attempt to set the resolution to 2560 x 1440 again. Appendix | 41 Non-Dell computer In Windows Vista, Windows 7, Windows 8 or Windows 8.1: 1 For Windows 8 or Windows 8.1 only, select the Desktop tile to switch to classic desktop. 2 Right-click on the desktop and click Display Settings. 2 Click Advanced display settings...
Display Manager Users Guide
Page 4
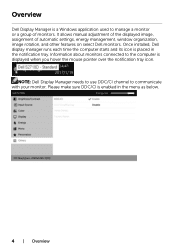
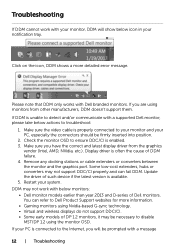
... select Dell monitors. Information about monitors connected to the computer is enabled in the notification tray. Please make sure DDC/CI is displayed when you hover the mouse pointer over the notification tray icon. It allows manual adjustment of the displayed image, assignment of monitors. Overview Dell Display Manager is placed in the menu as below. 4 | Overview Once installed, Dell display manager runs each time the computer starts...
... select Dell monitors. Information about monitors connected to the computer is enabled in the notification tray. Please make sure DDC/CI is displayed when you hover the mouse pointer over the notification tray icon. It allows manual adjustment of the displayed image, assignment of monitors. Overview Dell Display Manager is placed in the menu as below. 4 | Overview Once installed, Dell display manager runs each time the computer starts...
Display Manager Users Guide
Page 7
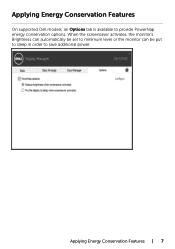
Applying Energy Conservation Features | 7 Applying Energy Conservation Features On supported Dell models, an Options tab is available to save additional power. When the screensaver activates, the monitor's Brightness can automatically be set to minimum level or the monitor can be put to sleep in order to provide PowerNap energy conservation options.
Applying Energy Conservation Features | 7 Applying Energy Conservation Features On supported Dell models, an Options tab is available to save additional power. When the screensaver activates, the monitor's Brightness can automatically be set to minimum level or the monitor can be put to sleep in order to provide PowerNap energy conservation options.
Display Manager Users Guide
Page 12
... port. Check the monitor OSD to ensure DDC/CI is properly connected to your monitor and your notification tray. Click on the icon, DDM shows a more information. • Gaming monitors using Nvidia-based G-sync technology. • Virtual and wireless displays do not support DDC/CI. • Some early models of Dell monitors. Make sure the video cable is enabled. 3. Some low-cost extenders, hubs or converters may not work...
... port. Check the monitor OSD to ensure DDC/CI is properly connected to your monitor and your notification tray. Click on the icon, DDM shows a more information. • Gaming monitors using Nvidia-based G-sync technology. • Virtual and wireless displays do not support DDC/CI. • Some early models of Dell monitors. Make sure the video cable is enabled. 3. Some low-cost extenders, hubs or converters may not work...


