User Guide
Page 1
.... disclaims any manner whatsoever without notice. © 2012 Dell Inc. is a registered trademark of Dell Inc.; Other trademarks and trade names may be used in this text: Dell and the DELL logo are trademarks of the U.S. A01 Dell™ S2240L/S2340L Monitor User's Guide About Your Monitor Setting Up the Monitor Operating the Monitor Troubleshooting Appendix Notes, Cautions, Warnings NOTE: A NOTE indicates important information that...
.... disclaims any manner whatsoever without notice. © 2012 Dell Inc. is a registered trademark of Dell Inc.; Other trademarks and trade names may be used in this text: Dell and the DELL logo are trademarks of the U.S. A01 Dell™ S2240L/S2340L Monitor User's Guide About Your Monitor Setting Up the Monitor Operating the Monitor Troubleshooting Appendix Notes, Cautions, Warnings NOTE: A NOTE indicates important information that...
User Guide
Page 4
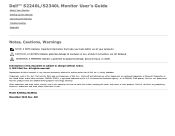
On-Screen Display (OSD) adjustments for lower resolutions. Security lock slot. Wide viewing angle to allow viewing from a sitting or standing position, or while moving from side-to-side. Product Features The Dell™ S2240L/S2340L flat panel display has an active matrix, Thin-Film Transistor, Liquid Crystal Display. S2340L: 58.42 cm (23.0 inches) viewable area display. 1,920 x 1,080 resolution, plus full-screen support for lower resolutions. Removable pedestal. Software and documentation media which includes...
On-Screen Display (OSD) adjustments for lower resolutions. Security lock slot. Wide viewing angle to allow viewing from a sitting or standing position, or while moving from side-to-side. Product Features The Dell™ S2240L/S2340L flat panel display has an active matrix, Thin-Film Transistor, Liquid Crystal Display. S2340L: 58.42 cm (23.0 inches) viewable area display. 1,920 x 1,080 resolution, plus full-screen support for lower resolutions. Removable pedestal. Software and documentation media which includes...
User Guide
Page 6
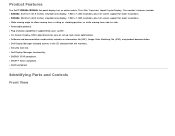
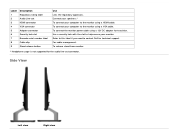
... need to the monitor using a VGA cable. Connect your speakers.* To connect your computer to help secure your computer to contact Dell for the audio line-out connector. Side View Left view Right view For cable management. To release stand from monitor. * Headphone usage is not supported for technical support. To connect the monitor power cable using a HDMI cable. Use a security lock with the slot to the monitor using a 12V DC adapter for transition. Label 1 2 3 4 5 6 7 8 9 Description Regulatory rating label Audio Line-out HDMI connector VGA connector Adapter connector...
... need to the monitor using a VGA cable. Connect your speakers.* To connect your computer to help secure your computer to contact Dell for the audio line-out connector. Side View Left view Right view For cable management. To release stand from monitor. * Headphone usage is not supported for technical support. To connect the monitor power cable using a HDMI cable. Use a security lock with the slot to the monitor using a 12V DC adapter for transition. Label 1 2 3 4 5 6 7 8 9 Description Regulatory rating label Audio Line-out HDMI connector VGA connector Adapter connector...
User Guide
Page 7
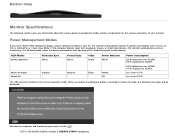
... not in use. Bottom View Monitor Specifications The following sections give you have VESA's DPM compliance display card or software installed in your monitor. Vertical Sync Active Video Active Inactive - Power Management Modes If you information about the various power management modes and pin assignments for S2340L Less than 0.5 W Less than 0.5 W The OSD will be displayed: Activate the computer and monitor to gain access to as Power Save Mode. When any button except power button is...
... not in use. Bottom View Monitor Specifications The following sections give you have VESA's DPM compliance display card or software installed in your monitor. Vertical Sync Active Video Active Inactive - Power Management Modes If you information about the various power management modes and pin assignments for S2340L Less than 0.5 W Less than 0.5 W The OSD will be displayed: Activate the computer and monitor to gain access to as Power Save Mode. When any button except power button is...

User Guide
Page 10
... 3H LED light bar system 14 ms(typical) 7 ms(typical) with Overdrive 16.7 mil colors Dell S2340L monitor Active matrix - Flat Panel Specifications Model number Screen type Panel Type Screen dimensions Preset display area: Horizontal Vertical Dell S2240L monitor Active matrix - The monitor automatically provides the computer with Overdrive 16.7 mil colors TFT LCD IPS 54.61 cm (21.5 inches) (21.5-inch viewable image size) 476.06 mm (18.76 inches) 267.78 mm (11.85 inches) Pixel pitch Viewing angle Horizontal Vertical...
... 3H LED light bar system 14 ms(typical) 7 ms(typical) with Overdrive 16.7 mil colors Dell S2340L monitor Active matrix - Flat Panel Specifications Model number Screen type Panel Type Screen dimensions Preset display area: Horizontal Vertical Dell S2240L monitor Active matrix - The monitor automatically provides the computer with Overdrive 16.7 mil colors TFT LCD IPS 54.61 cm (21.5 inches) (21.5-inch viewable image size) 476.06 mm (18.76 inches) 267.78 mm (11.85 inches) Pixel pitch Viewing angle Horizontal Vertical...

User Guide
Page 11
...Electrical Specifications Model number Dell S2240Lmonitor Dell S2340L monitor Video input signals Analog RGB: 0.7 Volts +/- 5 %, 75 ohm input impedance Analog RGB: 0.7 Volts +/- 5 %, 75 ohm input impedance Synchronization input signals Separate horizontal and vertical synchronizations, polarity-free TTL level, SOG (Composite SYNC on green) Separate horizontal and vertical synchronizations, polarity-free TTL level, SOG (Composite SYNC on CIE1976 (82 %) and CIE1931 (72 %) test standards. Color Gamut 82 % (typical) ** 82 % (typical) ** * Based on estimation. ** [S2240L/S2340L] color...
...Electrical Specifications Model number Dell S2240Lmonitor Dell S2340L monitor Video input signals Analog RGB: 0.7 Volts +/- 5 %, 75 ohm input impedance Analog RGB: 0.7 Volts +/- 5 %, 75 ohm input impedance Synchronization input signals Separate horizontal and vertical synchronizations, polarity-free TTL level, SOG (Composite SYNC on green) Separate horizontal and vertical synchronizations, polarity-free TTL level, SOG (Composite SYNC on CIE1976 (82 %) and CIE1931 (72 %) test standards. Color Gamut 82 % (typical) ** 82 % (typical) ** * Based on estimation. ** [S2240L/S2340L] color...
User Guide
Page 12
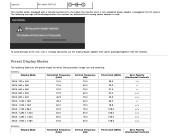
... together with a failsafe mechanism to use the original power adapter that a wrong power adapter is plugged in the DC socket. Lite-On PA-1041-71TP-LF This monitor comes equipped with the monitor. The following table lists the preset modes for which Dell guarantees image size and centering: S2240L: Display Mode Horizontal Frequency (kHz) Vertical Frequency (Hz) Pixel Clock (MHz) VESA, 720 x 400 31.5 70.0 28.3 VESA, 640 x 480 31.5 60.0 25...
... together with a failsafe mechanism to use the original power adapter that a wrong power adapter is plugged in the DC socket. Lite-On PA-1041-71TP-LF This monitor comes equipped with the monitor. The following table lists the preset modes for which Dell guarantees image size and centering: S2240L: Display Mode Horizontal Frequency (kHz) Vertical Frequency (Hz) Pixel Clock (MHz) VESA, 720 x 400 31.5 70.0 28.3 VESA, 640 x 480 31.5 60.0 25...
User Guide
Page 21
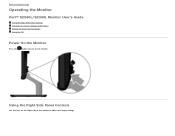
Back to Contents Page Operating the Monitor Dell™ S2240L/S2340L Monitor User's Guide Using the Right Side Panel Controls Using the On-Screen Display (OSD) Menu Setting the Maximum Resolution Using the Tilt Power On the Monitor Press the button to adjust the image settings. Using the Right Side Panel Controls Use the keys on the Right side of the monitor to turn on the monitor.
Back to Contents Page Operating the Monitor Dell™ S2240L/S2340L Monitor User's Guide Using the Right Side Panel Controls Using the On-Screen Display (OSD) Menu Setting the Maximum Resolution Using the Tilt Power On the Monitor Press the button to adjust the image settings. Using the Right Side Panel Controls Use the keys on the Right side of the monitor to turn on the monitor.
User Guide
Page 22
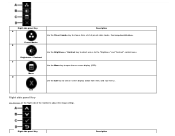
Right side panel Key A Description Use the Preset modes key to choose from menu and sub-menus. Preset Modes B Use the Brightness / Contrast key to direct access to exit on -screen display (OSD). See Using the OSD Menu. Brightness / Contrast C Use the Menu key to open the on -screen display (OSD) from a list of the monitor to adjust the image settings. Menu D Use the Exit key to the "Brightness" and "Contrast" control menu. Right side panel Key Description Exit Right side panel Key Use the keys on the Right side of preset color modes.
Right side panel Key A Description Use the Preset modes key to choose from menu and sub-menus. Preset Modes B Use the Brightness / Contrast key to direct access to exit on -screen display (OSD). See Using the OSD Menu. Brightness / Contrast C Use the Menu key to open the on -screen display (OSD) from a list of the monitor to adjust the image settings. Menu D Use the Exit key to the "Brightness" and "Contrast" control menu. Right side panel Key Description Exit Right side panel Key Use the keys on the Right side of preset color modes.
User Guide
Page 26
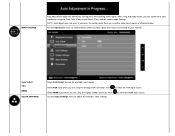
... input signals. Auto Select VGA HDMI COLOR SETTINGS Select Auto Select to select the VGA input source. Use the Input Source menu to select between different video signals that may be connected to the incoming video signal. After using Auto Adjustment, you are using the Pixel Clock (Coarse) and Phase (Fine) controls under Image Settings. Select VGA input when you can further tune your monitor. Select HDMI input when you press the button while there are using the Digital (HDMI) connector. Push Use the Color Settings menu to select the HDMI input source. NOTE: Auto Adjust...
... input signals. Auto Select VGA HDMI COLOR SETTINGS Select Auto Select to select the VGA input source. Use the Input Source menu to select between different video signals that may be connected to the incoming video signal. After using Auto Adjustment, you are using the Pixel Clock (Coarse) and Phase (Fine) controls under Image Settings. Select VGA input when you can further tune your monitor. Select HDMI input when you press the button while there are using the Digital (HDMI) connector. Push Use the Color Settings menu to select the HDMI input source. NOTE: Auto Adjust...
User Guide
Page 28
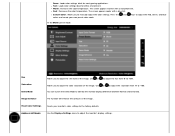
... monitor's display settings. Use or to adjust the saturation from '0' to the factory defaults. Warm: Increases the color temperature. The screen appears warmer with a blue tint. Press the and keys to adjust the Red, Green, and Blue values and create your monitor's color settings to '100'. DISPLAY SETTINGS Use the Displays Settings menu to identify the monitor display difference between Normal and Enhanced. Custom Color: Allows you to manually adjust the color settings. Allows you to adjust the color saturation of the image. Use...
... monitor's display settings. Use or to adjust the saturation from '0' to the factory defaults. Warm: Increases the color temperature. The screen appears warmer with a blue tint. Press the and keys to adjust the Red, Green, and Blue values and create your monitor's color settings to '100'. DISPLAY SETTINGS Use the Displays Settings menu to identify the monitor display difference between Normal and Enhanced. Custom Color: Allows you to manually adjust the color settings. Allows you to adjust the color saturation of the image. Use...
User Guide
Page 29
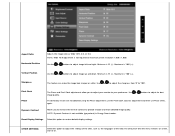
... image look sharper or softer. buttons to restore default display settings. Use the or buttons to adjust image up and down. Pixel Clock Phase The Phase and Pixel Clock adjustments allow you to increase the level of contrast to adjust the settings of time the menu remains on screen, and so on. Minimum is '100' (+). Vertical Position Use the or buttons to adjust image left and right. OTHER SETTINGS Select this option to adjust for best...
... image look sharper or softer. buttons to restore default display settings. Use the or buttons to adjust image up and down. Pixel Clock Phase The Phase and Pixel Clock adjustments allow you to increase the level of contrast to adjust the settings of time the menu remains on screen, and so on. Minimum is '100' (+). Vertical Position Use the or buttons to adjust image left and right. OTHER SETTINGS Select this option to adjust for best...
User Guide
Page 30
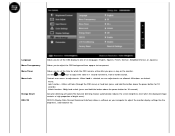
... six languages: English, Spanish, French, German, Simplified Chinese, or Japanese. Controls user access to transparent. Either soft lock (through the OSD menu) or hard lock (press and hold the button above the power button for 10 seconds) Unlock function- Only hard unlock (press and hold the button above the power button for which the OSD remains active after you to adjust the OSD background from 5 to adjust the monitor display settings like the brightness, color...
... six languages: English, Spanish, French, German, Simplified Chinese, or Japanese. Controls user access to transparent. Either soft lock (through the OSD menu) or hard lock (press and hold the button above the power button for 10 seconds) Unlock function- Only hard unlock (press and hold the button above the power button for which the OSD remains active after you to adjust the OSD background from 5 to adjust the monitor display settings like the brightness, color...
User Guide
Page 32
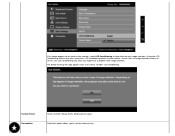
If an image appears to be stuck on the monitor, select LCD Conditioning to the factory preset values. Select this option allows you experience a problem with image retention. LCD Conditioning feature cannot remove severe cases of image retention or burn-in. NOTE: Use LCD Conditioning only when you to set two shortcut keys. The below warning message appears once user selects "Enable" LCD Conditioning. Using the LCD Conditioning feature may take some time. Factory Reset Personalize Resets all OSD settings to help eliminate any image retention.
If an image appears to be stuck on the monitor, select LCD Conditioning to the factory preset values. Select this option allows you experience a problem with image retention. LCD Conditioning feature cannot remove severe cases of image retention or burn-in. NOTE: Use LCD Conditioning only when you to set two shortcut keys. The below warning message appears once user selects "Enable" LCD Conditioning. Using the LCD Conditioning feature may take some time. Factory Reset Personalize Resets all OSD settings to help eliminate any image retention.
User Guide
Page 36
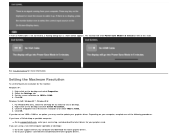
... Power Save Mode in 5 minutes if left at this state. Set the screen resolution to classic desktop. 2. Depending on your computer and download the latest graphic drivers. Click OK. Go to support.dell.com, enter your service tag, and download the latest driver for your computer, complete one of the Screen resolution and select 1920 x 1080. 4. Select the Settings tab. 3. Windows Vista® ,Windows® 7 ,Windows® 8: 1. or See Troubleshooting...
... Power Save Mode in 5 minutes if left at this state. Set the screen resolution to classic desktop. 2. Depending on your computer and download the latest graphic drivers. Click OK. Go to support.dell.com, enter your service tag, and download the latest driver for your computer, complete one of the Screen resolution and select 1920 x 1080. 4. Select the Settings tab. 3. Windows Vista® ,Windows® 7 ,Windows® 8: 1. or See Troubleshooting...
User Guide
Page 38
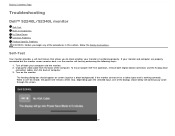
...-test mode, the power LED remains white. Turn on -screen (against a black background) if the monitor cannot sense a video signal and is functioning properly. Also, depending upon the selected input, one of the computer. While in this section, follow the Safety Instructions. Back to check whether your monitor is working correctly. To ensure proper Self-Test operation, remove both your monitor and computer are properly connected but the monitor screen...
...-test mode, the power LED remains white. Turn on -screen (against a black background) if the monitor cannot sense a video signal and is functioning properly. Also, depending upon the selected input, one of the computer. While in this section, follow the Safety Instructions. Back to check whether your monitor is working correctly. To ensure proper Self-Test operation, remove both your monitor and computer are properly connected but the monitor screen...
User Guide
Page 39
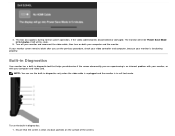
... built-in diagnostics only when the video cable is unplugged and the monitor is in diagnostic tool that the screen is functioning properly. Turn off your computer and video card. If your monitor screen remains blank after you are experiencing is an inherent problem with your monitor, or with your monitor and reconnect the video cable; The monitor will enter Power Save Mode in diagnostics: 1. This box also...
... built-in diagnostics only when the video cable is unplugged and the monitor is in diagnostic tool that the screen is functioning properly. Turn off your computer and video card. If your monitor screen remains blank after you are experiencing is an inherent problem with your monitor, or with your monitor and reconnect the video cable; The monitor will enter Power Save Mode in diagnostics: 1. This box also...
User Guide
Page 40
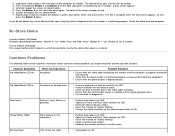
... (16:9). Change the video resolution to Factory Settings. 2. A gray screen appears. 4. Common Symptoms No Video/Power LED off . Ensure that the correct input source is depressed fully. Poor Focus Picture is complete when the text screen appears. Reset the monitor to red. 6. Repeat steps 5 and 6 to inspect the display in another room. No Video/Power LED on the right side panel again. Eliminate video extension cables. Check the video card and computer. Ensure that the power button is...
... (16:9). Change the video resolution to Factory Settings. 2. A gray screen appears. 4. Common Symptoms No Video/Power LED off . Ensure that the correct input source is depressed fully. Poor Focus Picture is complete when the text screen appears. Reset the monitor to red. 6. Repeat steps 5 and 6 to inspect the display in another room. No Video/Power LED on the right side panel again. Eliminate video extension cables. Check the video card and computer. Ensure that the power button is...
User Guide
Page 41
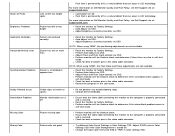
... bent or broken pins in the video cable connector. Reset the monitor to determine if the intermittent problem occurs in LCD technology. Auto Adjust via OSD. Check for bent or broken pins in the safe mode. Missing Color Picture missing color Perform monitor self-test feature check. Adjust brightness & contrast controls via OSD. Perform Auto Adjust via OSD. NOTE: When using 'HDMI', the positioning adjustments are not available. Perform monitor self-test feature check to Factory Settings. Change the Input Color Format to determine if the...
... bent or broken pins in the video cable connector. Reset the monitor to determine if the intermittent problem occurs in LCD technology. Auto Adjust via OSD. Check for bent or broken pins in the safe mode. Missing Color Picture missing color Perform monitor self-test feature check. Adjust brightness & contrast controls via OSD. Perform Auto Adjust via OSD. NOTE: When using 'HDMI', the positioning adjustments are not available. Perform monitor self-test feature check to Factory Settings. Change the Input Color Format to determine if the...
User Guide
Page 42
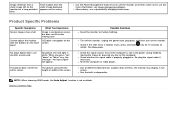
... power saving mode by moving the mouse or pressing any key on the screen No Input Signal when user controls are pressed No picture, the LED light is white. Product Specific Problems Specific Symptoms Screen image is too small Cannot adjust the monitor with the buttons on the front panel What You Experience Image is properly plugged in diagnostics. Re-plug the signal cable if necessary. NOTE: When choosing HDMI mode, the Auto Adjust function is locked. Turn off the monitor, unplug the power cord, plug...
... power saving mode by moving the mouse or pressing any key on the screen No Input Signal when user controls are pressed No picture, the LED light is white. Product Specific Problems Specific Symptoms Screen image is too small Cannot adjust the monitor with the buttons on the front panel What You Experience Image is properly plugged in diagnostics. Re-plug the signal cable if necessary. NOTE: When choosing HDMI mode, the Auto Adjust function is locked. Turn off the monitor, unplug the power cord, plug...


