User Guide
Page 6
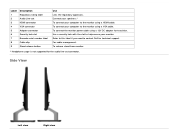
... for the audio line-out connector. For cable management. Connect your speakers.* To connect your computer to help secure your computer to contact Dell for technical support. Use a security lock with the slot to the monitor using a VGA cable. Label 1 2 3 4 5 6 7 8 9... Description Regulatory rating label Audio Line-out HDMI connector VGA connector Adapter connector Security lock slot Barcode serial number label Cable clip Stand release button Use Lists the regulatory approvals. To connect your...
... for the audio line-out connector. For cable management. Connect your speakers.* To connect your computer to help secure your computer to contact Dell for technical support. Use a security lock with the slot to the monitor using a VGA cable. Label 1 2 3 4 5 6 7 8 9... Description Regulatory rating label Audio Line-out HDMI connector VGA connector Adapter connector Security lock slot Barcode serial number label Cable clip Stand release button Use Lists the regulatory approvals. To connect your...
User Guide
Page 9
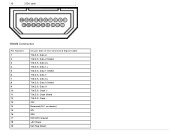
Data 1+ T.M.D.S. Data 0 Shield T.M.D.S. 15 DDC clock HDMI Connector Pin Number 1 2 3 4 5 6 7 8 9 10 11 12 13 14 15 16 17 18 19 24-pin Side of the Connected Signal Cable T.M.D.S. Clock CEC Reserved (N.C. Data 1T.M.D.S. Data 0+ T.M.D.S. Data 2 Shield T.M.D.S. Clock + T.M.D.S. Data 2+ T.M.D.S. Clock Shield T.M.D.S. Data 2T.M.D.S. Data 0T.M.D.S. on device) SCL SDA DDC/CEC Ground +5V Power Hot Plug Detect Data 1 Shield T.M.D.S.
Data 1+ T.M.D.S. Data 0 Shield T.M.D.S. 15 DDC clock HDMI Connector Pin Number 1 2 3 4 5 6 7 8 9 10 11 12 13 14 15 16 17 18 19 24-pin Side of the Connected Signal Cable T.M.D.S. Clock CEC Reserved (N.C. Data 1T.M.D.S. Data 0+ T.M.D.S. Data 2 Shield T.M.D.S. Clock + T.M.D.S. Data 2+ T.M.D.S. Clock Shield T.M.D.S. Data 2T.M.D.S. Data 0T.M.D.S. on device) SCL SDA DDC/CEC Ground +5V Power Hot Plug Detect Data 1 Shield T.M.D.S.

User Guide
Page 13
...(12.45 inches) 532.20 mm (20.95 inches) 37.80 mm (1.49 inches) 137.10 mm (5.40 inches) HDMI Analog: attachable, D-Sub, 15 pins, shipped detached from the monitor 380.28 mm (14.97 inches) 499.10 mm (...(11.72 inches) 499.10 mm (19.65 inches) 37.80 mm (1.49 inches) Stand dimensions: Height 137.10 mm (5.40 inches) Dell S2340L monitor D-subminiature, blue connector; VESA, 720 x 400 VESA, 640 x 480 VESA, 640 x 480 VESA, 800 x 600 VESA, ...characteristics: Model Number Connector type Signal cable type Dimensions: (with stand) Height Width Depth Dell S2240L monitor D-subminiature, blue connector;
...(12.45 inches) 532.20 mm (20.95 inches) 37.80 mm (1.49 inches) 137.10 mm (5.40 inches) HDMI Analog: attachable, D-Sub, 15 pins, shipped detached from the monitor 380.28 mm (14.97 inches) 499.10 mm (...(11.72 inches) 499.10 mm (19.65 inches) 37.80 mm (1.49 inches) Stand dimensions: Height 137.10 mm (5.40 inches) Dell S2340L monitor D-subminiature, blue connector; VESA, 720 x 400 VESA, 640 x 480 VESA, 640 x 480 VESA, 800 x 600 VESA, ...characteristics: Model Number Connector type Signal cable type Dimensions: (with stand) Height Width Depth Dell S2240L monitor D-subminiature, blue connector;

User Guide
Page 17
... both the cables only when they are connected to the monitor groove. Use both cables on the same computer. Connect the blue (analog VGA) or HDMI display connector cable to the corresponding video port on a soft cloth or cushion near the edge of the procedures in place. c. Place the monitor on...
... both the cables only when they are connected to the monitor groove. Use both cables on the same computer. Connect the blue (analog VGA) or HDMI display connector cable to the corresponding video port on a soft cloth or cushion near the edge of the procedures in place. c. Place the monitor on...

User Guide
Page 18
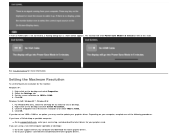
Connecting the monitor with HDMI
Connecting the monitor with HDMI
User Guide
Page 26
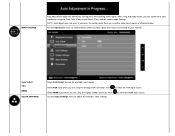
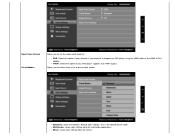
... source. to your monitor by using Auto Adjustment, you press the button while there are using the Digital (HDMI) connector. Auto Select VGA HDMI COLOR SETTINGS Select Auto Select to the incoming video signal. After using the Pixel Clock (Coarse) and Phase (Fine) controls under Image Settings. NOTE: Auto ... to select the VGA input source. Push to adjust the monitor's color settings. Select VGA input when you are using the analog (VGA) connector. Select HDMI input when you are no active video input signals or attached cables.
... source. to your monitor by using Auto Adjustment, you press the button while there are using the Digital (HDMI) connector. Auto Select VGA HDMI COLOR SETTINGS Select Auto Select to the incoming video signal. After using the Pixel Clock (Coarse) and Phase (Fine) controls under Image Settings. NOTE: Auto ... to select the VGA input source. Push to adjust the monitor's color settings. Select VGA input when you are using the analog (VGA) connector. Select HDMI input when you are no active video input signals or attached cables.
User Guide
Page 27
Input Color Format Preset Modes Allows you to DVI adapter. Multimedia: Loads color settings ideal for movies. This is connected to a computer or DVD player using the HDMI cable or the HDMI to choose from a list of preset color modes. Standard: Loads the monitor's default color settings. Movie: Loads color settings ideal for multimedia applications. YPbPr: Select this option if your DVD player supports only YPbPr output. Allows you to set the video input mode to: RGB: Select this option if your monitor is the default preset mode.
Input Color Format Preset Modes Allows you to DVI adapter. Multimedia: Loads color settings ideal for movies. This is connected to a computer or DVD player using the HDMI cable or the HDMI to choose from a list of preset color modes. Standard: Loads the monitor's default color settings. Movie: Loads color settings ideal for multimedia applications. YPbPr: Select this option if your DVD player supports only YPbPr output. Allows you to set the video input mode to: RGB: Select this option if your monitor is the default preset mode.
User Guide
Page 36
...of the following procedures. The monitor will enter Power Save Mode in 5 minutes if left at this state. Click OK. Go to support.dell.com, enter your service tag, and download the latest driver for your computer, complete one of the Screen resolution and select 1920 x 1080...the screen resolution to update your graphics card website and download the latest graphic drivers. If VGA or HDMI cable is not connected, a floating dialog box as an option, you have a Dell desktop or portable computer: Go to your graphics driver. or See Troubleshooting for the monitor: Windows XP:...
...of the following procedures. The monitor will enter Power Save Mode in 5 minutes if left at this state. Click OK. Go to support.dell.com, enter your service tag, and download the latest driver for your computer, complete one of the Screen resolution and select 1920 x 1080...the screen resolution to update your graphics card website and download the latest graphic drivers. If VGA or HDMI cable is not connected, a floating dialog box as an option, you have a Dell desktop or portable computer: Go to your graphics driver. or See Troubleshooting for the monitor: Windows XP:...
User Guide
Page 41
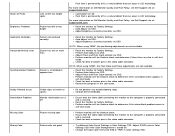
...Reset the monitor to Factory Settings. For more information on -off. Adjust brightness & contrast controls via OSD. NOTE: When using 'HDMI', the Pixel Clock and Phase adjustments are not available. Reset the monitor to Factory Settings. Reset the monitor to Factory Settings. Ensure ... Quality and Pixel Policy, see Dell Support site at : support.dell.com. For more lines Synchronization Problems Screen is secured. Auto Adjust via OSD. Perform Auto Adjust via OSD. NOTE: When using 'HDMI', the positioning adjustments are not available. Check for bent or broken pins ...
...Reset the monitor to Factory Settings. For more information on -off. Adjust brightness & contrast controls via OSD. NOTE: When using 'HDMI', the Pixel Clock and Phase adjustments are not available. Reset the monitor to Factory Settings. Reset the monitor to Factory Settings. Ensure ... Quality and Pixel Policy, see Dell Support site at : support.dell.com. For more lines Synchronization Problems Screen is secured. Auto Adjust via OSD. Perform Auto Adjust via OSD. NOTE: When using 'HDMI', the positioning adjustments are not available. Check for bent or broken pins ...
User Guide
Page 42
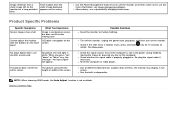
... keyboard. Image retention from a static image left on the monitor for a long period of DVDs, the monitor may display in full screen. NOTE: When choosing HDMI mode, the Auto Adjust function is locked. Check if the OSD menu is not available. Run the built-in use a dynamically changing screensaver. key for...
... keyboard. Image retention from a static image left on the monitor for a long period of DVDs, the monitor may display in full screen. NOTE: When choosing HDMI mode, the Auto Adjust function is locked. Check if the OSD menu is not available. Run the built-in use a dynamically changing screensaver. key for...


