Getting Started Guide
Page 5
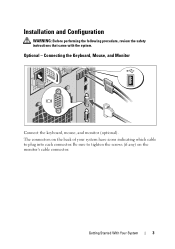
Getting Started With Your System 3 The connectors on the monitor's cable connector. Connecting the Keyboard, Mouse, and Monitor Connect the keyboard, mouse, and monitor (optional). Optional - Be sure to tighten the screws (if any) on the back of your system have icons indicating which cable to plug into each connector. Installation and Configuration WARNING: Before performing the following procedure, review the safety instructions that came with the system.
Getting Started With Your System 3 The connectors on the monitor's cable connector. Connecting the Keyboard, Mouse, and Monitor Connect the keyboard, mouse, and monitor (optional). Optional - Be sure to tighten the screws (if any) on the back of your system have icons indicating which cable to plug into each connector. Installation and Configuration WARNING: Before performing the following procedure, review the safety instructions that came with the system.
Hardware Owner's Manual
Page 31
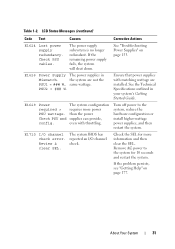
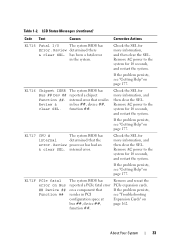
... not the PSU1 = ### W, same wattage. If the problem persists, see "Getting Help" on page 153. than the power Check PSU and supplies can provide, config. Review & clear SEL. Table 1-2. See "Troubleshooting Power Supplies" on page 177. PSU2 = ### W. Check the SEL for 10 seconds and restart the system. LCD Status Messages (continued...
... not the PSU1 = ### W, same wattage. If the problem persists, see "Getting Help" on page 153. than the power Check PSU and supplies can provide, config. Review & clear SEL. Table 1-2. See "Troubleshooting Power Supplies" on page 177. PSU2 = ### W. Check the SEL for 10 seconds and restart the system. LCD Status Messages (continued...
Hardware Owner's Manual
Page 32
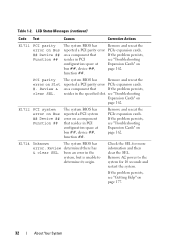
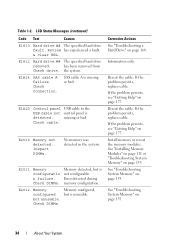
...restart the system. If the problem persists, see "Troubleshooting Expansion Cards" on page 162. function ##. see "Getting Help" on Slot #. Review determined there has & clear SEL. Remove AC power to determine its origin. If the problem persists, see "Troubleshooting configuration space at bus ##,...Code Text Causes Corrective Actions E1711 PCI parity error on a component that If the problem persists, resides in the specified slot. Table 1-2. Review & clear SEL. The system BIOS has Remove and reseat the reported a PCI parity error PCIe expansion cards. on Bus ## Device ...
...restart the system. If the problem persists, see "Troubleshooting Expansion Cards" on page 162. function ##. see "Getting Help" on Slot #. Review determined there has & clear SEL. Remove AC power to determine its origin. If the problem persists, see "Troubleshooting configuration space at bus ##,...Code Text Causes Corrective Actions E1711 PCI parity error on a component that If the problem persists, resides in the specified slot. Table 1-2. Review & clear SEL. The system BIOS has Remove and reseat the reported a PCI parity error PCIe expansion cards. on Bus ## Device ...
Hardware Owner's Manual
Page 33
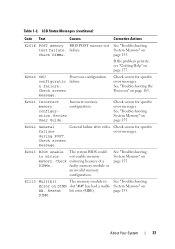
... there & clear SEL. Check the SEL for more information, and then clear the SEL. Review & clear SEL. The system BIOS has reported a chipset internal error that resides in the system. If the problem persists, see "Getting Help" on page 177. ..., and restart the system. Remove AC power to the system for 10 seconds, and restart the system. has been a fatal error in bus ##, device ##, function ##. Review processor has had an & clear SEL. If the problem persists, see "Getting Help" on page 162. Check the SEL for 10 seconds, and restart the...
... there & clear SEL. Check the SEL for more information, and then clear the SEL. Review & clear SEL. The system BIOS has reported a chipset internal error that resides in the system. If the problem persists, see "Getting Help" on page 177. ..., and restart the system. Remove AC power to the system for 10 seconds, and restart the system. has been a fatal error in bus ##, device ##, function ##. Review processor has had an & clear SEL. If the problem persists, see "Getting Help" on page 162. Check the SEL for 10 seconds, and restart the...
Hardware Owner's Manual
Page 34
Table 1-2. Review has experienced a fault. & clear SEL. has been removed from Check drive. E1A14 SAS cable A failure. missing or bad. E2012 Memory Memory configured, configured but is ...
Table 1-2. Review has experienced a fault. & clear SEL. has been removed from Check drive. E1A14 SAS cable A failure. missing or bad. E2012 Memory Memory configured, configured but is ...
Hardware Owner's Manual
Page 37
... (continued) Code Text Causes Corrective Actions E201E POST memory BIOS POST memory test See "Troubleshooting test failure. System Memory" on page 177. Processor configuration failure. Review User Guide. Check screen for specific error messages. System Memory" on page 155. Check screen message. See "Troubleshooting System Memory" on ##. E2022 General failure during...
... (continued) Code Text Causes Corrective Actions E201E POST memory BIOS POST memory test See "Troubleshooting test failure. System Memory" on page 177. Processor configuration failure. Review User Guide. Check screen for specific error messages. System Memory" on page 155. Check screen message. See "Troubleshooting System Memory" on ##. E2022 General failure during...

Hardware Owner's Manual
Page 38
... by the BIOS. LCD overflow message. Remove AC power to the disabled memory single-bit system for more . Reseat DIMM. "##" represents System Memory" on DIMM ## & ##. Review & clear log. The SEL is full of events and is see "Troubleshooting System Memory" on the events. LCD Status Messages (continued) Code Text Causes Corrective.... Table 1-2. implicated by the BIOS. I1911 LCD Log Full. A maximum of the mirror has had too many errors. The eleventh message instructs the user to review all Errors.
... by the BIOS. LCD overflow message. Remove AC power to the disabled memory single-bit system for more . Reseat DIMM. "##" represents System Memory" on DIMM ## & ##. Review & clear log. The SEL is full of events and is see "Troubleshooting System Memory" on the events. LCD Status Messages (continued) Code Text Causes Corrective.... Table 1-2. implicated by the BIOS. I1911 LCD Log Full. A maximum of the mirror has had too many errors. The eleventh message instructs the user to review all Errors.
Hardware Owner's Manual
Page 43
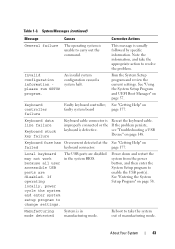
... user accessible USB ports are disabled in manufacturing mode. Manufacturing mode detected System is defective. About Your System 43 Run the System Setup program and review the current settings. An invalid system configuration caused a system halt. Keyboard fuse has Overcurrent detected at the See "Getting Help" on faulty system board page...
... user accessible USB ports are disabled in manufacturing mode. Manufacturing mode detected System is defective. About Your System 43 Run the System Setup program and review the current settings. An invalid system configuration caused a system halt. Keyboard fuse has Overcurrent detected at the See "Getting Help" on faulty system board page...

Hardware Owner's Manual
Page 169
Before you begin this procedure, review the safety instructions that came with the system. System Board Jumper Settings Jumper PWRD_EN Setting Description (default) The password feature is enabled (pins 2-4) NVRAM_CLR The ...
Before you begin this procedure, review the safety instructions that came with the system. System Board Jumper Settings Jumper PWRD_EN Setting Description (default) The password feature is enabled (pins 2-4) NVRAM_CLR The ...


