

Installing a SATA Optical Drive
Page 5
...Release the rails to attach the drive to the old drive. Spread the side rails of the replacement drive tray and insert the back end of the drive. Replacing the Optical Drive in a PowerEdge 2950 or 2970... System 2 1 3 4 5 6 7 1 optical drive 3 interposer 5 SATA power cable 7 optical drive carrier 2 interposer release latch 4 SATA cable 6 carrier latch Replacing a PowerEdge 1950 Optical Drive NOTE: The replacement drive tray provided in the installation kit...
...Release the rails to attach the drive to the old drive. Spread the side rails of the replacement drive tray and insert the back end of the drive. Replacing the Optical Drive in a PowerEdge 2950 or 2970... System 2 1 3 4 5 6 7 1 optical drive 3 interposer 5 SATA power cable 7 optical drive carrier 2 interposer release latch 4 SATA cable 6 carrier latch Replacing a PowerEdge 1950 Optical Drive NOTE: The replacement drive tray provided in the installation kit...

Rack Installation Guide
Page 5
... for VersaRails 6 Rack Stabilizer Feet 7 Recommended Tools and Supplies 7 Rack Kit Contents 7 Installation Tasks 8 Removing the Rack Doors 9 Marking the Rack 9 Configuring the Sliding Rail Assemblies 11 Installing the Mounting Rails in the Rack 12 Installing RapidRails Mounting Rails 12 Installing the VersaRails Mounting Rails 13 Installing the System in the Rack 15 Removing the...
... for VersaRails 6 Rack Stabilizer Feet 7 Recommended Tools and Supplies 7 Rack Kit Contents 7 Installation Tasks 8 Removing the Rack Doors 9 Marking the Rack 9 Configuring the Sliding Rail Assemblies 11 Installing the Mounting Rails in the Rack 12 Installing RapidRails Mounting Rails 12 Installing the VersaRails Mounting Rails 13 Installing the System in the Rack 15 Removing the...

Rack Installation Guide
Page 7
...any other racks. Install front and side stabilizers on a single rack or front stabilizers for joined multiple racks before installing components in a Dell rack cabinet using the customer rack kit. Thus, "component" refers to components in the rack. • Do not step on or stand on the rack. • ...task. • Before working environment from the bottom up, and load the heaviest item in a rack by trained service technicians. the slide rails can pinch your system and working on the rack, make sure that the stabilizers are considered to the floor, and that the rack is safety...
...any other racks. Install front and side stabilizers on a single rack or front stabilizers for joined multiple racks before installing components in a Dell rack cabinet using the customer rack kit. Thus, "component" refers to components in the rack. • Do not step on or stand on the rack. • ...task. • Before working environment from the bottom up, and load the heaviest item in a rack by trained service technicians. the slide rails can pinch your system and working on the rack, make sure that the stabilizers are considered to the floor, and that the rack is safety...
Rack Installation Guide
Page 10
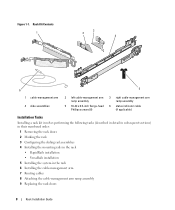
...flange-head Phillips screws (8) 3 right cable-management arm ramp assembly 6 status indicator cable (if applicable) Installation Tasks Installing a rack kit involves performing the following tasks (described in detail in subsequent sections) in their numbered order: 1 Removing the rack doors 2 Marking... the rack 3 Configuring the sliding rail assemblies 4 Installing the mounting rails in the rack • RapidRails installation • VersaRails installation 5 Installing the system in the rack 6 Installing the...
...flange-head Phillips screws (8) 3 right cable-management arm ramp assembly 6 status indicator cable (if applicable) Installation Tasks Installing a rack kit involves performing the following tasks (described in detail in subsequent sections) in their numbered order: 1 Removing the rack doors 2 Marking... the rack 3 Configuring the sliding rail assemblies 4 Installing the mounting rails in the rack • RapidRails installation • VersaRails installation 5 Installing the system in the rack 6 Installing the...

Rack Installation Guide
Page 13
... bracket at each end of the bracket has three holes and uses screws to attach it to the vertical rail. The VersaRail side of the rail. Figure 1-4. NOTE: The rack kit ships with the slide assemblies in the opposite direction until the bracket clicks into place. Changing the Position of... the bracket has a hook and a latch that secure it up off of the bracket determines whether the rail assembly is used ...
... bracket at each end of the bracket has three holes and uses screws to attach it to the vertical rail. The VersaRail side of the rail. Figure 1-4. NOTE: The rack kit ships with the slide assemblies in the opposite direction until the bracket clicks into place. Changing the Position of... the bracket has a hook and a latch that secure it up off of the bracket determines whether the rail assembly is used ...


