Dell PowerEdge 860 Support Question
Dell PowerEdge 860 Support Question
Find answers below for this question about Dell PowerEdge 860.Need a Dell PowerEdge 860 manual? We have 6 online manuals for this item!
Question posted by hubdennis on April 10th, 2014
Poweredge 860 How To Mount Rails
The person who posted this question about this Dell product did not include a detailed explanation. Please use the "Request More Information" button to the right if more details would help you to answer this question.
Current Answers
Answer #1: Posted by MWatDell on April 13th, 2014 10:54 PM
MWatDell

Member since:
November 17th, 2011 Points: 306,490

Member since:
November 17th, 2011 Points: 306,490
Hi hubdennis
Please refer to this guide for Rack installation:-
ftp://ftp.dell.com/Manuals/all-products/esuprt_ser_stor_net/esuprt_poweredge/poweredge-860_Setup%20Guide2_en-us.pdf
Hope this helps.
MW@Dell
Related Dell PowerEdge 860 Manual Pages
Information Update - Dell OpenManage™ Server Support Kit Version 4.3
(.pdf) - Page 20

... 4/P Novell® NetWare Red Hat® Linux
2004 Dell Inc Printed in the U.S.A. www.dell.com | support.dell.com
Microsoft® Windows DRAC 4/P Dell OpenManage Server Assistant CD』内の Systems Management Dell: Remote Access Controller - DRAC 4/P (Driver) Windows 2003 DRAC4 Drivers (Self Extracting Zip) または Dell: Remote...
Rack Installation Guide - Page 5

... Rack Kit Contents 8 VersaRails Rack Kit Contents 8 Installation Tasks 9 Removing the Rack Doors 10 Marking the Rack 10 Installing the Mounting Rails in the Rack 12 Installing and Removing Chassis Static Rail Modules 14 Installing the System in the Rack 15 Installing the Releasable Tie Wraps 17 Removing the System From the Rack...
Rack Installation Guide - Page 6

...-Hole Spacing 20 Two-Post, Open-Frame Relay Rack Wide-Hole Spacing 21 Installing the Mounting Rails for Center-Mount Configuration 23 Configuring the Adjustable Mounting Bracket for Flush-Mount Installation 24 Installing the Mounting Rails for Flush-Mount Configuration 25
4
Contents Figure 1-3. Figure 1-5. Figure 1-9.
Figure 1-14. Figure 1-12.
Figure 1-13.
Figures
Figure...
Rack Installation Guide - Page 10

... pair of threads per inch is identified as a 10-32 screw.
8
Rack Installation Guide RapidRails Rack Kit Contents
mounting rails (2)
releasable tie wrap attachment points (2)
VersaRails Rack Kit Contents
• One pair of VersaRails mounting rails • 10-32 x 0.5-inch flange-head Phillips screws (8) • Releasable tie wraps (2) (not shown in Figure 1-2)
NOTE: The...
Rack Installation Guide - Page 11

... (described in detail in subsequent sections) in their numbered order:
1 Removing the rack doors 2 Marking the rack 3 Installing the mounting rails in the rack
• RapidRails installation • VersaRails installation • Static Rails Installation 4 Installing the system in the rack 5 Routing cables and securing with releasable tie wraps 6 Replacing the rack doors
NOTE...
Rack Installation Guide - Page 12

If you want, you are installing more than one system, install the mounting rails so that meet EIA-310 standards have round or square holes. Removing the ...If you can make a note of the rack cabinet doors, never attempt to mark or place tape on the rack's vertical rail.
CAUTION: Because of the size and weight of the number marking on the rack.
CAUTION: Store the doors where they ...
Rack Installation Guide - Page 14

... should enter the top hole between the marks or tape you made on the vertical rails.
2 Push the mounting rail forward until the mounting hooks enter their square holes, and then push down on the mounting-bracket flange until the mounting hooks seat and the push button pops out and clicks.
4 Repeat step 1 through step 3 for...
Rack Installation Guide - Page 15
... x 0.5-inch flange-head Phillips screws in the mounting-bracket flange's top- and bottom-holes to secure the mounting rail to the front vertical rail.
3 At the back of the VersaRails mounting rails so that the mounting rails are mounted at the same position on the vertical rails on each side of the mounting-bracket flange should align with their respective holes...
Rack Installation Guide - Page 16

... install or remove the chassis static rail modules from the chassis.
14
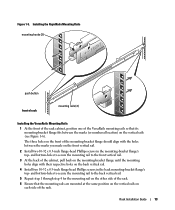
Rack Installation Guide Installing the VersaRails Mounting Rails
mounting-bracket flange
10-32 x 0.5-inch flange-head Phillips screws (4 per mounting rail)
front of each rail.
5 Unseat the rails from the J slots and remove the rails from the chassis.
1 To install the rails, locate the J slots on the front...
Rack Installation Guide - Page 17
... install the system in the Rack
CAUTION: If you are aligned with the mounting rails on the rack.
Rack Installation Guide
15 Installing and Removing Static Rail Modules
rail modules (2)
J slots (4)
front release latch
shoulder screws (4)
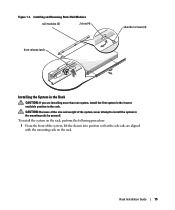
Installing the System in the mounting rails by yourself. CAUTION: Because of the size and weight of the system, lift...
Rack Installation Guide - Page 18

... 1-8 applies to left, position the chassis on the mounting rails and slide back
(see Figure 1-8). 3 Push the chassis back into the mounting rails until the system stops (see Figure 1-8). 4 Secure both thumbscrews on the front panel of the chassis. Figure 1-8. Installing the System in the Rack system rails (2)
mounting rails (2)
back release latches (2)
thumbscrews (2) 2 Working from right...
Rack Installation Guide - Page 19

... Wraps
The two releasable tie wraps are used to secure your system's cables to the mounting rails. 1 Locate the releasable tie wrap attachment points located on the two back mounting-bracket flanges (see Figure 1-9).
Installing the Releasable Tie Wraps mounting rails (2)
releasable tie wraps (2)
2 Push the tie wrap's fastener through the attachment point. 3 Push the...
Rack Installation Guide - Page 21

... x 0.5-inch pan-head Phillips screws (8)
mounting rails (2)
15.24-cm (6-inch) wide, center-mount, threaded studs
7.62-cm (3-inch) wide, centermount, threaded studs adjustable mounting flange
center-mount mounting flange
15.24-cm (6-inch) wide, flush-mount, threaded studs
7.62-cm (3-inch) wide, flush-mount, threaded studs
flush-mount mounting flange
Rack Installation Guide
19 Recommended...
Rack Installation Guide - Page 22

... performing the following tasks in order: 1 Marking the rack • Universal-hole spacing rack • Wide-hole spacing rack 2 Installing the mounting rails in the rack • Center-mount installation • Flush-mount installation 3 Installing the system in the two-post rack.
Two-Post, Open-Frame Relay Rack Universal-Hole Spacing
1 U (44 mm or...
Rack Installation Guide - Page 24

... complete the installation, perform the following steps:
1 Locate the right mounting rail and push the adjustable mounting bracket toward the back of the mounting rail (see Figure 1-13).
2 Position the right mounting rail in the two-post rack at the location you marked, push the center-mount adjustable mounting bracket forward against the vertical two-post rack, and secure...
Rack Installation Guide - Page 25

... two-post open-frame rack
12-24 x 0.5-inch pan-head Phillips screws (4 per rail)
center-mount mounting flange
mounting rails (2)
system rails (2)
release latch
Flush-Mount Installation
The two-post rack kit is shipped with the front ends of the mounting rails toward you (see Figure 1-14).
2 Using a 3/8-inch wrench or nut driver, remove two nuts from the adjustable...
Rack Installation Guide - Page 26

....
24
Rack Installation Guide Figure 1-14. Configuring the Adjustable Mounting Bracket for Flush-Mount Installation
nuts (2 per bracket) adjustable mounting bracket
flush-mount mounting flange
7.62-cm (3-inch) wide, flush-mount, threaded studs
6 Holding the left mounting rail at the location you marked, position the flush-mount mounting flange against the back of vertical two-post rack and...
Rack Installation Guide - Page 27

Figure 1-15. Installing the Mounting Rails for Flush-Mount Configuration two-post open-frame rack 12-24 x 0.5-inch pan-head Phillips screws (4 per rail)
mounting rails (2)
Rack Installation Guide
25
Rack Installation Guide - Page 29

... and supplies, 7 VersaRails kit contents, 8
I
installing four-post rack kit, 13 RapidRails mounting rails, 13 static rail modules, 14 system in four-post rack, 15
installing (continued) system in two-post rack... tie wraps for two-post rack, 26 two-post rack kit, 18 two-post rack mounting rails, 22-23 VersaRails mounting rails, 14-15
K
kit contents RapidRails, 8 two-post rack, 19 VersaRails, 8-9, 17...
Information Update - Page 1

Figure 1. System Board Connectors
Item Connector 1 CPU 2 12V
9
8
Description Processor socket Power supply connector
September 2006 Dell™ PowerEdge™ 860 Systems Information Update
This document provides updated information for your system on the following topics: • System board information • Using the setup password
System ...
Similar Questions

How Do You Install Mounting Rails For Dell Poweredge 2950
(Posted by atanit 9 years ago)

Where To Setup A Raid On A Poweredge 860 Server
(Posted by janebssenti 10 years ago)

