

Rack- to-Tower Conversion Guide
Page 7
...CAUTION: Installing system components in a rack without the front and side stabilizers installed could cause the rack to tip over and injure someone. The weight of more than one time. Install front and side stabilizers on a single rack or front stabilizers for joined multiple racks before working on the ..., as well as a separate document. CAUTION: Do not move large racks by yourself. Due to the height and weight of the rack, it is recommended that the full weight of your system and rack kit in any other rack cabinet has not been approved by any other rack, be included...
...CAUTION: Installing system components in a rack without the front and side stabilizers installed could cause the rack to tip over and injure someone. The weight of more than one time. Install front and side stabilizers on a single rack or front stabilizers for joined multiple racks before working on the ..., as well as a separate document. CAUTION: Do not move large racks by yourself. Due to the height and weight of the rack, it is recommended that the full weight of your system and rack kit in any other rack cabinet has not been approved by any other rack, be included...

Rack- to-Tower Conversion Guide
Page 9
...-Rack and Rack-to tip over when a system or other component is pulled out of the rack on installing and anchoring the stabilizer feet. The weight of more than one time. Installing the Tower-to move the system by yourself.
...-Rack and Rack-to tip over when a system or other component is pulled out of the rack on installing and anchoring the stabilizer feet. The weight of more than one time. Installing the Tower-to move the system by yourself.

Rack Installation Guide
Page 7
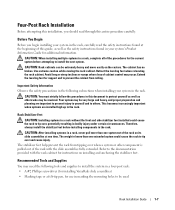
...and sliding a component into the rack. CAUTION: Do not move racks by trained service technicians. Systems are considered to tip over and injure someone. The weight of a rack; Due to the floor, and that the rack meets the specifications. If you install the kit in a rack cabinet using the customer ... one component out of Systems Observe the following safety guidelines to help ensure your own personal safety and to be sure that the full weight of system and rack complies with such combinations. • System rack kits are secured to the rack, extended to the height and...
...and sliding a component into the rack. CAUTION: Do not move racks by trained service technicians. Systems are considered to tip over and injure someone. The weight of a rack; Due to the floor, and that the rack meets the specifications. If you install the kit in a rack cabinet using the customer ... one component out of Systems Observe the following safety guidelines to help ensure your own personal safety and to be sure that the full weight of system and rack complies with such combinations. • System rack kits are secured to the rack, extended to the height and...
Rack Installation Guide
Page 9
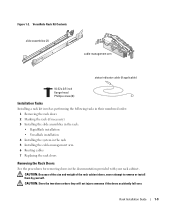
... the system in a four-post rack: • A #2 Phillips screwdriver (for installing VersaRails slide assemblies) • Masking tape or a felt-tip pen, for additional information. The weight of more than one time. Extend the leveling feet for support and to protect yourself as well as the safety instructions found in your system...
... the system in a four-post rack: • A #2 Phillips screwdriver (for installing VersaRails slide assemblies) • Masking tape or a felt-tip pen, for additional information. The weight of more than one time. Extend the leveling feet for support and to protect yourself as well as the safety instructions found in your system...
Rack Installation Guide
Page 11
CAUTION: Because of the size and weight of the rack cabinet doors, never attempt to remove or install them by yourself. Rack Installation Guide 1-9 CAUTION: Store the two doors where they will ...
CAUTION: Because of the size and weight of the rack cabinet doors, never attempt to remove or install them by yourself. Rack Installation Guide 1-9 CAUTION: Store the two doors where they will ...

Rack Installation Guide
Page 16
CAUTION: Never pull more than one system, install the first system in the lowest available position in the rack. CAUTION: Because of the size and weight of the system, never attempt to install the system in the slide assemblies by yourself. 2 Lift the system into position in front of the extended ...
CAUTION: Never pull more than one system, install the first system in the lowest available position in the rack. CAUTION: Because of the size and weight of the system, never attempt to install the system in the slide assemblies by yourself. 2 Lift the system into position in front of the extended ...

Rack Installation Guide
Page 22
Routing Cables Replacing the Rack Doors Refer to remove or install them by yourself. CAUTION: Because of the size and weight of the rack cabinet doors, never attempt to the procedures for replacing doors in the documentation provided with your system in and out of your ...
Routing Cables Replacing the Rack Doors Refer to remove or install them by yourself. CAUTION: Because of the size and weight of the rack cabinet doors, never attempt to the procedures for replacing doors in the documentation provided with your system in and out of your ...

Rack Installation Guide
Page 32
... document. Routing Cables See "Routing Cables" in "Four-Post Rack Installation" found earlier in this document. CAUTION: Because of the size and weight of the system, never attempt to install the system in the slide assemblies by yourself. You have completed the installation of the system locking mechanism...mount and center-mount slide assemblies. 1 Pull the slides out to the rack. Installing the System in the Rack CAUTION: Due to the size and weight of the system, never attempt to install the system by yourself. 2 Lift the system into position (see Figure 1-18). 3 Place one hand ...
... document. Routing Cables See "Routing Cables" in "Four-Post Rack Installation" found earlier in this document. CAUTION: Because of the size and weight of the system, never attempt to install the system in the slide assemblies by yourself. You have completed the installation of the system locking mechanism...mount and center-mount slide assemblies. 1 Pull the slides out to the rack. Installing the System in the Rack CAUTION: Due to the size and weight of the system, never attempt to install the system by yourself. 2 Lift the system into position (see Figure 1-18). 3 Place one hand ...


