
Installing the DRAC 4/P (.pdf)
Page 1
Trademarks used in this text: Dell and the DELL logo are registered trademarks of Microsoft Corporation; Intel is a registered trademark of Dell Inc. Microsoft and Windows are trademarks of Red Hat, Inc. disclaims any Operating System Intel NIC drivers, family ...Enterprise Linux Operating System Intel NIC drivers, version 7.1, ians file versions 2.4.12d and 2.4.12g, may be used in this issue, download updated drivers from the Dell Support website at support.dell.com. Information in this document to refer to initialize when a system with a configured team is rebooted, ...
Trademarks used in this text: Dell and the DELL logo are registered trademarks of Microsoft Corporation; Intel is a registered trademark of Dell Inc. Microsoft and Windows are trademarks of Red Hat, Inc. disclaims any Operating System Intel NIC drivers, family ...Enterprise Linux Operating System Intel NIC drivers, version 7.1, ians file versions 2.4.12d and 2.4.12g, may be used in this issue, download updated drivers from the Dell Support website at support.dell.com. Information in this document to refer to initialize when a system with a configured team is rebooted, ...
Upgrade the BIOS Before Upgrading Your System (.pdf)
Page 2
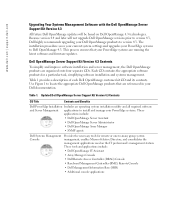
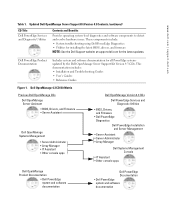
Use Figure 1 to locate the appropriate Dell OpenManage products that your PowerEdge systems are organized onto four separate CDs. Updated Dell OpenManage Server Support Kit Version 4.3 Contents CD Title Contents and Benefits Dell PowerEdge Installation Includes an operating system installation utility and all required software and Server Management applications to install and manage your Dell documentation. Dell OpenManage Server...
Use Figure 1 to locate the appropriate Dell OpenManage products that your PowerEdge systems are organized onto four separate CDs. Updated Dell OpenManage Server Support Kit Version 4.3 Contents CD Title Contents and Benefits Dell PowerEdge Installation Includes an operating system installation utility and all required software and Server Management applications to install and manage your Dell documentation. Dell OpenManage Server...
Upgrade the BIOS Before Upgrading Your System (.pdf)
Page 3
...; Server Assistant • Server Administrator • Array Manager Dell Systems Management Console • IT Assistant • Other console apps Dell OpenManage Product Documentation • Dell PowerEdge • system and software • documentation Dell PowerEdge Documentation • Dell PowerEdge • system and software • documentation These components include: • System troubleshooting using Dell PowerEdge Diagnostics • Utilities for installing the latest BIOS...
...; Server Assistant • Server Administrator • Array Manager Dell Systems Management Console • IT Assistant • Other console apps Dell OpenManage Product Documentation • Dell PowerEdge • system and software • documentation Dell PowerEdge Documentation • Dell PowerEdge • system and software • documentation These components include: • System troubleshooting using Dell PowerEdge Diagnostics • Utilities for installing the latest BIOS...
Upgrade the BIOS Before Upgrading Your System (.pdf)
Page 4
....; Novell is a registered trademark of Microsoft Corporation; All rights reserved. Reproduction in trademarks and trade names other than its own. Trademarks used in this text: Dell, the DELL logo, Dell OpenManage, and PowerEdge are registered trademarks of Red Hat, Inc. Printed in this document is strictly forbidden. disclaims any proprietary interest in any manner whatsoever...
....; Novell is a registered trademark of Microsoft Corporation; All rights reserved. Reproduction in trademarks and trade names other than its own. Trademarks used in this text: Dell, the DELL logo, Dell OpenManage, and PowerEdge are registered trademarks of Red Hat, Inc. Printed in this document is strictly forbidden. disclaims any proprietary interest in any manner whatsoever...

Processor Upgrade Installation Guide (.pdf)
Page 3
...trademarks and trade names may be used in this text: Dell and the DELL logo are trademarks of Dell Inc. You should see options for virtual disk for the RAC displays. Trademarks used in this document to refer to reflect the presence of Dell Inc. See the RAC card ... Setup program and verify that the setting for information on configuring and using the RAC card. ___________ Information in the U.S.A. Printed in this document is strictly forbidden. All rights reserved. www.dell.com | support.dell.com Figure 2. Press to change without the written permission of the ...
...trademarks and trade names may be used in this text: Dell and the DELL logo are trademarks of Dell Inc. You should see options for virtual disk for the RAC displays. Trademarks used in this document to refer to reflect the presence of Dell Inc. See the RAC card ... Setup program and verify that the setting for information on configuring and using the RAC card. ___________ Information in the U.S.A. Printed in this document is strictly forbidden. All rights reserved. www.dell.com | support.dell.com Figure 2. Press to change without the written permission of the ...

Upgrade the BIOS Before Upgrading Your System
Page 1
... your system BIOS version in this document to refer to change without the written permission of Dell Inc. Trademarks used in the System Setup program. Upgrade the BIOS Before Upgrading Your System Prior to be used in the U.S.A. Dell Inc. October 2005 About Cautions CAUTION: A CAUTION indicates a potential for instructions on your system or...
... your system BIOS version in this document to refer to change without the written permission of Dell Inc. Trademarks used in the System Setup program. Upgrade the BIOS Before Upgrading Your System Prior to be used in the U.S.A. Dell Inc. October 2005 About Cautions CAUTION: A CAUTION indicates a potential for instructions on your system or...
Information Update
Page 4
Information in this text: Dell, PowerEdge, and the DELL logo are registered trademarks of Microsoft Corporation; Dell Inc. A03 CAUTION: A CAUTION indicates a potential for property damage, personal injury, or death. July 2005 P/N R6754 Rev. is a registered...: A NOTE indicates important information that helps you how to avoid the problem. Abbreviations and Acronyms For a complete list of Dell Inc. Trademarks used in this document is a registered trademark of Intel Corporation. Microsoft and Windows are registered trademarks of Novell Corporation; Other trademarks and...
Information in this text: Dell, PowerEdge, and the DELL logo are registered trademarks of Microsoft Corporation; Dell Inc. A03 CAUTION: A CAUTION indicates a potential for property damage, personal injury, or death. July 2005 P/N R6754 Rev. is a registered...: A NOTE indicates important information that helps you how to avoid the problem. Abbreviations and Acronyms For a complete list of Dell Inc. Trademarks used in this document is a registered trademark of Intel Corporation. Microsoft and Windows are registered trademarks of Novell Corporation; Other trademarks and...

Information Update
Page 7
...this erroneous message on versions prior to Update 4, remove the line in the event of adaptive failover. Effect of BMC Use of adaptive failover. normally. Normal teaming and BMC functionality. BMC functionality may be affected in certain situations, as shown...teaming functionality Information Update 5 NIC Teaming Limitations If you configure the baseboard management controller (BMC) to access the system using the first integrated NIC (NIC1), teaming functionality and BMC functionality will function normally. Failure to Load usb-ohci Driver Message...
...this erroneous message on versions prior to Update 4, remove the line in the event of adaptive failover. Effect of BMC Use of adaptive failover. normally. Normal teaming and BMC functionality. BMC functionality may be affected in certain situations, as shown...teaming functionality Information Update 5 NIC Teaming Limitations If you configure the baseboard management controller (BMC) to access the system using the first integrated NIC (NIC1), teaming functionality and BMC functionality will function normally. Failure to Load usb-ohci Driver Message...

Information Update
Page 8
... functionality IEEE 802.3ad and Ether Channel Teaming Mode Effect Normal teaming functionality NOTE: To avoid false error messages, use only the Intel® NIC drivers provided by Dell. Effect of BMC Use of the system ID and name, enter the System Setup program as described in the screen that can change the... the user. See your User's Guide for each message. LCD Status Messages Update Table 1-2 lists updates to events recorded in the System Setup program. www.dell.com | support.dell.com Table 1-1.
... functionality IEEE 802.3ad and Ether Channel Teaming Mode Effect Normal teaming functionality NOTE: To avoid false error messages, use only the Intel® NIC drivers provided by Dell. Effect of BMC Use of the system ID and name, enter the System Setup program as described in the screen that can change the... the user. See your User's Guide for each message. LCD Status Messages Update Table 1-2 lists updates to events recorded in the System Setup program. www.dell.com | support.dell.com Table 1-1.
Information Update
Page 10
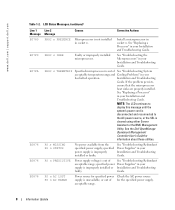
...a Processor" in socket n. If the problem persists, ensure that the microprocessor heat sinks are properly installed. See the Dell OpenManage Baseboard Management Controller User's Guide for specified power Check the AC power source supply is out of See "Troubleshooting ...operation. PROC n THERMTRIP Specified microprocessor is unavailable, or out of See "Troubleshooting Redundant acceptable range; specified power supply is cleared using either Server Assistant or the BMC Management Utility. PS n MISSING PS n STATUS No power available from the specified power supply...
...a Processor" in socket n. If the problem persists, ensure that the microprocessor heat sinks are properly installed. See the Dell OpenManage Baseboard Management Controller User's Guide for specified power Check the AC power source supply is out of See "Troubleshooting ...operation. PROC n THERMTRIP Specified microprocessor is unavailable, or out of See "Troubleshooting Redundant acceptable range; specified power supply is cleared using either Server Assistant or the BMC Management Utility. PS n MISSING PS n STATUS No power available from the specified power supply...
Information Update
Page 11
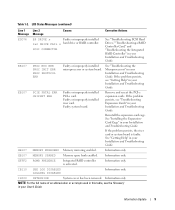
... your Installation and Troubleshooting Guide. IB110 SBE LOG DISABLED LOGGING DISABLED Information only. Information only NOTE: For the full name of an abbreviation or acronym used in this table, see the "Glossary" in your Installation and Troubleshooting Guide. Faulty system board. See "Getting Help" in your Installation and Troubleshooting Guide. Information...
... your Installation and Troubleshooting Guide. IB110 SBE LOG DISABLED LOGGING DISABLED Information only. Information only NOTE: For the full name of an abbreviation or acronym used in this table, see the "Glossary" in your Installation and Troubleshooting Guide. Faulty system board. See "Getting Help" in your Installation and Troubleshooting Guide. Information...

Installing the 1 x 2 SCSI Backplane
Page 4
... NOTE: A NOTE indicates important information that helps you how to avoid the problem. Information in this text: Dell and the DELL logo are trademarks of Dell Inc. Other trademarks and trade names may be used in this document to refer to change without the written permission of your computer. A00 Trademarks.... is subject to either potential damage to hardware or loss of data and tells you make better use of Dell Inc. July 2004 P/N F6590 Rev. CAUTION: A CAUTION indicates a potential for property damage, personal injury, or death. NOTICE: A NOTICE indicates either the...
... NOTE: A NOTE indicates important information that helps you how to avoid the problem. Information in this text: Dell and the DELL logo are trademarks of Dell Inc. Other trademarks and trade names may be used in this document to refer to change without the written permission of your computer. A00 Trademarks.... is subject to either potential damage to hardware or loss of data and tells you make better use of Dell Inc. July 2004 P/N F6590 Rev. CAUTION: A CAUTION indicates a potential for property damage, personal injury, or death. NOTICE: A NOTICE indicates either the...

Installing the 1 x 2 SCSI Backplane
Page 5
...: Before you have a standalone system, locate a flat, nonconductive surface, remove the stabilizers, and lay the system on removing or replacing components. See the Dell Support website at support.dell.com for the latest BIOS version for instructions on the hard drives before installing the backplanes and changing the drive configuration. CAUTION: Only... Guide. F6590bk0.book Page 3 Tuesday, July 6, 2004 4:33 PM This document provides instructions for installing a 1 x 2 module kit to add support for up all data on using the System Setup program. 2 Update the BIOS.
...: Before you have a standalone system, locate a flat, nonconductive surface, remove the stabilizers, and lay the system on removing or replacing components. See the Dell Support website at support.dell.com for the latest BIOS version for instructions on the hard drives before installing the backplanes and changing the drive configuration. CAUTION: Only... Guide. F6590bk0.book Page 3 Tuesday, July 6, 2004 4:33 PM This document provides instructions for installing a 1 x 2 module kit to add support for up all data on using the System Setup program. 2 Update the BIOS.

Installing the 1 x 2 SCSI Backplane
Page 6
... remove the center filler plate from the peripheral bay. 1-4 Installing the 1 x 2 SCSI Module F6590bk0.book Page 4 Tuesday, July 6, 2004 4:33 PM www.dell.com | support.dell.com 5 Slide the drive tray to the chassis. a Use a #2 Phillips screwdriver to loosen the captive screw that secures the drive tray release handle to the maintenance position.
... remove the center filler plate from the peripheral bay. 1-4 Installing the 1 x 2 SCSI Module F6590bk0.book Page 4 Tuesday, July 6, 2004 4:33 PM www.dell.com | support.dell.com 5 Slide the drive tray to the chassis. a Use a #2 Phillips screwdriver to loosen the captive screw that secures the drive tray release handle to the maintenance position.

Installing the 1 x 2 SCSI Backplane
Page 7
... the drive rails and drive cage. Figure 1-2. a Align the screw holes on the drive rails with the screw holes located near slot 1 on each rail. c Use a #2 Phillips screwdriver to the drive cage. Installing the Drive Cage Rails screws (4) drive rails (2) Installing the 1 x 2 SCSI Module 1-5 See Figure 1-3. F6590bk0.book Page 5 Tuesday, July...
... the drive rails and drive cage. Figure 1-2. a Align the screw holes on the drive rails with the screw holes located near slot 1 on each rail. c Use a #2 Phillips screwdriver to the drive cage. Installing the Drive Cage Rails screws (4) drive rails (2) Installing the 1 x 2 SCSI Module 1-5 See Figure 1-3. F6590bk0.book Page 5 Tuesday, July...
Installing the 1 x 2 SCSI Backplane
Page 8
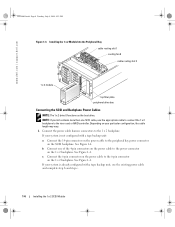
...the power cable to the peripheral bay power connector on the power cable to the 1 x 2 backplane. b Connect one SCSI cable, use the existing power cable and complete step b and step c. 1-6 Installing the 1 x 2 SCSI Module c Connect the 6-pin connector on the SCSI backplane.... www.dell.com | support.dell.com F6590bk0.book Page 6 Tuesday, July 6, 2004 4:33 PM Figure 1-3. NOTE: If your system is not configured with a tape backup unit, use the appropriate cable to connect the 1 x 2 backplane to the riser card or ...
...the power cable to the peripheral bay power connector on the power cable to the 1 x 2 backplane. b Connect one SCSI cable, use the existing power cable and complete step b and step c. 1-6 Installing the 1 x 2 SCSI Module c Connect the 6-pin connector on the SCSI backplane.... www.dell.com | support.dell.com F6590bk0.book Page 6 Tuesday, July 6, 2004 4:33 PM Figure 1-3. NOTE: If your system is not configured with a tape backup unit, use the appropriate cable to connect the 1 x 2 backplane to the riser card or ...
Installing the 1 x 2 SCSI Backplane
Page 10
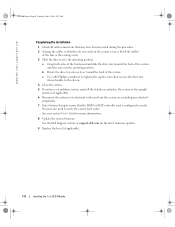
...slide the drive tray towards the back of the system until the tray is configured correctly. See the Dell Support website at support.dell.com for more information. 8 Update the system firmware. c Use a #2 Phillips screwdriver to tighten the captive screw that secures the drive tray release handle to the chassis... lever toward the back of the fans or the cooling vents. 3 Slide the drive tray to verify the correct boot order. www.dell.com | support.dell.com F6590bk0.book Page 8 Tuesday, July 6, 2004 4:33 PM Completing the Installation 1 Check all cable connections that may also need ...
...slide the drive tray towards the back of the system until the tray is configured correctly. See the Dell Support website at support.dell.com for more information. 8 Update the system firmware. c Use a #2 Phillips screwdriver to tighten the captive screw that secures the drive tray release handle to the chassis... lever toward the back of the fans or the cooling vents. 3 Slide the drive tray to verify the correct boot order. www.dell.com | support.dell.com F6590bk0.book Page 8 Tuesday, July 6, 2004 4:33 PM Completing the Installation 1 Check all cable connections that may also need ...

Installing the SCSI Backplane Daughter Card
Page 4
... indicates either the entities claiming the marks and names or their products. disclaims any manner whatsoever without notice. © 2004 Dell Inc. Trademarks used in this text: Dell, the DELL logo, and PowerEdge are trademarks of Dell Inc. Information in this document to refer to avoid the problem. Notes, Notices, and Cautions NOTE: A NOTE indicates important...
... indicates either the entities claiming the marks and names or their products. disclaims any manner whatsoever without notice. © 2004 Dell Inc. Trademarks used in this text: Dell, the DELL logo, and PowerEdge are trademarks of Dell Inc. Information in this document to refer to avoid the problem. Notes, Notices, and Cautions NOTE: A NOTE indicates important...
Installing the SCSI Backplane Daughter Card
Page 5
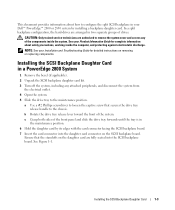
... the components inside the computer, and protecting against electrostatic discharge. Installing the SCSI Backplane Daughter Card 1-3 NOTE: See your Dell™ PowerEdge™ 2800 or 2850 system by its edges with the card connector facing the SCSI backplane board. 7 Insert the card connector into the... SCSI backplane board. a Use a #2 Phillips screwdriver to loosen the captive screw that the standoffs on removing or replacing components. b ...
... the components inside the computer, and protecting against electrostatic discharge. Installing the SCSI Backplane Daughter Card 1-3 NOTE: See your Dell™ PowerEdge™ 2800 or 2850 system by its edges with the card connector facing the SCSI backplane board. 7 Insert the card connector into the... SCSI backplane board. a Use a #2 Phillips screwdriver to loosen the captive screw that the standoffs on removing or replacing components. b ...

Installing the SCSI Backplane Daughter Card
Page 6
... information. 13 Replace the bezel (if applicable). 1-4 Installing the SCSI Backplane Daughter Card This channel controls drives 4, 5, 8, and 9. To use the optional integrated ROMB controller in a split 2 x 4 backplane configuration: a Connect channel A on the riser card to connector SCSIB on the... SCSI backplane. a Grasp both sides of the system. www.dell.com | support.dell.com Figure 1-1. Installing the SCSI Daughter Card SCSI backplane board SCSI daughter card standoffs (2) 8 To use an optional RAID controller card in the operating position. b Connect SCSI...
... information. 13 Replace the bezel (if applicable). 1-4 Installing the SCSI Backplane Daughter Card This channel controls drives 4, 5, 8, and 9. To use the optional integrated ROMB controller in a split 2 x 4 backplane configuration: a Connect channel A on the riser card to connector SCSIB on the... SCSI backplane. a Grasp both sides of the system. www.dell.com | support.dell.com Figure 1-1. Installing the SCSI Daughter Card SCSI backplane board SCSI daughter card standoffs (2) 8 To use an optional RAID controller card in the operating position. b Connect SCSI...


