
Microprocessor Upgrade Installation Guide
Page 3
...• A heat sink • Heat-sink retention clip(s) • A VRM, if applicable Your upgrade kit may also include a cooling fan. NOTICE: Before you perform this procedure, read the safety instructions in the primary microprocessor socket. Adding or Replacing a Microprocessor NOTICE: The secondary ...speed as the primary microprocessor. The following subsection describes how to the ZIF socket for the primary microprocessor on the Dell Support website at support.dell.com, and upgrade the BIOS if necessary. NOTE: In a single microprocessor system, the microprocessor must be installed...
...• A heat sink • Heat-sink retention clip(s) • A VRM, if applicable Your upgrade kit may also include a cooling fan. NOTICE: Before you perform this procedure, read the safety instructions in the primary microprocessor socket. Adding or Replacing a Microprocessor NOTICE: The secondary ...speed as the primary microprocessor. The following subsection describes how to the ZIF socket for the primary microprocessor on the Dell Support website at support.dell.com, and upgrade the BIOS if necessary. NOTE: In a single microprocessor system, the microprocessor must be installed...
Microprocessor Upgrade Installation Guide
Page 4
...on a flat surface to maintain proper thermal conditions. CAUTION: The microprocessor and heat sink can remove the heat sink without removing the fan. If any of the pins when unpacking the microprocessor. For information on the microprocessor appear bent, see "Getting Help" in the ...and Troubleshooting Guide for the new microprocessor. See your Installation and Troubleshooting Guide. 1-2 Microprocessor Upgrade Installation Guide www.dell.com | support.dell.com 4 If you can permanently damage the microprocessor. 7 Unpack the new microprocessor. Bending the pins can remove the...
...on a flat surface to maintain proper thermal conditions. CAUTION: The microprocessor and heat sink can remove the heat sink without removing the fan. If any of the pins when unpacking the microprocessor. For information on the microprocessor appear bent, see "Getting Help" in the ...and Troubleshooting Guide for the new microprocessor. See your Installation and Troubleshooting Guide. 1-2 Microprocessor Upgrade Installation Guide www.dell.com | support.dell.com 4 If you can permanently damage the microprocessor. 7 Unpack the new microprocessor. Bending the pins can remove the...
Microprocessor Upgrade Installation Guide
Page 6
...provided with one of the connector engage (see your Installation and Troubleshooting Guide. 13 If a cooling fan is provided with your system. For information on installing a cooling fan, see Figure 1-2). NOTICE: To avoid possible damage to the microprocessor, you are adding a secondary ...microprocessor, examine the VRM to provide proper thermal conditions. www.dell.com | support.dell.com 9 Install the heat sink. • If...
...provided with one of the connector engage (see your Installation and Troubleshooting Guide. 13 If a cooling fan is provided with your system. For information on installing a cooling fan, see Figure 1-2). NOTICE: To avoid possible damage to the microprocessor, you are adding a secondary ...microprocessor, examine the VRM to provide proper thermal conditions. www.dell.com | support.dell.com 9 Install the heat sink. • If...
Removing and Replacing a System Cooling Fan
Page 1
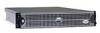
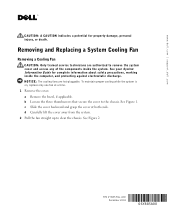
...the components inside the computer, and protecting against electrostatic discharge. See Figure 2. Removing and Replacing a System Cooling Fan Removing a Cooling Fan CAUTION: Only trained service technicians are hot-pluggable. b Loosen the three thumbscrews that secure the cover to clear ... the cover. d Carefully lift the cover away from the system. 2 Pull the fan straight up to the chassis. P/N 6Y885 Rev. a Remove the bezel, if applicable. www.dell.com | support.dell.com CAUTION: A CAUTION indicates a potential for complete information about safety precautions, working ...
...the components inside the computer, and protecting against electrostatic discharge. See Figure 2. Removing and Replacing a System Cooling Fan Removing a Cooling Fan CAUTION: Only trained service technicians are hot-pluggable. b Loosen the three thumbscrews that secure the cover to clear ... the cover. d Carefully lift the cover away from the system. 2 Pull the fan straight up to the chassis. P/N 6Y885 Rev. a Remove the bezel, if applicable. www.dell.com | support.dell.com CAUTION: A CAUTION indicates a potential for complete information about safety precautions, working ...

Removing and Replacing a System Cooling Fan
Page 2
Removing and Replacing the Cover thumbscrews (3) Figure 2. www.dell.com | support.dell.com Figure 1. Removing and Installing a Cooling Fan system fans (2) fan connector cooling fan
Removing and Replacing the Cover thumbscrews (3) Figure 2. www.dell.com | support.dell.com Figure 1. Removing and Installing a Cooling Fan system fans (2) fan connector cooling fan
Removing and Replacing a System Cooling Fan
Page 3
... cover and access any of the chassis, and slide the cover forward. Dell Computer Corporation disclaims any manner whatsoever without notice. © 2002 Dell Computer Corporation. www.dell.com | support.dell.com Replacing a Cooling Fan CAUTION: Only trained service technicians are trademarks of Dell Computer Corporation. b Tighten the three thumbscrews that secure the cover to either...
... cover and access any of the chassis, and slide the cover forward. Dell Computer Corporation disclaims any manner whatsoever without notice. © 2002 Dell Computer Corporation. www.dell.com | support.dell.com Replacing a Cooling Fan CAUTION: Only trained service technicians are trademarks of Dell Computer Corporation. b Tighten the three thumbscrews that secure the cover to either...


