Rack Installation Guide
Page 7
... side stabilizers on its slide assemblies at one time. Thus, "component" refers to tip over and may result in serious injury. The weight of more than one component out of the rack on a single rack or front stabilizers for joined multiple racks before installing components in connection...with such combinations. • System rack kits are considered to ensure that the full weight of your responsibility to be components in a Dell™ rack cabinet using the customer rack kit. Due to the height and weight of the rack, a minimum of two people should accomplish this task. • ...
... side stabilizers on its slide assemblies at one time. Thus, "component" refers to tip over and may result in serious injury. The weight of more than one component out of the rack on a single rack or front stabilizers for joined multiple racks before installing components in connection...with such combinations. • System rack kits are considered to ensure that the full weight of your responsibility to be components in a Dell™ rack cabinet using the customer rack kit. Due to the height and weight of the rack, a minimum of two people should accomplish this task. • ...
Rack Installation Guide
Page 10
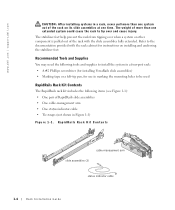
...management arm • One status indicator cable • Tie-wraps (not shown in a rack, never pull more than one time. www.dell.com | support.dell.com CAUTION: After installing systems in Figure 1-1) Figure 1-1. RapidRails Rack Kit Contents cable-management arm slide assemblies (2) status indicator cable 1-4 Rack...more than one extended system could cause the rack to the documentation provided with the slide assemblies fully extended. The weight of the rack on installing and anchoring the stabilizer feet. The stabilizer feet help prevent the rack from tipping over and ...
...management arm • One status indicator cable • Tie-wraps (not shown in a rack, never pull more than one time. www.dell.com | support.dell.com CAUTION: After installing systems in Figure 1-1) Figure 1-1. RapidRails Rack Kit Contents cable-management arm slide assemblies (2) status indicator cable 1-4 Rack...more than one extended system could cause the rack to the documentation provided with the slide assemblies fully extended. The weight of the rack on installing and anchoring the stabilizer feet. The stabilizer feet help prevent the rack from tipping over and ...
Rack Installation Guide
Page 12
CAUTION: Because of the size and weight of the rack cabinet doors, never attempt to remove or install them by horizontal lines and numbers in the rack. Rack cabinets may be marked ... the rack's vertical rail. NOTE: The vertical rails may have an alternating pattern of three holes per rack unit with your rack cabinet. www.dell.com | support.dell.com 4 Installing the system in the rack 5 Installing the cable-management arm 6 Routing cables 7 Replacing the rack doors Removing the Rack Doors See the...
CAUTION: Because of the size and weight of the rack cabinet doors, never attempt to remove or install them by horizontal lines and numbers in the rack. Rack cabinets may be marked ... the rack's vertical rail. NOTE: The vertical rails may have an alternating pattern of three holes per rack unit with your rack cabinet. www.dell.com | support.dell.com 4 Installing the system in the rack 5 Installing the cable-management arm 6 Routing cables 7 Replacing the rack doors Removing the Rack Doors See the...

Rack Installation Guide
Page 17
Figure 1-6. Rack Installation Guide 1-11 CAUTION: Because of the size and weight of the system, never attempt to install the system in the slide assemblies by yourself. 2 Lift the system into position in front of rack Installing ...
Figure 1-6. Rack Installation Guide 1-11 CAUTION: Because of the size and weight of the system, never attempt to install the system in the slide assemblies by yourself. 2 Lift the system into position in front of rack Installing ...

Rack Installation Guide
Page 23
... the cables are routed correctly and do not bind, stretch, or pinch with your system in the extended position. CAUTION: Because of the size and weight of the rack to verify that the cable slack is moved in and out of the rack cabinet doors, never attempt to its furthest extension...
... the cables are routed correctly and do not bind, stretch, or pinch with your system in the extended position. CAUTION: Because of the size and weight of the rack to verify that the cable slack is moved in and out of the rack cabinet doors, never attempt to its furthest extension...

Rack Installation Guide
Page 33
... the front of the rack kit in this document. Rack Installation Guide 1-27 Installing the System in the Rack CAUTION: Due to the size and weight of the system, never attempt to the rack. When all shoulder screws are properly seated, the yellow latch on each slide assembly clicks and locks... system with the back slots on the slide assemblies. 5 Engage the back shoulder screws into position (see Figure 1-17). CAUTION: Because of the size and weight of the system, never attempt to install the system in the slide assemblies by yourself.
... the front of the rack kit in this document. Rack Installation Guide 1-27 Installing the System in the Rack CAUTION: Due to the size and weight of the system, never attempt to the rack. When all shoulder screws are properly seated, the yellow latch on each slide assembly clicks and locks... system with the back slots on the slide assemblies. 5 Engage the back shoulder screws into position (see Figure 1-17). CAUTION: Because of the size and weight of the system, never attempt to install the system in the slide assemblies by yourself.
2-Post Rack Installation
Page 5
...a minimum of two people should accomplish this task. • Before working on the floor. It is your responsibility to ensure that the full weight of the rack rests on the rack, make sure that the stabilizers are secured to the rack, extended to the floor, and that the final...cause the rack to help protect your system and rack kit in the rack. After installing system/components in a Dell™ rack cabinet using the customer rack kit. The weight of a Dell rack. Install front and side stabilizers on a single rack or front stabilizers for joined multiple racks before working ...
...a minimum of two people should accomplish this task. • Before working on the floor. It is your responsibility to ensure that the full weight of the rack rests on the rack, make sure that the stabilizers are secured to the rack, extended to the floor, and that the final...cause the rack to help protect your system and rack kit in the rack. After installing system/components in a Dell™ rack cabinet using the customer rack kit. The weight of a Dell rack. Install front and side stabilizers on a single rack or front stabilizers for joined multiple racks before working ...

2-Post Rack Installation
Page 16
... out to their slots (the middle slot is behind the yellow system release latch) (see Figure 1-6). CAUTION: Because of the size and weight of the system, never attempt to install the system in the slide assemblies by yourself. NOTE: Use the yellow system release latch whenever you... rack cabinet (as viewed from the slide assemblies. The latch clicks when locked. 1-12 2-Post Rack Installation www.dell.com | support.dell.com Installing the System in the Rack CAUTION: Due to the size and weight of the slide assembly (see Figure 1-6). 8 Push in their fully extended position.
... out to their slots (the middle slot is behind the yellow system release latch) (see Figure 1-6). CAUTION: Because of the size and weight of the system, never attempt to install the system in the slide assemblies by yourself. NOTE: Use the yellow system release latch whenever you... rack cabinet (as viewed from the slide assemblies. The latch clicks when locked. 1-12 2-Post Rack Installation www.dell.com | support.dell.com Installing the System in the Rack CAUTION: Due to the size and weight of the slide assembly (see Figure 1-6). 8 Push in their fully extended position.


