
Information Update
Page 8
... bus processor, your system BIOS must be used together in a memory-configuration error beep code of at least 512 KB. www.dell.com | support.dell.com Compatibility Considerations Processors A system board that uses up to two Intel Xeon™ 533-MHz front-side bus microprocessors is not applied to the processors so that...
... bus processor, your system BIOS must be used together in a memory-configuration error beep code of at least 512 KB. www.dell.com | support.dell.com Compatibility Considerations Processors A system board that uses up to two Intel Xeon™ 533-MHz front-side bus microprocessors is not applied to the processors so that...
Microprocessor Upgrade Installation
Page 5
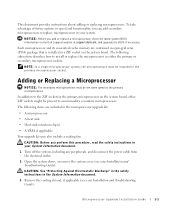
...adding or replacing microprocessors. The following items are contained in a pin-grid array (PGA) package that is installed in a ZIF socket on the system board. CAUTION: Before you perform this procedure, read the safety instructions in your Installation and Troubleshooting Guide). Microprocessor Upgrade Installation Guide 1-1 To take advantage of ... Your upgrade kit may also include a cooling fan. The following subsection describes how to the ZIF socket for the primary microprocessor on the Dell Support website at support.dell.com, and upgrade the BIOS if necessary.
...adding or replacing microprocessors. The following items are contained in a pin-grid array (PGA) package that is installed in a ZIF socket on the system board. CAUTION: Before you perform this procedure, read the safety instructions in your Installation and Troubleshooting Guide). Microprocessor Upgrade Installation Guide 1-1 To take advantage of ... Your upgrade kit may also include a cooling fan. The following subsection describes how to the ZIF socket for the primary microprocessor on the Dell Support website at support.dell.com, and upgrade the BIOS if necessary.
Microprocessor Upgrade Installation
Page 8
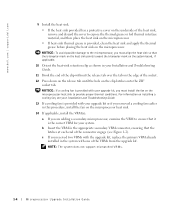
www.dell.com | support.dell.com 9 Install the heat sink. • If the heat sink provided has a protective cover on the underside of the VRMs from the upgrade kit. For ... the VRM in the appropriate secondary VRM connector, ensuring that the triangular mark on the heat sink points toward the triangular mark on the system board, if applicable. 10 Orient the heat-sink retention clip as shown in your Installation and Troubleshooting Guide. 11 Hook the end of the clip without...
www.dell.com | support.dell.com 9 Install the heat sink. • If the heat sink provided has a protective cover on the underside of the VRMs from the upgrade kit. For ... the VRM in the appropriate secondary VRM connector, ensuring that the triangular mark on the heat sink points toward the triangular mark on the system board, if applicable. 10 Orient the heat-sink retention clip as shown in your Installation and Troubleshooting Guide. 11 Hook the end of the clip without...
Installing or Replacing an ERA/O Card
Page 4
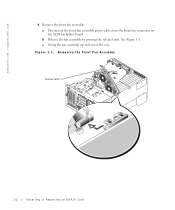
www.dell.com | support.dell.com 4 Remove the front fan assembly: a Disconnect the front fan assembly power cable from the front fan connector on the SCSI backplane board. See Figure 1-1. Figure 1-1. c Swing the fan assembly up and out of the way. b Release the fan assembly by pressing the release latch. Removing the Front Fan Assembly release latch 1-2 Installing or Replacing an ERA/O Card
www.dell.com | support.dell.com 4 Remove the front fan assembly: a Disconnect the front fan assembly power cable from the front fan connector on the SCSI backplane board. See Figure 1-1. Figure 1-1. c Swing the fan assembly up and out of the way. b Release the fan assembly by pressing the release latch. Removing the Front Fan Assembly release latch 1-2 Installing or Replacing an ERA/O Card
Installing or Replacing an ERA/O Card
Page 5
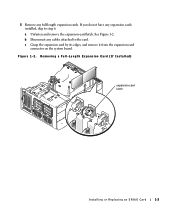
b Disconnect any expansion cards installed, skip to the card. If you do not have any cables attached to step 6. See Figure 1-2. Figure 1-2. Removing a Full-Length Expansion Card (If Installed) expansion-card latch Installing or Replacing an ERA/O Card 1-3 5 Remove any full-length expansion cards. c Grasp the expansion card by its edges, and remove it from the expansion-card connector on the system board. a Unfasten and remove the expansion-card latch.
b Disconnect any expansion cards installed, skip to the card. If you do not have any cables attached to step 6. See Figure 1-2. Figure 1-2. Removing a Full-Length Expansion Card (If Installed) expansion-card latch Installing or Replacing an ERA/O Card 1-3 5 Remove any full-length expansion cards. c Grasp the expansion card by its edges, and remove it from the expansion-card connector on the system board. a Unfasten and remove the expansion-card latch.
Installing or Replacing an ERA/O Card
Page 6
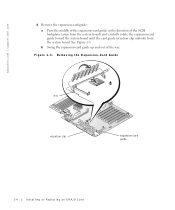
Removing the Expansion-Card Guide slot retention clip expansion-card guide 1-4 Installing or Replacing an ERA/O Card b Swing the expansion-card guide up and out of the SCSI backplane (away from the system board) and carefully rotate the expansion-card guide toward the system board until the card guide retention clip unhooks from the system board. www.dell.com | support.dell.com 6 Remove the expansion-card guide: a Press the middle of the expansion-card guide in the direction of the way. Figure 1-3. See Figure 1-3.
Removing the Expansion-Card Guide slot retention clip expansion-card guide 1-4 Installing or Replacing an ERA/O Card b Swing the expansion-card guide up and out of the SCSI backplane (away from the system board) and carefully rotate the expansion-card guide toward the system board until the card guide retention clip unhooks from the system board. www.dell.com | support.dell.com 6 Remove the expansion-card guide: a Press the middle of the expansion-card guide in the direction of the way. Figure 1-3. See Figure 1-3.
Installing or Replacing an ERA/O Card
Page 7
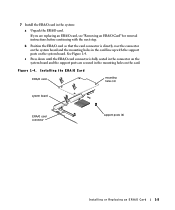
.../O card connector support posts (4) Installing or Replacing an ERA/O Card 1-5 If you are secured in the mounting holes on the system board and the mounting holes in the system: a Unpack the ERA/O card. 7 Install the ERA/O card in the card line up with the next step. b Position ...the ERA/O card so that the card connector is fully seated in the connector on the system board and the support posts are replacing an ERA/O card, see "Removing an ERA/O Card" for removal instructions before continuing with the support posts on the...
.../O card connector support posts (4) Installing or Replacing an ERA/O Card 1-5 If you are secured in the mounting holes on the system board and the mounting holes in the system: a Unpack the ERA/O card. 7 Install the ERA/O card in the card line up with the next step. b Position ...the ERA/O card so that the card connector is fully seated in the connector on the system board and the support posts are replacing an ERA/O card, see "Removing an ERA/O Card" for removal instructions before continuing with the support posts on the...
Installing or Replacing an ERA/O Card
Page 8
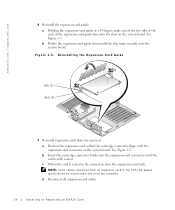
... the card-edge connector firmly into the slots on the system board. NOTE: SCSI cables connected from an expansion card to the SCSI backplane board should be routed under the front fan assembly. www.dell.com | support.dell.com 8 Reinstall the expansion-card guide: a Holding the expansion-card guide at a 45-degree angle, insert...
... the card-edge connector firmly into the slots on the system board. NOTE: SCSI cables connected from an expansion card to the SCSI backplane board should be routed under the front fan assembly. www.dell.com | support.dell.com 8 Reinstall the expansion-card guide: a Holding the expansion-card guide at a 45-degree angle, insert...

Installing or Replacing an ERA/O Card
Page 9
... Update the ERA/O card with the latest version of the connector. 12 Connect a network cable to the front fan connector on the SCSI backplane board. 11 Replace the system cover. See the RAC documentation provided on the system back panel. Figure 1-6. Installing or Replacing an ERA/O Card 1-7 ...the 10-Mbps server management Ethernet connector on the documentation CD for the location of the ERA/O firmware, available at the Dell Support website at support.dell.com. See "Replacing the Cover" in the hinge bracket and swing the fan assembly down until the release lever snaps into...
... Update the ERA/O card with the latest version of the connector. 12 Connect a network cable to the front fan connector on the SCSI backplane board. 11 Replace the system cover. See the RAC documentation provided on the system back panel. Figure 1-6. Installing or Replacing an ERA/O Card 1-7 ...the 10-Mbps server management Ethernet connector on the documentation CD for the location of the ERA/O firmware, available at the Dell Support website at support.dell.com. See "Replacing the Cover" in the hinge bracket and swing the fan assembly down until the release lever snaps into...
Installing or Replacing an ERA/O Card
Page 10
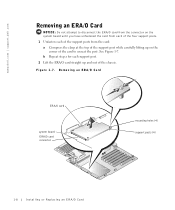
Figure 1-7. See Figure 1-7. Removing an ERA/O Card ERA/O card system board ERA/O card connector mounting holes (4) support posts (4) 1-8 Installing or Replacing an ERA/O Card b Repeat step a for each of the support posts from each of the ... support post. 2 Lift the ERA/O card straight up on the corner of the card to disconnect the ERA/O card from the connector on the system board until you have unfastened the card from the card: a Compress the clasp at the top of the support post while carefully lifting up and out...
Figure 1-7. See Figure 1-7. Removing an ERA/O Card ERA/O card system board ERA/O card connector mounting holes (4) support posts (4) 1-8 Installing or Replacing an ERA/O Card b Repeat step a for each of the support posts from each of the ... support post. 2 Lift the ERA/O card straight up on the corner of the card to disconnect the ERA/O card from the connector on the system board until you have unfastened the card from the card: a Compress the clasp at the top of the support post while carefully lifting up and out...


