Information Update
Page 5
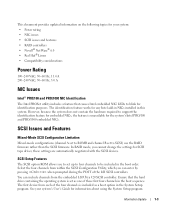
... feature works for information about using the System Setup program. Information Update 1-3 these first four channels in the boot sequence. See your system: • Power rating • NIC issues • SCSI issues and features • RAID controllers • Novell® NetWare® 6.0 • Red Hat®...; Linux • Compatibility considerations Power Rating 100-240 VAC, 50-60 Hz, 11.4 A 200-240 VAC, 50-60 Hz, 5.0 A NIC Issues Intel® PRO/100 and PRO/1000...
... feature works for information about using the System Setup program. Information Update 1-3 these first four channels in the boot sequence. See your system: • Power rating • NIC issues • SCSI issues and features • RAID controllers • Novell® NetWare® 6.0 • Red Hat®...; Linux • Compatibility considerations Power Rating 100-240 VAC, 50-60 Hz, 11.4 A 200-240 VAC, 50-60 Hz, 5.0 A NIC Issues Intel® PRO/100 and PRO/1000...

Information Update
Page 6
...the boot drive by mistake. NOTE: "Overload" in this issue. 1-4 Information Update Be careful to the signal load, not the power load. When you access the RAID controller setup functions by mistake can lock up when the reset server command is run. See ...controller. Do not install PERC 3/DC and PERC 3/QC controller cards in PCI-X expansion slots 2 through 5. www.dell.com | support.dell.com RAID Controllers Installing RAID Controllers Install Dell™ PowerEdge™ Expandable RAID Controller (PERC) 3/DC and PERC 3/QC controller cards in slots 6 and 7. Novell NetWare 6.0...
...the boot drive by mistake. NOTE: "Overload" in this issue. 1-4 Information Update Be careful to the signal load, not the power load. When you access the RAID controller setup functions by mistake can lock up when the reset server command is run. See ...controller. Do not install PERC 3/DC and PERC 3/QC controller cards in PCI-X expansion slots 2 through 5. www.dell.com | support.dell.com RAID Controllers Installing RAID Controllers Install Dell™ PowerEdge™ Expandable RAID Controller (PERC) 3/DC and PERC 3/QC controller cards in slots 6 and 7. Novell NetWare 6.0...

Information Update
Page 8
... same system. System BIOS Version If your system uses the Xeon 533-MHz front-side bus processor, your system BIOS must be damaged. Power is not applied to the processors so that uses up to two Intel Xeon™ 533-MHz front-side bus microprocessors is displayed. Memory...front-side bus processors have 604 pins, support internal operating speeds of at least 2.0 GHz, and include an internal cache of 1-3-2. www.dell.com | support.dell.com Compatibility Considerations Processors A system board that they will not boot and no error message is now available. The Xeon 400-MHz and ...
... same system. System BIOS Version If your system uses the Xeon 533-MHz front-side bus processor, your system BIOS must be damaged. Power is not applied to the processors so that uses up to two Intel Xeon™ 533-MHz front-side bus microprocessors is displayed. Memory...front-side bus processors have 604 pins, support internal operating speeds of at least 2.0 GHz, and include an internal cache of 1-3-2. www.dell.com | support.dell.com Compatibility Considerations Processors A system board that they will not boot and no error message is now available. The Xeon 400-MHz and ...
Microprocessor Upgrade Installation
Page 5
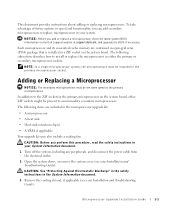
...if applicable (see your Installation and Troubleshooting Guide). In addition to the ZIF socket for the primary microprocessor on the Dell Support website at support.dell.com, and upgrade the BIOS if necessary. Microprocessor Upgrade Installation Guide 1-1 NOTICE: Before you perform this procedure, read... and its associated cache memory are included in your System Information document. 1 Turn off the system, including any peripherals, and disconnect the power cable from the electrical outlet. 2 Open the system doors, or remove the system cover (see your system. NOTE: In a single...
...if applicable (see your Installation and Troubleshooting Guide). In addition to the ZIF socket for the primary microprocessor on the Dell Support website at support.dell.com, and upgrade the BIOS if necessary. Microprocessor Upgrade Installation Guide 1-1 NOTICE: Before you perform this procedure, read... and its associated cache memory are included in your System Information document. 1 Turn off the system, including any peripherals, and disconnect the power cable from the electrical outlet. 2 Open the system doors, or remove the system cover (see your system. NOTE: In a single...
Installing or Replacing an ERA/O Card
Page 4
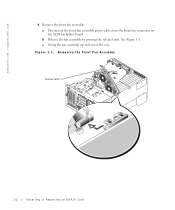
Removing the Front Fan Assembly release latch 1-2 Installing or Replacing an ERA/O Card See Figure 1-1. b Release the fan assembly by pressing the release latch. c Swing the fan assembly up and out of the way. Figure 1-1. www.dell.com | support.dell.com 4 Remove the front fan assembly: a Disconnect the front fan assembly power cable from the front fan connector on the SCSI backplane board.
Removing the Front Fan Assembly release latch 1-2 Installing or Replacing an ERA/O Card See Figure 1-1. b Release the fan assembly by pressing the release latch. c Swing the fan assembly up and out of the way. Figure 1-1. www.dell.com | support.dell.com 4 Remove the front fan assembly: a Disconnect the front fan assembly power cable from the front fan connector on the SCSI backplane board.

Installing or Replacing an ERA/O Card
Page 9
...a network cable to the front fan connector on the documentation CD for the location of the ERA/O firmware, available at the Dell Support website at support.dell.com. Installing or Replacing an ERA/O Card 1-7 See "Replacing the Cover" in the hinge bracket and swing the fan assembly ...down until the release lever snaps into place. See Figure 1-6. See Figure 1-6 for information about updating the firmware. b Connect the fan assembly power cable ...
...a network cable to the front fan connector on the documentation CD for the location of the ERA/O firmware, available at the Dell Support website at support.dell.com. Installing or Replacing an ERA/O Card 1-7 See "Replacing the Cover" in the hinge bracket and swing the fan assembly ...down until the release lever snaps into place. See Figure 1-6. See Figure 1-6 for information about updating the firmware. b Connect the fan assembly power cable ...

Installing Novell NetWare 5.1 and Support Pack 5
Page 1
... system and Support Pack 5 using the NetWare 5.1 Network Software CD or the NetWare 5.1 Overlay CD Preinstallation Requirements Verify that includes the following drivers. www.dell.com | support.dell.com Installing Novell® NetWare® 5.1 and Support Pack 5 The following are not supported with Hyper-Threading. • JAVA update (4pent.exe) Create ... use the ACPI modules from the Novell support and downloads website at support.novell.com and install each individually: • Advanced Configuration and Power Interface (ACPI) fix for more information. • One of the following: -
... system and Support Pack 5 using the NetWare 5.1 Network Software CD or the NetWare 5.1 Overlay CD Preinstallation Requirements Verify that includes the following drivers. www.dell.com | support.dell.com Installing Novell® NetWare® 5.1 and Support Pack 5 The following are not supported with Hyper-Threading. • JAVA update (4pent.exe) Create ... use the ACPI modules from the Novell support and downloads website at support.novell.com and install each individually: • Advanced Configuration and Power Interface (ACPI) fix for more information. • One of the following: -


