Getting Started Guide
Page 12
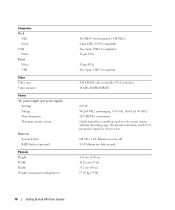
... inrush current may reach 55 A per power supply) Wattage Voltage Heat dissipation Maximum inrush current Batteries System battery RAID battery (optional) Physical Height Width Depth Weight (maximum configuration) Two RJ-45 (for 10 ms or less.
... inrush current may reach 55 A per power supply) Wattage Voltage Heat dissipation Maximum inrush current Batteries System battery RAID battery (optional) Physical Height Width Depth Weight (maximum configuration) Two RJ-45 (for 10 ms or less.

Rack Installation Guide
Page 7
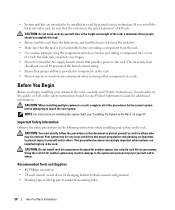
... separate document. Due to the height and weight of the rack, a minimum of more than one time. Therefore, always install the stabilizer(s) before working on racks joined to any other rack cabinet has not been approved by yourself. The installation of a Dell rack. If you install the kit in...system/components in a rack, never pull more than one component out of the rack rests on the rack, make sure that the full weight of the rack on a single rack or front stabilizers for specific caution statements and procedures. Four-Post Rack Installation Safety Instructions Use the ...
... separate document. Due to the height and weight of the rack, a minimum of more than one time. Therefore, always install the stabilizer(s) before working on racks joined to any other rack cabinet has not been approved by yourself. The installation of a Dell rack. If you install the kit in...system/components in a rack, never pull more than one component out of the rack rests on the rack, make sure that the full weight of the rack on a single rack or front stabilizers for specific caution statements and procedures. Four-Post Rack Installation Safety Instructions Use the ...

Rack Installation Guide
Page 12
... square holes. CAUTION: Store the two doors where they will not injure someone if the doors accidently fall over. CAUTION: Because of the size and weight of the number marking on the rack. 10 Four-Post Rack Installation Marking the Rack For a 1-U system, you install in 1-U increments. Rack cabinets may be...
... square holes. CAUTION: Store the two doors where they will not injure someone if the doors accidently fall over. CAUTION: Because of the size and weight of the number marking on the rack. 10 Four-Post Rack Installation Marking the Rack For a 1-U system, you install in 1-U increments. Rack cabinets may be...

Rack Installation Guide
Page 20
CAUTION: Because of the size and weight of the system, never attempt to install the system in the slide assemblies. The three shoulder screws on each inner slide, then push the system ...
CAUTION: Because of the size and weight of the system, never attempt to install the system in the slide assemblies. The three shoulder screws on each inner slide, then push the system ...

Rack Installation Guide
Page 24
... rotate the latch downward (see Figure 1-12). 2 In preparation for replacing doors in the documentation provided with your rack. CAUTION: Because of the size and weight of system 1 mounting rails (2) 2 tray 3 cable-management arm retention latch 22 Four-Post Rack Installation Installing the Tray 1 2 3 back of the rack cabinet doors, never...
... rotate the latch downward (see Figure 1-12). 2 In preparation for replacing doors in the documentation provided with your rack. CAUTION: Because of the size and weight of system 1 mounting rails (2) 2 tray 3 cable-management arm retention latch 22 Four-Post Rack Installation Installing the Tray 1 2 3 back of the rack cabinet doors, never...

Rack Installation Guide
Page 29
... 27 Two-Post Rack Installation The two-post rack kit is your responsibility to ensure that has not been securely anchored in place. The weight of Systems Observe the following safety guidelines to ensure your own personal safety and to tip over and may result. The installation of the... component could cause the rack to help protect your system and rack kit in any other rack cabinet has not been approved by industry standards. Dell disclaims all liability and warranties in telecommunications equipment facilities. Both 7.62-cm or 15.24-cm (3-inch and 6-inch) wide two-post racks...
... 27 Two-Post Rack Installation The two-post rack kit is your responsibility to ensure that has not been securely anchored in place. The weight of Systems Observe the following safety guidelines to ensure your own personal safety and to tip over and may result. The installation of the... component could cause the rack to help protect your system and rack kit in any other rack cabinet has not been approved by industry standards. Dell disclaims all liability and warranties in telecommunications equipment facilities. Both 7.62-cm or 15.24-cm (3-inch and 6-inch) wide two-post racks...
Rack Installation Guide
Page 30
... Always load the rack from the rack. • Use caution when pressing the component rail release latches and sliding a component into or out of a Dell rack. CAUTION: When installing multiple systems in a rack, complete all of the branch circuit rating. • Ensure that provides power to the rack. ...mount configuration) • Masking tape or felt-tip pen to mark the mounting holes 28 Two-Post Rack Installation Due to the height and weight of the rack, a minimum of two people should not exceed 80 percent of the procedures for the current system before extending a component from...
... Always load the rack from the rack. • Use caution when pressing the component rail release latches and sliding a component into or out of a Dell rack. CAUTION: When installing multiple systems in a rack, complete all of the branch circuit rating. • Ensure that provides power to the rack. ...mount configuration) • Masking tape or felt-tip pen to mark the mounting holes 28 Two-Post Rack Installation Due to the height and weight of the rack, a minimum of two people should not exceed 80 percent of the procedures for the current system before extending a component from...

Rack Installation Guide
Page 39
... that the side rails at the back of the system are aligned with the mounting rails in the rack. CAUTION: Because of the size and weight of the system, never attempt to install the system in the mounting rails by yourself. 3 Push the system into position so that secures the system...
... that the side rails at the back of the system are aligned with the mounting rails in the rack. CAUTION: Because of the size and weight of the system, never attempt to install the system in the mounting rails by yourself. 3 Push the system into position so that secures the system...


