
Hardware Owner's Manual (PDF)
Page 5
...Installing the Diskette Drive 74 System Battery 75 Replacing the System Battery 75 Cooling Shroud 77 Removing the Cooling Shroud 77 Installing the Cooling Shroud 79 Fan Brackets 79 Removing the Center Fan Bracket 79 Replacing the Center Fan Bracket 79 Removing the Back Fan Bracket 80 ... TOE 87 Microprocessor 87 Replacing a Processor 88 SAS RAID Controller Daughter Card 92 Replacing the SAS RAID Controller Daughter Card Battery 92 Removing the SAS RAID Controller Daughter Card 93 Installing the SAS RAID Controller Daughter Card 95 Configuring the Boot Drive 95 Control Panel...
...Installing the Diskette Drive 74 System Battery 75 Replacing the System Battery 75 Cooling Shroud 77 Removing the Cooling Shroud 77 Installing the Cooling Shroud 79 Fan Brackets 79 Removing the Center Fan Bracket 79 Replacing the Center Fan Bracket 79 Removing the Back Fan Bracket 80 ... TOE 87 Microprocessor 87 Replacing a Processor 88 SAS RAID Controller Daughter Card 92 Replacing the SAS RAID Controller Daughter Card Battery 92 Removing the SAS RAID Controller Daughter Card 93 Installing the SAS RAID Controller Daughter Card 95 Configuring the Boot Drive 95 Control Panel...
Hardware Owner's Manual (PDF)
Page 6
System Board (Service-Only Procedure 97 Removing the System Board 97 Installing the System Board 99 4 Troubleshooting Your System Safety First-For You and Your System 101 ...Troubleshooting a Serial I/O Device 105 Troubleshooting a USB Device 105 Troubleshooting a NIC 106 Troubleshooting a Wet System 106 Troubleshooting a Damaged System 107 Troubleshooting the System Battery 108 Troubleshooting the Power Supply 108 Troubleshooting System Cooling Problems 109 Troubleshooting a Fan 109 Troubleshooting System Memory 110 Troubleshooting a Diskette Drive 112 Troubleshooting an Optical...
System Board (Service-Only Procedure 97 Removing the System Board 97 Installing the System Board 99 4 Troubleshooting Your System Safety First-For You and Your System 101 ...Troubleshooting a Serial I/O Device 105 Troubleshooting a USB Device 105 Troubleshooting a NIC 106 Troubleshooting a Wet System 106 Troubleshooting a Damaged System 107 Troubleshooting the System Battery 108 Troubleshooting the Power Supply 108 Troubleshooting System Cooling Problems 109 Troubleshooting a Fan 109 Troubleshooting System Memory 110 Troubleshooting a Diskette Drive 112 Troubleshooting an Optical...
Hardware Owner's Manual (PDF)
Page 16
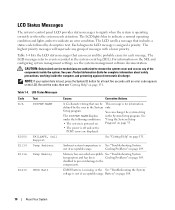
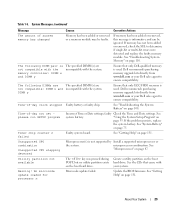
...on page 109. Setup program. Cooling Problems" on the SEL and configuring system management settings, see "Getting Help" on page 131. Battery" on page 109. The highest priority messages will supersede any of messages with a lower priority. Table 1-4. disabled to prevent damage to...condition and lights amber to boot, press the System ID button for information defined by descriptive text. The LCD messages refer to remove the system cover and access any group of the components inside the computer, and protecting against electrostatic discharge. See under the ...
...on page 109. Setup program. Cooling Problems" on the SEL and configuring system management settings, see "Getting Help" on page 131. Battery" on page 109. The highest priority messages will supersede any of messages with a lower priority. Table 1-4. disabled to prevent damage to...condition and lights amber to boot, press the System ID button for information defined by descriptive text. The LCD messages refer to remove the system cover and access any group of the components inside the computer, and protecting against electrostatic discharge. See under the ...
Hardware Owner's Manual (PDF)
Page 22
See "Troubleshooting System Memory" on the LCD. I1910 Intrusion System cover has been removed. messages can often specify a very precise fault condition that the problem is a failing power supply. 22 About Your System I1912 SEL Full System Event... page 92. Clear the log by LCD Status Messages When a single message appears on the LCD can display sequentially on page 110. Controller Daughter Card Battery" on the A maximum of three error events. Table 1-4. I1911 >3 ERRs Chk Log LCD overflow message. W1228 ROMB Batt < 24hr Warns predictively that a microprocessor ...
See "Troubleshooting System Memory" on the LCD. I1910 Intrusion System cover has been removed. messages can often specify a very precise fault condition that the problem is a failing power supply. 22 About Your System I1912 SEL Full System Event... page 92. Clear the log by LCD Status Messages When a single message appears on the LCD can display sequentially on page 110. Controller Daughter Card Battery" on the A maximum of three error events. Table 1-4. I1911 >3 ERRs Chk Log LCD overflow message. W1228 ROMB Batt < 24hr Warns predictively that a microprocessor ...
Hardware Owner's Manual (PDF)
Page 29
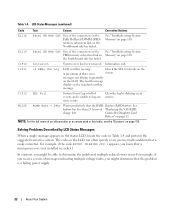
...The amount of system memory has changed Memory has been added or removed or a memory module may be ignored. If memory has been added or removed, this message is used . If memory has not been added or removed, check the SEL to ensure compatibility. The following DIMMs are The... purchasing memory upgrade kits directly from www.dell.com or your Dell sales agent to determine if single-bit or multi-bit errors were detected and replace the faulty memory module. Time-of -day clock stopped Faulty battery or faulty chip. See system battery. "Using the System Setup Program" on ...
...The amount of system memory has changed Memory has been added or removed or a memory module may be ignored. If memory has been added or removed, this message is used . If memory has not been added or removed, check the SEL to ensure compatibility. The following DIMMs are The... purchasing memory upgrade kits directly from www.dell.com or your Dell sales agent to determine if single-bit or multi-bit errors were detected and replace the faulty memory module. Time-of -day clock stopped Faulty battery or faulty chip. See system battery. "Using the System Setup Program" on ...
Hardware Owner's Manual (PDF)
Page 66
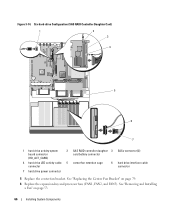
...Controller Daughter Card) 1 2 3 4 5 6 7 1 hard drive activity system board connector (HD_ACT_CARD) 2 SAS RAID controller daughter 3 SASx connector (2) card battery connector 4 hard drive LED activity cable 5 center fan retention cage connector 6 hard drive interface cable connector 7 hard drive power connector 5 Replace the center fan... bracket. See "Replacing the Center Fan Bracket" on page 53. 66 Installing System Components See "Removing and Installing a Fan" on page 79. 6 Replace the expansion-bay and processor fans (FAN1, FAN2, and FAN3). Figure 3-14.
...Controller Daughter Card) 1 2 3 4 5 6 7 1 hard drive activity system board connector (HD_ACT_CARD) 2 SAS RAID controller daughter 3 SASx connector (2) card battery connector 4 hard drive LED activity cable 5 center fan retention cage connector 6 hard drive interface cable connector 7 hard drive power connector 5 Replace the center fan... bracket. See "Replacing the Center Fan Bracket" on page 53. 66 Installing System Components See "Removing and Installing a Fan" on page 79. 6 Replace the expansion-bay and processor fans (FAN1, FAN2, and FAN3). Figure 3-14.
Hardware Owner's Manual (PDF)
Page 75
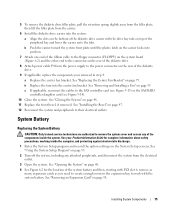
...of the diskette drive. 9 If applicable, replace the components your Product Information Guide for the location of the system battery and then, starting with PCI slot 6, remove as many expansion cards as you need to create enough room in step 4: a Replace the center fan bracket....Setup screens. Installing System Components 75 See "Removing an Expansion Card" on page 48. 11 Replace the front bezel, if removed. See "Installing the Bezel" on the carrier locks into the center fan bracket. System Battery Replacing the System Battery CAUTION: Only trained service technicians are authorized...
...of the diskette drive. 9 If applicable, replace the components your Product Information Guide for the location of the system battery and then, starting with PCI slot 6, remove as many expansion cards as you need to create enough room in step 4: a Replace the center fan bracket....Setup screens. Installing System Components 75 See "Removing an Expansion Card" on page 48. 11 Replace the front bezel, if removed. See "Installing the Bezel" on the carrier locks into the center fan bracket. System Battery Replacing the System Battery CAUTION: Only trained service technicians are authorized...
Hardware Owner's Manual (PDF)
Page 76
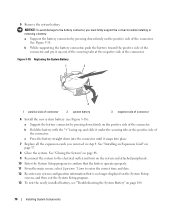
...on the system and attached peripherals. 10 Enter the System Setup program to confirm that the battery operates properly. 11 From the main screen, select System Time to the battery connector, you removed in step 4. NOTICE: To avoid damage to enter the correct time and date. 12 ... displayed on the System Setup screens, and then exit the System Setup program. 13 To test the newly installed battery, see Figure 3-18): a Support the battery connector by pressing down into place. 7 Replace all the expansion cards you must firmly support the connector while installing or removing a battery.
...on the system and attached peripherals. 10 Enter the System Setup program to confirm that the battery operates properly. 11 From the main screen, select System Time to the battery connector, you removed in step 4. NOTICE: To avoid damage to enter the correct time and date. 12 ... displayed on the System Setup screens, and then exit the System Setup program. 13 To test the newly installed battery, see Figure 3-18): a Support the battery connector by pressing down into place. 7 Replace all the expansion cards you must firmly support the connector while installing or removing a battery.
Hardware Owner's Manual (PDF)
Page 92
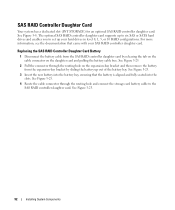
... SAS or SATA hard drives and enables you to the SAS RAID controller daughter card. Replacing the SAS RAID Controller Daughter Card Battery 1 Disconnect the battery cable from the expansion-bay bracket by releasing the tab on the cable connector on the expansion-bay bracket and then... remove the battery from the SAS RAID controller daughter card by sliding the battery up your SAS RAID controller daughter card. See Figure 3-8. See Figure 3-25. 4 Route the cable connector ...
... SAS or SATA hard drives and enables you to the SAS RAID controller daughter card. Replacing the SAS RAID Controller Daughter Card Battery 1 Disconnect the battery cable from the expansion-bay bracket by releasing the tab on the cable connector on the expansion-bay bracket and then... remove the battery from the SAS RAID controller daughter card by sliding the battery up your SAS RAID controller daughter card. See Figure 3-8. See Figure 3-25. 4 Route the cable connector ...
Hardware Owner's Manual (PDF)
Page 93
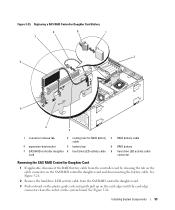
... RAID Controller Daughter Card Battery 8 9 1 7 2 6 5 4 3 1 connector release tab 2 routing hole for RAID battery 3 RAID battery cable cable 4 expansion-bay bracket 5 battery bay 6 RAID battery 7 SAS RAID controller daughter 8 hard drive LED activity cable 9 hard drive LED activity cable card connector Removing the SAS RAID Controller ...Daughter Card 1 If applicable, disconnect the RAID battery cable from the SAS RAID controller daughter card. 3 Push outward on the ...
... RAID Controller Daughter Card Battery 8 9 1 7 2 6 5 4 3 1 connector release tab 2 routing hole for RAID battery 3 RAID battery cable cable 4 expansion-bay bracket 5 battery bay 6 RAID battery 7 SAS RAID controller daughter 8 hard drive LED activity cable 9 hard drive LED activity cable card connector Removing the SAS RAID Controller ...Daughter Card 1 If applicable, disconnect the RAID battery cable from the SAS RAID controller daughter card. 3 Push outward on the ...
Hardware Owner's Manual (PDF)
Page 94
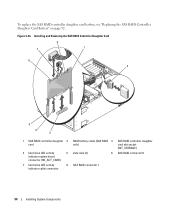
To replace the SAS RAID controller daughter card battery, see "Replacing the SAS RAID Controller Daughter Card Battery" on page 92. Figure 3-26. Installing and Removing the SAS RAID Controller Daughter Card 8 7 1 6 2 5 4 3 1 SAS RAID controller daughter 2 card 4 hard drive LED activity 5 indicator system board connector (HD_ACT_CARD) 7 hard drive LED activity 8 indicator ...
To replace the SAS RAID controller daughter card battery, see "Replacing the SAS RAID Controller Daughter Card Battery" on page 92. Figure 3-26. Installing and Removing the SAS RAID Controller Daughter Card 8 7 1 6 2 5 4 3 1 SAS RAID controller daughter 2 card 4 hard drive LED activity 5 indicator system board connector (HD_ACT_CARD) 7 hard drive LED activity 8 indicator ...
Hardware Owner's Manual (PDF)
Page 95
...and slide the card down until it clears the chassis hooks and lift up to the battery cable connector on page 92. See "Opening the System" on page 48. 4 Remove the system top panel: a Remove the screw on the DIMM or any of the system that secure the control panel ...board to replace the SAS RAID controller daughter card battery, see "Replacing the SAS RAID Controller Daughter Card Battery" on the SAS RAID controller daughter card. See Figure 3-27. 6 Remove the three screws that secures the system top panel. Installing System Components 95 If ...
...and slide the card down until it clears the chassis hooks and lift up to the battery cable connector on page 92. See "Opening the System" on page 48. 4 Remove the system top panel: a Remove the screw on the DIMM or any of the system that secure the control panel ...board to replace the SAS RAID controller daughter card battery, see "Replacing the SAS RAID Controller Daughter Card Battery" on the SAS RAID controller daughter card. See Figure 3-27. 6 Remove the three screws that secures the system top panel. Installing System Components 95 If ...

Hardware Owner's Manual (PDF)
Page 108
... "Getting Help" on the system board. See "Replacing the System Battery" on page 51. If the problem is not resolved, see "Getting Help" on the system. 4 Enter the System Setup program. See "Removing the Power Supply" on page 50 and "Installing the Power Supply" on page 75. NOTE: ...Some software may cause the system time to operate normally except for weeks or months), the NVRAM may be caused by software rather than by a defective battery. Action 1 Check the...
... "Getting Help" on the system board. See "Replacing the System Battery" on page 51. If the problem is not resolved, see "Getting Help" on the system. 4 Enter the System Setup program. See "Removing the Power Supply" on page 50 and "Installing the Power Supply" on page 75. NOTE: ...Some software may cause the system time to operate normally except for weeks or months), the NVRAM may be caused by software rather than by a defective battery. Action 1 Check the...
Hardware Owner's Manual (PDF)
Page 117
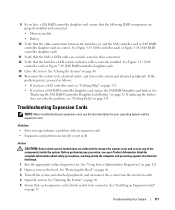
...a SAS RAID controller daughter card, ensure that the following RAID components are properly installed and connected: • Memory module • Battery 10 Verify that the cable connections between the hard drive(s) and the SAS controller card or SAS RAID controller daughter card are securely seated...See "Using Server Administrator Diagnostics" on page 92. Troubleshooting Your System 117 See "Replacing the SAS RAID Controller Daughter Card Battery" on page 121. 2 Open or remove the bezel. See Figure 3-13 (SAS controller card) or Figure 3-14 (SAS RAID controller daughter card). 11 Verify ...
...a SAS RAID controller daughter card, ensure that the following RAID components are properly installed and connected: • Memory module • Battery 10 Verify that the cable connections between the hard drive(s) and the SAS controller card or SAS RAID controller daughter card are securely seated...See "Using Server Administrator Diagnostics" on page 92. Troubleshooting Your System 117 See "Replacing the SAS RAID Controller Daughter Card Battery" on page 121. 2 Open or remove the bezel. See Figure 3-13 (SAS controller card) or Figure 3-14 (SAS RAID controller daughter card). 11 Verify ...
Hardware Owner's Manual (PDF)
Page 163
... options, 37 D damaged systems troubleshooting, 107 Dell contacting, 136 diagnostics checklist, 135 testing options, 122 when to use, 121 DIMM installing, 83 removing, 85 sockets, 80 diskette drive drive carrier, 74 installing, 74 removing, 72 troubleshooting, 112 drive carrier diskette drive,... 23 expansion cards installing, 57 removing, 58 troubleshooting, 117 expansion slots, 56 expansion-bay bracket installing, 100 removing, 98 external devices connecting, 15 Index 163 Index A alert messages, 31 asset tag, 37 B baseboard management controller battery, 75 SAS RAID controller daughter ...
... options, 37 D damaged systems troubleshooting, 107 Dell contacting, 136 diagnostics checklist, 135 testing options, 122 when to use, 121 DIMM installing, 83 removing, 85 sockets, 80 diskette drive drive carrier, 74 installing, 74 removing, 72 troubleshooting, 112 drive carrier diskette drive,... 23 expansion cards installing, 57 removing, 58 troubleshooting, 117 expansion slots, 56 expansion-bay bracket installing, 100 removing, 98 external devices connecting, 15 Index 163 Index A alert messages, 31 asset tag, 37 B baseboard management controller battery, 75 SAS RAID controller daughter ...
Hardware Owner's Manual (PDF)
Page 164
...100 hard drives, 61 memory, 83 memory guidelines, 82 optical drive, 71 power supply, 51 processor, 88 RAC card, 85 RAID battery, 92 system battery, 75 system board, 99 tape backup unit, 68 IRQs avoiding conflicts, 102 configuring, 36 line assignments, 102 J jumpers system board,... 125 K keyboard troubleshooting, 103 L LCD panel configuring, 36 M memory branches, 80 channels, 80 installation guidelines, 82 installing, 83 mirroring, 83 removing DIMMs,...
...100 hard drives, 61 memory, 83 memory guidelines, 82 optical drive, 71 power supply, 51 processor, 88 RAC card, 85 RAID battery, 92 system battery, 75 system board, 99 tape backup unit, 68 IRQs avoiding conflicts, 102 configuring, 36 line assignments, 102 J jumpers system board,... 125 K keyboard troubleshooting, 103 L LCD panel configuring, 36 M memory branches, 80 channels, 80 installation guidelines, 82 installing, 83 mirroring, 83 removing DIMMs,...
Hardware Owner's Manual (PDF)
Page 165
...10 power supply installing, 51 removing, 50 troubleshooting, 108 processor replacing, 88 R RAC card installing, 85 RAID controller. See SAS controller daughter card SAS RAID controller daughter card battery replacement, 92 troubleshooting, 116... securing your system, 42 serial I/O device troubleshooting, 105 setup password assigning, 43 changing, 44 using, 43 spare bank, 82 startup accessing system features, 10 status messages LCD, 16 systems management, 23 support contacting Dell, 136 system board connectors, 127 installing, 99 jumpers, 125 removing...
...10 power supply installing, 51 removing, 50 troubleshooting, 108 processor replacing, 88 R RAC card installing, 85 RAID controller. See SAS controller daughter card SAS RAID controller daughter card battery replacement, 92 troubleshooting, 116... securing your system, 42 serial I/O device troubleshooting, 105 setup password assigning, 43 changing, 44 using, 43 spare bank, 82 startup accessing system features, 10 status messages LCD, 16 systems management, 23 support contacting Dell, 136 system board connectors, 127 installing, 99 jumpers, 125 removing...
Hardware Owner's Manual (PDF)
Page 166
...setup screens console redirection, 38 CPU information, 37 integrated devices, 38 main, 34 system security, 39 T tape backup unit installing, 68 removing, 67 tape drive troubleshooting, 113 troubleshooting CD drive, 113 cooling fans, 109 damaged system, 107 diskette drive, 112 expansion cards, 117 ... 104 NIC, 106 troubleshooting (continued) power supply, 108 SAS RAID controller daughter card, 116 serial I/O device, 105 start-up routine, 101 system battery, 108 system cooling, 109 tape drive, 113 USB device, 105 video, 103 wet system, 106 U USB device troubleshooting, 105 V video troubleshooting,...
...setup screens console redirection, 38 CPU information, 37 integrated devices, 38 main, 34 system security, 39 T tape backup unit installing, 68 removing, 67 tape drive troubleshooting, 113 troubleshooting CD drive, 113 cooling fans, 109 damaged system, 107 diskette drive, 112 expansion cards, 117 ... 104 NIC, 106 troubleshooting (continued) power supply, 108 SAS RAID controller daughter card, 116 serial I/O device, 105 start-up routine, 101 system battery, 108 system cooling, 109 tape drive, 113 USB device, 105 video, 103 wet system, 106 U USB device troubleshooting, 105 V video troubleshooting,...


