PowerEdge 1800 Support - Dell
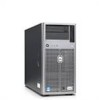
PowerEdge 1800 Support
View Results Below
Free Dell PowerEdge 1800 manuals!
Problems with Dell PowerEdge 1800?
Ask a Question
Free Dell PowerEdge 1800 manuals!
Problems with Dell PowerEdge 1800?
Ask a Question
Related Manual Pages


Similar Questions

R710 Advanced Ecc Memory Mode Disabled! Memory Configuration Does Not Support
advanced ecc memory mode.
advanced ecc memory mode.
(Posted by tochin 10 years ago)

Can A Dell Powervault Nf100 Support Multiple Virtual Disks?
I am working on a Powervault NF100 and would like to add bigger hard drives than 500 GB. I am runnin...
I am working on a Powervault NF100 and would like to add bigger hard drives than 500 GB. I am runnin...
(Posted by DMyers 11 years ago)
