
Dell Monitor Outline Drawing
Page 1
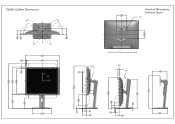
i 39.1. (1.54) 180.0 (7.09) P1914S Outline Dimensions \ Swivel 45° / / Swivel 45° M Cl 00 O N 17.5 (0.69) ti 411.4 (16.20) 376.4 (14.82) Pivot 90* 3.4 (0.1.3) 0, 0 N / 225.0 (8.86) ri 39.1 O (1.54) 51.1. (2.01) 122.0,2X (4.80) Nominal Dimensions Unit:mm (inch) 1,44x10(4x) 0 ri 0 Back view of Monitor without stand Tlit 5* 21° 178.3 (7.02) / N O N 15.4 (0.61) N.
i 39.1. (1.54) 180.0 (7.09) P1914S Outline Dimensions \ Swivel 45° / / Swivel 45° M Cl 00 O N 17.5 (0.69) ti 411.4 (16.20) 376.4 (14.82) Pivot 90* 3.4 (0.1.3) 0, 0 N / 225.0 (8.86) ri 39.1 O (1.54) 51.1. (2.01) 122.0,2X (4.80) Nominal Dimensions Unit:mm (inch) 1,44x10(4x) 0 ri 0 Back view of Monitor without stand Tlit 5* 21° 178.3 (7.02) / N O N 15.4 (0.61) N.
Dell Users Guide
Page 4
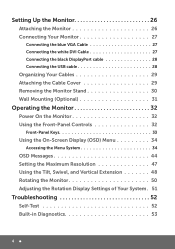
... Cable 27 Connecting the black DisplayPort cable 28 Connecting the USB cable 28 Organizing Your Cables 29 Attaching the Cable Cover 29 Removing the Monitor Stand 30 Wall Mounting (Optional 31 Operating the Monitor 32 Power On the Monitor 32 Using the Front-Panel Controls 32 Front-Panel Keys 33 Using...
... Cable 27 Connecting the black DisplayPort cable 28 Connecting the USB cable 28 Organizing Your Cables 29 Attaching the Cable Cover 29 Removing the Monitor Stand 30 Wall Mounting (Optional 31 Operating the Monitor 32 Power On the Monitor 32 Using the Front-Panel Controls 32 Front-Panel Keys 33 Using...
Dell Users Guide
Page 10
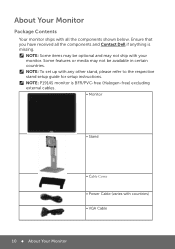
...Your monitor ships with any other stand, please refer to the respective stand setup guide for setup instructions. ...NOTE: Some items may be optional and may not be available in certain countries. Some features or media may not ship with countries) • VGA Cable 10 About Your Monitor NOTE: To set up with all the components and Contact Dell... if anything is BFR/PVC-free (Halogen-free) excluding external cables. • Monitor • Stand • Cable Cover • Power Cable ...
...Your monitor ships with any other stand, please refer to the respective stand setup guide for setup instructions. ...NOTE: Some items may be optional and may not be available in certain countries. Some features or media may not ship with countries) • VGA Cable 10 About Your Monitor NOTE: To set up with all the components and Contact Dell... if anything is BFR/PVC-free (Halogen-free) excluding external cables. • Monitor • Stand • Cable Cover • Power Cable ...
Dell Users Guide
Page 11
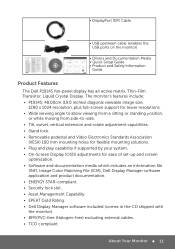
...monitor) • Drivers and Documentation Media • Quick Setup Guide • Product and Safety Information Guide Product Features The Dell P1914S flat-panel display has an active matrix, Thin-Film Transistor, Liquid Crystal Display. About Your Monitor 11 The monitor's features... resolutions. • Wide viewing angle to allow viewing from a sitting or standing position, or while moving from side-to-side. • Tilt, swivel, vertical extension and rotate adjustment capabilities. • Stand lock. • Removable pedestal and Video Electronics Standards Association (VESA) 100...
...monitor) • Drivers and Documentation Media • Quick Setup Guide • Product and Safety Information Guide Product Features The Dell P1914S flat-panel display has an active matrix, Thin-Film Transistor, Liquid Crystal Display. About Your Monitor 11 The monitor's features... resolutions. • Wide viewing angle to allow viewing from a sitting or standing position, or while moving from side-to-side. • Tilt, swivel, vertical extension and rotate adjustment capabilities. • Stand lock. • Removable pedestal and Video Electronics Standards Association (VESA) 100...
Dell Users Guide
Page 12
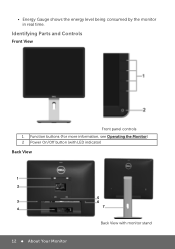
Identifying Parts and Controls Front View Front panel controls 1. Function buttons (For more information, see Operating the Monitor) 2 Power On/Off button (with LED indicator) Back View 1 2 3 4 12 About Your Monitor 5 6 7 Back View with monitor stand • Energy Gauge shows the energy level being consumed by the monitor in real time.
Identifying Parts and Controls Front View Front panel controls 1. Function buttons (For more information, see Operating the Monitor) 2 Power On/Off button (with LED indicator) Back View 1 2 3 4 12 About Your Monitor 5 6 7 Back View with monitor stand • Energy Gauge shows the energy level being consumed by the monitor in real time.
Dell Users Guide
Page 13
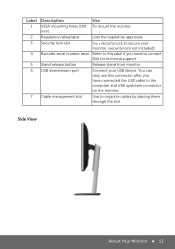
...you need to the computer and USB upstream connector on the monitor. Release stand from monitor. Connect your monitor. (security lock not included). You can only use this label if you have connected the USB cable to contact Dell for technical support. Label 1 2 3 4 5 6 7 Description ...VESA mounting holes (100 mm) Regulatory rating label Security lock slot Barcode serial number label Stand release button USB downstream port Cable management slot Use To mount ...
...you need to the computer and USB upstream connector on the monitor. Release stand from monitor. Connect your monitor. (security lock not included). You can only use this label if you have connected the USB cable to contact Dell for technical support. Label 1 2 3 4 5 6 7 Description ...VESA mounting holes (100 mm) Regulatory rating label Security lock slot Barcode serial number label Stand release button USB downstream port Cable management slot Use To mount ...

Dell Users Guide
Page 14
... Description Use 1 AC power connector To connect the monitor power cable. 2 DisplayPort connector To connect your computer to the monitor using a DisplayPort cable. 3 Stand lock feature To lock the stand to the monitor using a M3 x 6 mm screw (screw not included). 4 DVI connector To connect your computer to the monitor using a DVI cable...
... Description Use 1 AC power connector To connect the monitor power cable. 2 DisplayPort connector To connect your computer to the monitor using a DisplayPort cable. 3 Stand lock feature To lock the stand to the monitor using a M3 x 6 mm screw (screw not included). 4 DVI connector To connect your computer to the monitor using a DVI cable...
Dell Users Guide
Page 23
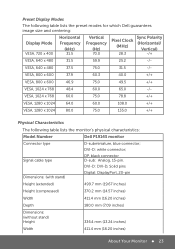
...) Height (compressed) 370.2 mm (14.57 inches) Width 411.4 mm (16.20 inches) Depth 180.0 mm (7.09 inches) Dimensions: (without stand) Height 336.4 mm (13.24 inches) Width 411.4 mm (16.20 inches) About Your Monitor 23 VESA, 640 x 480 37.5... DP, black connector D-sub: Analog, 15-pin. Preset Display Modes The following table lists the monitor's physical characteristics: Model Number Dell P1914S monitor Connector type Signal cable type Dimensions: (with stand) D-subminiature, blue connector; VESA, 800 x 600 37.9 60.3 40.0 +/+ VESA, 800 x 600 46.9 75.0 49...
...) Height (compressed) 370.2 mm (14.57 inches) Width 411.4 mm (16.20 inches) Depth 180.0 mm (7.09 inches) Dimensions: (without stand) Height 336.4 mm (13.24 inches) Width 411.4 mm (16.20 inches) About Your Monitor 23 VESA, 640 x 480 37.5... DP, black connector D-sub: Analog, 15-pin. Preset Display Modes The following table lists the monitor's physical characteristics: Model Number Dell P1914S monitor Connector type Signal cable type Dimensions: (with stand) D-subminiature, blue connector; VESA, 800 x 600 37.9 60.3 40.0 +/+ VESA, 800 x 600 46.9 75.0 49...
Dell Users Guide
Page 24
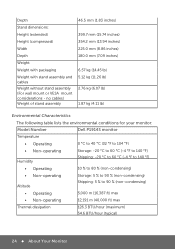
... (11.26 lb) 2.76 kg (6.07 lb) 1.87 kg (4.11 lb) Environmental Characteristics The following table lists the environmental conditions for your monitor: Model Number Dell P1914S monitor Temperature • Operating 0 °C to 40 °C (32 °F to 104 °F) • Non-operating Humidity Storage: -20 °C to 60 °C (-4...operating 12,191 m (40,000 ft) max Thermal dissipation 126.3 BTU/hour (maximum) 54.6 BTU/hour (typical) 24 About Your Monitor Depth Stand dimensions: Height (extended) Height (compressed) Width Depth Weight: Weight with packaging Weight with...
... (11.26 lb) 2.76 kg (6.07 lb) 1.87 kg (4.11 lb) Environmental Characteristics The following table lists the environmental conditions for your monitor: Model Number Dell P1914S monitor Temperature • Operating 0 °C to 40 °C (32 °F to 104 °F) • Non-operating Humidity Storage: -20 °C to 60 °C (-4...operating 12,191 m (40,000 ft) max Thermal dissipation 126.3 BTU/hour (maximum) 54.6 BTU/hour (typical) 24 About Your Monitor Depth Stand dimensions: Height (extended) Height (compressed) Width Depth Weight: Weight with packaging Weight with...

Dell Users Guide
Page 26
Fit the two tabs on the upper part of the monitor. 3. Setting Up the Monitor Attaching the Monitor NOTE: The stand is detached when the monitor is applicable for the set up instructions. 3 2 To attach the monitor stand: 1. When any other stand is bought, please refer to the groove on it snaps into place. 26 Setting Up the Monitor Remove the cover and place the monitor on the back of the stand to the respective stand setup guide for a monitor with a stand. Press the stand till it . 2. NOTE: This is shipped from the factory.
Fit the two tabs on the upper part of the monitor. 3. Setting Up the Monitor Attaching the Monitor NOTE: The stand is detached when the monitor is applicable for the set up instructions. 3 2 To attach the monitor stand: 1. When any other stand is bought, please refer to the groove on it snaps into place. 26 Setting Up the Monitor Remove the cover and place the monitor on the back of the stand to the respective stand setup guide for a monitor with a stand. Press the stand till it . 2. NOTE: This is shipped from the factory.

Dell Users Guide
Page 28
.../DP cable, follow the procedures below to connect the USB cable to organize the cables. 28 Setting Up the Monitor Turn on the monitor stand to the computer and complete your computer and monitor into a nearby outlet. 4. Connect the upstream USB port (cable supplied) to the downstream USB ports on...
.../DP cable, follow the procedures below to connect the USB cable to organize the cables. 28 Setting Up the Monitor Turn on the monitor stand to the computer and complete your computer and monitor into a nearby outlet. 4. Connect the upstream USB port (cable supplied) to the downstream USB ports on...

Dell Users Guide
Page 30
Press and hold the stand release button. 3. Removing the Monitor Stand Note: To prevent scratches on the LCD screen while removing the stand, ensure that the monitor is bought, please refer to the respective stand setup guide for a monitor with a stand. Note: This is applicable for the set-up and away from the monitor. 30 Setting Up the Monitor Place the monitor on a soft, clean surface. Lift the stand up instructions. 3 2 To remove the stand: 1. When any other stand is placed on a flat surface. 2.
Press and hold the stand release button. 3. Removing the Monitor Stand Note: To prevent scratches on the LCD screen while removing the stand, ensure that the monitor is bought, please refer to the respective stand setup guide for a monitor with a stand. Note: This is applicable for the set-up and away from the monitor. 30 Setting Up the Monitor Place the monitor on a soft, clean surface. Lift the stand up instructions. 3 2 To remove the stand: 1. When any other stand is placed on a flat surface. 2.

Dell Users Guide
Page 31
Setting Up the Monitor 31 Use a screwdriver to the LCD. 5. Mount the LCD on a stable, flat table. 2. Remove the stand. 3. Place the monitor panel on a soft cloth or cushion on the wall by following the instructions that come with the VESA-compatible base mounting kit. 1. ...
Setting Up the Monitor 31 Use a screwdriver to the LCD. 5. Mount the LCD on a stable, flat table. 2. Remove the stand. 3. Place the monitor panel on a soft cloth or cushion on the wall by following the instructions that come with the VESA-compatible base mounting kit. 1. ...

Dell Users Guide
Page 48
Using the Tilt, Swivel, and Vertical Extension Tilt, Swivel With the stand assembly, you can tilt and swivel the monitor for the most comfortable viewing angle. NOTE: The stand is detached when the monitor is shipped from the factory. 48 Operating the Monitor
Using the Tilt, Swivel, and Vertical Extension Tilt, Swivel With the stand assembly, you can tilt and swivel the monitor for the most comfortable viewing angle. NOTE: The stand is detached when the monitor is shipped from the factory. 48 Operating the Monitor

Dell Users Guide
Page 49
Vertical Extension NOTE: The stand extends vertically up to extend the stand vertically. The figure below illustrates how to 130 mm. Operating the Monitor 49
Vertical Extension NOTE: The stand extends vertically up to extend the stand vertically. The figure below illustrates how to 130 mm. Operating the Monitor 49


