User's Guide
Page 14
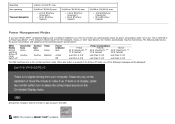
...Power Save Mode*. When any button is pressed in the Active-off Horizontal Sync Active Inactive - This is ENERGY STAR®-compliant. If the computer detects input from the keyboard, mouse, or other input devices, the monitor automatically resumes functioning. Vertical Sync Active Inactive - Power Indicator Blue Amber Off P1913... 42 W (maximum) ** 17 W (typical) Less than 0.3 W Less than 0.3 W Power Consumption P1913S P2213 42 W (maximum) ** 45 W (maximum) ** ...
...Power Save Mode*. When any button is pressed in the Active-off Horizontal Sync Active Inactive - This is ENERGY STAR®-compliant. If the computer detects input from the keyboard, mouse, or other input devices, the monitor automatically resumes functioning. Vertical Sync Active Inactive - Power Indicator Blue Amber Off P1913... 42 W (maximum) ** 17 W (typical) Less than 0.3 W Less than 0.3 W Power Consumption P1913S P2213 42 W (maximum) ** 45 W (maximum) ** ...
User's Guide
Page 19
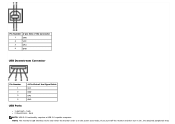
Pin Number 4-pin Side of the Connector 1 DMU 2 VCC 3 DPU 4 GND USB Downstream Connector Pin Number 1 2 3 4 4-Pin Side of the Signal Cable VCC DMD DPD GND USB Ports 1 upstream - back NOTE: USB 2.0 functionality requires a USB 2.0-capable computer. back 2 downstream - If you turn Off the monitor and then turn it On, the attached peripherals may NOTE: The monitor's USB interface works only when the monitor is On or in the power save mode.
Pin Number 4-pin Side of the Connector 1 DMU 2 VCC 3 DPU 4 GND USB Downstream Connector Pin Number 1 2 3 4 4-Pin Side of the Signal Cable VCC DMD DPD GND USB Ports 1 upstream - back NOTE: USB 2.0 functionality requires a USB 2.0-capable computer. back 2 downstream - If you turn Off the monitor and then turn it On, the attached peripherals may NOTE: The monitor's USB interface works only when the monitor is On or in the power save mode.
User's Guide
Page 30
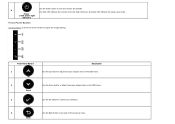
... Description Use the Up button to turn the monitor On and Off. 5 The blue LED indicates the monitor is On and fully functional. Use the Power button to adjust (increase ranges) items in the OSD menu. 3 Use the OK button to adjust the image settings. Use the Down button to... adjust (decrease ranges) items in the OSD menu. Power (with power light indicator) Front Panel Button Use the buttons on the front of the monitor to confirm your selection. OK 4 Use the Back button to go back to the previous menu. An amber LED indicates the power save mode.
... Description Use the Up button to turn the monitor On and Off. 5 The blue LED indicates the monitor is On and fully functional. Use the Power button to adjust (increase ranges) items in the OSD menu. 3 Use the OK button to adjust the image settings. Use the Down button to... adjust (decrease ranges) items in the OSD menu. Power (with power light indicator) Front Panel Button Use the buttons on the front of the monitor to confirm your selection. OK 4 Use the Back button to go back to the previous menu. An amber LED indicates the power save mode.
User's Guide
Page 41
To turn on the degree of your monitor. Menu Rotation Energy Smart Power Save Audio DDC/CI Lock function - The dynamic dimming feature automatically reduces the screen's brightness level when the displayed image contains a high proportion of image ... best user experience and optimum performance of image retention, the program may take some time to be adjustable via the software on or off Audio Power during Power Save mode. You can adjust the menu according to your computer. DDC/CI (Display Data Channel/Command Interface) allows your monitor parameters (brightness, color balance...
To turn on the degree of your monitor. Menu Rotation Energy Smart Power Save Audio DDC/CI Lock function - The dynamic dimming feature automatically reduces the screen's brightness level when the displayed image contains a high proportion of image ... best user experience and optimum performance of image retention, the program may take some time to be adjustable via the software on or off Audio Power during Power Save mode. You can adjust the menu according to your computer. DDC/CI (Display Data Channel/Command Interface) allows your monitor parameters (brightness, color balance...
User's Guide
Page 45
See Monitor Specifications for the P2213). This means that the monitor cannot synchronize with the signal that it is disabled: When the monitor enters the Power Save mode, the following message appears: You will see the following message before the DDC/CI function is receiving from the computer. Recommended mode is 1440 x 900 (for the P1913)/1280 x 1024 (for the P1913S)/1680 x 1050 (for the Horizontal and Vertical frequency ranges addressable by this monitor.
See Monitor Specifications for the P2213). This means that the monitor cannot synchronize with the signal that it is disabled: When the monitor enters the Power Save mode, the following message appears: You will see the following message before the DDC/CI function is receiving from the computer. Recommended mode is 1440 x 900 (for the P1913)/1280 x 1024 (for the P1913S)/1680 x 1050 (for the Horizontal and Vertical frequency ranges addressable by this monitor.
User's Guide
Page 54
... not in the Advance Setting OSD. Reset the computer or video player. Reconnect the upstream cable to PC RGB or YPbPr in the power saving mode by moving the mouse or pressing any troubleshooting steps. Switch off and then turn on the screen time Reset the monitor to determine if... from a static image Faint shadow from the static image left on the monitor for a long period of displayed appears on the monitor. Contact Dell immediately. Ensure that the video cable connecting the monitor to unlock (for more information, see Menu Lock). Perform monitor self-test feature check. ...
... not in the Advance Setting OSD. Reset the computer or video player. Reconnect the upstream cable to PC RGB or YPbPr in the power saving mode by moving the mouse or pressing any troubleshooting steps. Switch off and then turn on the screen time Reset the monitor to determine if... from a static image Faint shadow from the static image left on the monitor for a long period of displayed appears on the monitor. Contact Dell immediately. Ensure that the video cable connecting the monitor to unlock (for more information, see Menu Lock). Perform monitor self-test feature check. ...


