User Guide
Page 1
Dell™ OptiPlex™ GX260 Systems User's Guide Documentation for Your Computer Finding Information for Your Computer Technical Specifications System Board Components Cleaning Your Computer Advanced Features LegacySelect Technology Control ...
Dell™ OptiPlex™ GX260 Systems User's Guide Documentation for Your Computer Finding Information for Your Computer Technical Specifications System Board Components Cleaning Your Computer Advanced Features LegacySelect Technology Control ...
User Guide
Page 4
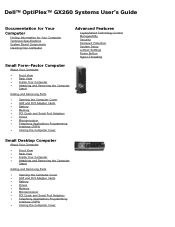
... information You can use this CD to reinstall my operating system Located on your computer. A diagnostic program for my computer Drivers for Your Computer Dell™ OptiPlex™ GX260 Systems User's Guide What Are You Looking For ? Operating System CD and Installation Guide Setup and Quick Reference Guide Express Service Code and Service...
... information You can use this CD to reinstall my operating system Located on your computer. A diagnostic program for my computer Drivers for Your Computer Dell™ OptiPlex™ GX260 Systems User's Guide What Are You Looking For ? Operating System CD and Installation Guide Setup and Quick Reference Guide Express Service Code and Service...
User Guide
Page 7
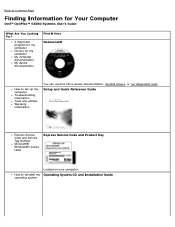
Back to microprocessor Memory Architecture 200- or 133-MHz clock (matches external bus speed) Math coprocessor internal to Contents Page Technical Specifications Dell™ OptiPlex™ GX260 Systems User's Guide Microprocessor Memory Computer Information Audio Expansion Bus Drives Ports Key Combinations Controls and Lights Power Physical Environmental Microprocessor Microprocessor type Level 1...: 512-KB SRAM *Certain 2.0G systems may be upgraded to 512K cache. or 533-MHz quad-data rate; 100- Design provides for future Dell-supported upgrades.
Back to microprocessor Memory Architecture 200- or 133-MHz clock (matches external bus speed) Math coprocessor internal to Contents Page Technical Specifications Dell™ OptiPlex™ GX260 Systems User's Guide Microprocessor Memory Computer Information Audio Expansion Bus Drives Ports Key Combinations Controls and Lights Power Physical Environmental Microprocessor Microprocessor type Level 1...: 512-KB SRAM *Certain 2.0G systems may be upgraded to 512K cache. or 533-MHz quad-data rate; 100- Design provides for future Dell-supported upgrades.
User Guide
Page 12
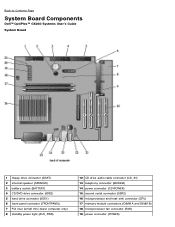
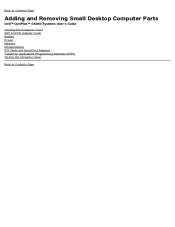
Back to Contents Page System Board Components Dell™ OptiPlex™ GX260 Systems User's Guide System Board 1 floppy drive connector (DSKT) 2 internal speaker (SPEAKER) 3 battery socket (BATTERY) 4 CD/DVD drive connector (IDE2) 5 hard drive connector (IDE1) 6 front-...
Back to Contents Page System Board Components Dell™ OptiPlex™ GX260 Systems User's Guide System Board 1 floppy drive connector (DSKT) 2 internal speaker (SPEAKER) 3 battery socket (BATTERY) 4 CD/DVD drive connector (IDE2) 5 hard drive connector (IDE1) 6 front-...

User Guide
Page 14
... dampen a soft, clean cloth with a brush attachment to remove dust from their channels if they are misaligned. Back to Contents Page Cleaning Your Computer Dell™ OptiPlex™ GX260 Systems User's Guide Computer, Keyboard, and Monitor Mouse Floppy Drive CDs and DVDs CAUTION: Before you begin any of the procedures in this section...
... dampen a soft, clean cloth with a brush attachment to remove dust from their channels if they are misaligned. Back to Contents Page Cleaning Your Computer Dell™ OptiPlex™ GX260 Systems User's Guide Computer, Keyboard, and Monitor Mouse Floppy Drive CDs and DVDs CAUTION: Before you begin any of the procedures in this section...
User Guide
Page 16
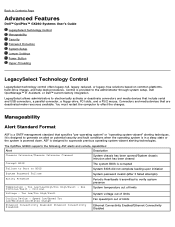
... It is designed to generate an alert on common platforms, hard-drive images, and help desk procedures. The OptiPlex GX260 supports the following ASF alerts and remote capabilities: Alert Description Chassis Intrusion/Chassis Intrusion Cleared System chassis has been opened...effect the changes. Critical System temperature out of limits Voltage - Back to Contents Page Advanced Features Dell™ OptiPlex™ GX260 Systems User's Guide LegacySelect Technology Control Manageability Security Password Protection System Setup Jumper Settings Power Button Hyper...
... It is designed to generate an alert on common platforms, hard-drive images, and help desk procedures. The OptiPlex GX260 supports the following ASF alerts and remote capabilities: Alert Description Chassis Intrusion/Chassis Intrusion Cleared System chassis has been opened...effect the changes. Critical System temperature out of limits Voltage - Back to Contents Page Advanced Features Dell™ OptiPlex™ GX260 Systems User's Guide LegacySelect Technology Control Manageability Security Password Protection System Setup Jumper Settings Power Button Hyper...
User Guide
Page 30
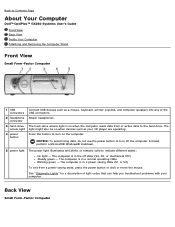
... state, press the power button or click or move the mouse. Back View Small Form-Factor Computer Back to Contents Page About Your Computer Dell™ OptiPlex™ GX260 Systems User's Guide Front View Back View Inside Your Computer Attaching and Removing the Computer Stand Front View Small Form-Factor Computer 1 USB connectors...
... state, press the power button or click or move the mouse. Back View Small Form-Factor Computer Back to Contents Page About Your Computer Dell™ OptiPlex™ GX260 Systems User's Guide Front View Back View Inside Your Computer Attaching and Removing the Computer Stand Front View Small Form-Factor Computer 1 USB connectors...
User Guide
Page 35
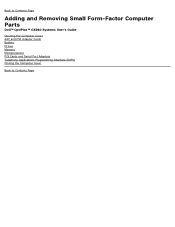
Back to Contents Page Adding and Removing Small Form-Factor Computer Parts Dell™ OptiPlex™ GX260 Systems User's Guide Opening the Computer Cover AGP and DVI Adapter Cards Battery Drives Memory Microprocessor PCI Cards and Serial Port Adapters Telephony Applications Programming Interface (TAPI) Closing the Computer Cover Back to Contents Page
Back to Contents Page Adding and Removing Small Form-Factor Computer Parts Dell™ OptiPlex™ GX260 Systems User's Guide Opening the Computer Cover AGP and DVI Adapter Cards Battery Drives Memory Microprocessor PCI Cards and Serial Port Adapters Telephony Applications Programming Interface (TAPI) Closing the Computer Cover Back to Contents Page
User Guide
Page 36
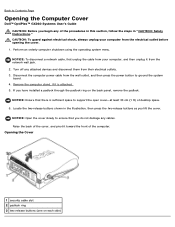
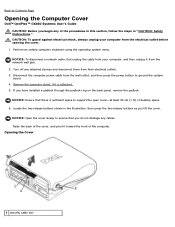
Back to Contents Page Opening the Computer Cover Dell™ OptiPlex™ GX260 Systems User's Guide CAUTION: Before you begin any of desktop space. 6. NOTICE: Ensure that you lift the cover. Locate the two release buttons shown in "...
Back to Contents Page Opening the Computer Cover Dell™ OptiPlex™ GX260 Systems User's Guide CAUTION: Before you begin any of desktop space. 6. NOTICE: Ensure that you lift the cover. Locate the two release buttons shown in "...

User Guide
Page 38
Your Dell™ computer provides a connector for an AGP or DVI adapter card. Removing an AGP/DVI Adapter Card 1. Open the computer cover. Filler Bracket Removal 1 hinged ... any attached devices and disconnect them from the wall outlet, and then press the power button to Contents Page AGP and DVI Adapter Cards Dell™ OptiPlex™ GX260 Systems User's Guide CAUTION: Before you begin any of the card clip. Perform an orderly computer shutdown using the operating system menu. Remove the...
Your Dell™ computer provides a connector for an AGP or DVI adapter card. Removing an AGP/DVI Adapter Card 1. Open the computer cover. Filler Bracket Removal 1 hinged ... any attached devices and disconnect them from the wall outlet, and then press the power button to Contents Page AGP and DVI Adapter Cards Dell™ OptiPlex™ GX260 Systems User's Guide CAUTION: Before you begin any of the card clip. Perform an orderly computer shutdown using the operating system menu. Remove the...
User Guide
Page 41
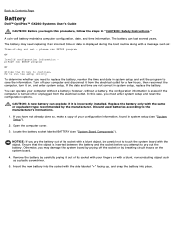
Replace the battery only with the object. Back to Contents Page Battery Dell™ OptiPlex™ GX260 Systems User's Guide CAUTION: Before you must enter system setup and reset the configuration options. please run SETUP program or Invalid configuration information please run ...
Replace the battery only with the object. Back to Contents Page Battery Dell™ OptiPlex™ GX260 Systems User's Guide CAUTION: Before you must enter system setup and reset the configuration options. please run SETUP program or Invalid configuration information please run ...
User Guide
Page 43
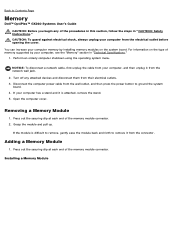
... the computer cover. Removing a Memory Module 1. Press out the securing clip at each end of the memory module connector. 2. Back to Contents Page Memory Dell™ OptiPlex™ GX260 Systems User's Guide CAUTION: Before you begin any attached devices and disconnect them from their electrical outlets. 3. Perform an orderly computer shutdown using the...
... the computer cover. Removing a Memory Module 1. Press out the securing clip at each end of the memory module connector. 2. Back to Contents Page Memory Dell™ OptiPlex™ GX260 Systems User's Guide CAUTION: Before you begin any attached devices and disconnect them from their electrical outlets. 3. Perform an orderly computer shutdown using the...
User Guide
Page 46
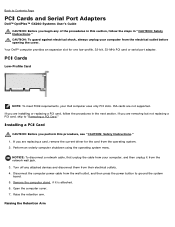
... cable, first unplug the cable from your computer, and then unplug it is attached. 6. Back to Contents Page PCI Cards and Serial Port Adapters Dell™ OptiPlex™ GX260 Systems User's Guide CAUTION: Before you begin any attached devices and disconnect them from the network wall jack. 3. If you perform this section, follow...
... cable, first unplug the cable from your computer, and then unplug it is attached. 6. Back to Contents Page PCI Cards and Serial Port Adapters Dell™ OptiPlex™ GX260 Systems User's Guide CAUTION: Before you begin any attached devices and disconnect them from the network wall jack. 3. If you perform this section, follow...
User Guide
Page 53
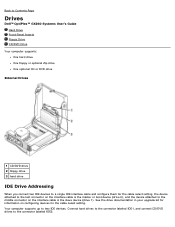
... IDE1, and connect CD/DVD drives to two IDE devices. Your computer supports up to the connector labeled IDE2. Back to Contents Page Drives Dell™ OptiPlex™ GX260 Systems User's Guide Hard Drive Front-Panel Inserts Floppy Drive CD/DVD Drive Your computer supports: One hard drive One floppy or optional Zip...
... IDE1, and connect CD/DVD drives to two IDE devices. Your computer supports up to the connector labeled IDE2. Back to Contents Page Drives Dell™ OptiPlex™ GX260 Systems User's Guide Hard Drive Front-Panel Inserts Floppy Drive CD/DVD Drive Your computer supports: One hard drive One floppy or optional Zip...

User Guide
Page 68
... from their electrical outlets. 3. Heat Sink/Blower Assembly Removal Remove the heat sink/blower assembly. The heat sink is attached to Contents Page Microprocessor Dell™ OptiPlex™ GX260 Systems User's Guide CAUTION: Before you lift it is parallel to ground the system board. 4. Back to the blower. Turn off any of the...
... from their electrical outlets. 3. Heat Sink/Blower Assembly Removal Remove the heat sink/blower assembly. The heat sink is attached to Contents Page Microprocessor Dell™ OptiPlex™ GX260 Systems User's Guide CAUTION: Before you lift it is parallel to ground the system board. 4. Back to the blower. Turn off any of the...

User Guide
Page 74
The caller's voice enters through the TAPI system board connector to your modem card. a. Back to Contents Page Telephony Applications Programming Interface (TAPI) Dell™ OptiPlex™ GX260 Systems User's Guide NOTE: See the documentation that the card works with the TAPI-compliant card for information on the system board, see the manufacturer's ...
The caller's voice enters through the TAPI system board connector to your modem card. a. Back to Contents Page Telephony Applications Programming Interface (TAPI) Dell™ OptiPlex™ GX260 Systems User's Guide NOTE: See the documentation that the card works with the TAPI-compliant card for information on the system board, see the manufacturer's ...
User Guide
Page 77
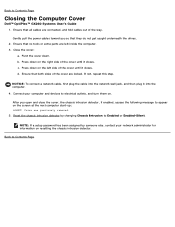
... cables out of the way. After you so that no tools or extra parts are locked. Back to Contents Page Closing the Computer Cover Dell™ OptiPlex™ GX260 Systems User's Guide 1. Ensure that both sides of the cover are left side of the cover until it closes. c. NOTICE: To connect a network cable...
... cables out of the way. After you so that no tools or extra parts are locked. Back to Contents Page Closing the Computer Cover Dell™ OptiPlex™ GX260 Systems User's Guide 1. Ensure that both sides of the cover are left side of the cover until it closes. c. NOTICE: To connect a network cable...
User Guide
Page 78
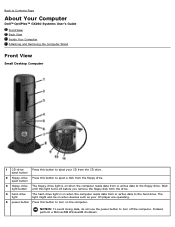
... button to eject your CD player are operating. 5 power button Press this button to the hard drive. Back to Contents Page About Your Computer Dell™ OptiPlex™ GX260 Systems User's Guide Front View Back View Inside Your Computer Attaching and Removing the Computer Stand Front View Small Desktop Computer 1 CD-drive Press...
... button to eject your CD player are operating. 5 power button Press this button to the hard drive. Back to Contents Page About Your Computer Dell™ OptiPlex™ GX260 Systems User's Guide Front View Back View Inside Your Computer Attaching and Removing the Computer Stand Front View Small Desktop Computer 1 CD-drive Press...
User Guide
Page 84
Back to Contents Page Adding and Removing Small Desktop Computer Parts Dell™ OptiPlex™ GX260 Systems User's Guide Opening the Computer Cover AGP and DVI Adapter Cards Battery Drives Memory Microprocessor PCI Cards and Serial Port Adapters Telephony Applications Programming Interface (TAPI) Closing the Computer Cover Back to Contents Page
Back to Contents Page Adding and Removing Small Desktop Computer Parts Dell™ OptiPlex™ GX260 Systems User's Guide Opening the Computer Cover AGP and DVI Adapter Cards Battery Drives Memory Microprocessor PCI Cards and Serial Port Adapters Telephony Applications Programming Interface (TAPI) Closing the Computer Cover Back to Contents Page
User Guide
Page 85
... the system board. 4. Raise the back of the cover, and pivot it from their electrical outlets. 3. Back to Contents Page Opening the Computer Cover Dell™ OptiPlex™ GX260 Systems User's Guide CAUTION: Before you have installed a padlock through the padlock ring on the back panel, remove the padlock. Turn off any cables...
... the system board. 4. Raise the back of the cover, and pivot it from their electrical outlets. 3. Back to Contents Page Opening the Computer Cover Dell™ OptiPlex™ GX260 Systems User's Guide CAUTION: Before you have installed a padlock through the padlock ring on the back panel, remove the padlock. Turn off any cables...


