Setup and Quick Reference Guide
Page 8
... from technicians, and online courses • Community Forum - support.dell.com The Dell Support website provides several online tools, including: • Solutions - Upgrade information for corporate, government, and education customers. This website may ...not be available in all regions. premiersupport.dell.com The Dell Premier Support website is customized for components, such as a modem) Find it Here D e l l S u...
... from technicians, and online courses • Community Forum - support.dell.com The Dell Support website provides several online tools, including: • Solutions - Upgrade information for corporate, government, and education customers. This website may ...not be available in all regions. premiersupport.dell.com The Dell Premier Support website is customized for components, such as a modem) Find it Here D e l l S u...

User Guide
Page 5
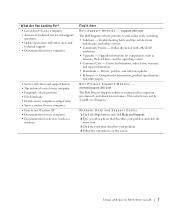
...solve problems User's Guides Icon Depending on your operating system, double-click the User's Guides icon on your hard drive. upgrade information for my computer and devices Windows XP Help and Support Center 1. contact information, order status, warranty, and repair information... for my computer Dell Premier Support website The Dell Premier Support website is customized for my computer Knowledge Base - Latest drivers for Dell Support website my computer Answers to technical service and support questions Online discussions with other Dell customers Upgrades - Type a word...
...solve problems User's Guides Icon Depending on your operating system, double-click the User's Guides icon on your hard drive. upgrade information for my computer and devices Windows XP Help and Support Center 1. contact information, order status, warranty, and repair information... for my computer Dell Premier Support website The Dell Premier Support website is customized for my computer Knowledge Base - Latest drivers for Dell Support website my computer Answers to technical service and support questions Online discussions with other Dell customers Upgrades - Type a word...
User Guide
Page 7
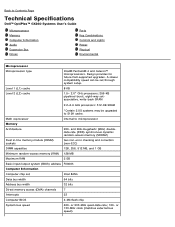
... chip System bus speed 400- or 133-MHz clock (matches external bus speed) A slower compatibility speed can be upgraded to 512K cache. Math coprocessor internal to Contents Page Technical Specifications Dell™ OptiPlex™ GX260 Systems User's Guide Microprocessor Memory Computer Information Audio Expansion Bus Drives Ports Key Combinations Controls and Lights Power Physical...
... chip System bus speed 400- or 133-MHz clock (matches external bus speed) A slower compatibility speed can be upgraded to 512K cache. Math coprocessor internal to Contents Page Technical Specifications Dell™ OptiPlex™ GX260 Systems User's Guide Microprocessor Memory Computer Information Audio Expansion Bus Drives Ports Key Combinations Controls and Lights Power Physical...
User Guide
Page 53
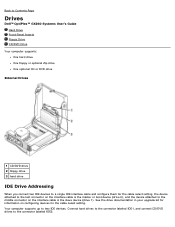
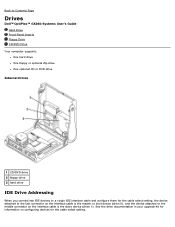
...connect CD/DVD drives to the middle connector on the interface cable is the slave device (drive 1). See the drive documentation in your upgrade kit for information on configuring devices for the cable select setting, the device attached to the last connector on the interface cable is the... master or boot device (drive 0), and the device attached to the connector labeled IDE2. Back to Contents Page Drives Dell™ OptiPlex™ GX260 Systems User's Guide Hard Drive Front-Panel Inserts Floppy Drive CD/DVD Drive Your computer supports: One hard drive One floppy or ...
...connect CD/DVD drives to the middle connector on the interface cable is the slave device (drive 1). See the drive documentation in your upgrade kit for information on configuring devices for the cable select setting, the device attached to the last connector on the interface cable is the... master or boot device (drive 0), and the device attached to the connector labeled IDE2. Back to Contents Page Drives Dell™ OptiPlex™ GX260 Systems User's Guide Hard Drive Front-Panel Inserts Floppy Drive CD/DVD Drive Your computer supports: One hard drive One floppy or ...

User Guide
Page 69
...straight up until the microprocessor is released, and then remove the microprocessor from the microprocessor. 10. If you are installing a microprocessor upgrade kit from Dell, reuse the original heat sink when you remove the microprocessor. Bending the pins can permanently damage the microprocessor. 11. NOTICE: ...Be careful not to remove it . If you are not installing a microprocessor upgrade kit from Dell, discard the original heat sink. Remove the two screws on the blower to bend any of the pins when you install your...
...straight up until the microprocessor is released, and then remove the microprocessor from the microprocessor. 10. If you are installing a microprocessor upgrade kit from Dell, reuse the original heat sink when you remove the microprocessor. Bending the pins can permanently damage the microprocessor. 11. NOTICE: ...Be careful not to remove it . If you are not installing a microprocessor upgrade kit from Dell, discard the original heat sink. Remove the two screws on the blower to bend any of the pins when you install your...

User Guide
Page 71
...retention lever and press until it is fully seated in the socket, ensure that all pins are installing a microprocessor replacement kit from Dell, reuse the original blower/heat-sink assembly when you place the microprocessor in the socket, pivot the release lever back toward the ... position. NOTICE: Ground yourself by touching an unpainted metal surface on the socket. NOTICE: If you are not installing a microprocessor upgrade kit from Dell, return the microprocessor to that it snaps into the corresponding holes on the back of the microprocessor and socket. Keep pressing the...
...retention lever and press until it is fully seated in the socket, ensure that all pins are installing a microprocessor replacement kit from Dell, reuse the original blower/heat-sink assembly when you place the microprocessor in the socket, pivot the release lever back toward the ... position. NOTICE: Ground yourself by touching an unpainted metal surface on the socket. NOTICE: If you are not installing a microprocessor upgrade kit from Dell, return the microprocessor to that it snaps into the corresponding holes on the back of the microprocessor and socket. Keep pressing the...
User Guide
Page 90
See the drive documentation in your upgrade kit for information on configuring devices for the cable select setting, the device attached to the last connector on the interface cable is the master ... device (drive 0), and the device attached to a single IDE interface cable and configure them for the cable select setting. Back to Contents Page Drives Dell™ OptiPlex™ GX260 Systems User's Guide Hard Drive Front-Panel Inserts Floppy Drive CD/DVD Drive Your computer supports: One hard drive One floppy or optional Zip...
See the drive documentation in your upgrade kit for information on configuring devices for the cable select setting, the device attached to the last connector on the interface cable is the master ... device (drive 0), and the device attached to a single IDE interface cable and configure them for the cable select setting. Back to Contents Page Drives Dell™ OptiPlex™ GX260 Systems User's Guide Hard Drive Front-Panel Inserts Floppy Drive CD/DVD Drive Your computer supports: One hard drive One floppy or optional Zip...

User Guide
Page 107
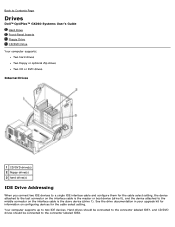
... from the heat sink. Microprocessor Removal 1 blower 4 retention base 2 screws (2) 5 heat sink 3 lever 9. If you are installing a microprocessor upgrade kit from Dell, discard the original heat sink. Remove the two screws on the blower to bend any of the pins when you install your new microprocessor. Pull ... released, and then remove the microprocessor from the microprocessor. 10. Lift the heat sink/blower assembly away from the socket. You will reuse it from Dell, reuse the original heat sink when you remove the microprocessor.
... from the heat sink. Microprocessor Removal 1 blower 4 retention base 2 screws (2) 5 heat sink 3 lever 9. If you are installing a microprocessor upgrade kit from Dell, discard the original heat sink. Remove the two screws on the blower to bend any of the pins when you install your new microprocessor. Pull ... released, and then remove the microprocessor from the microprocessor. 10. Lift the heat sink/blower assembly away from the socket. You will reuse it from Dell, reuse the original heat sink when you remove the microprocessor.

User Guide
Page 109
... microprocessor is not fully extended, move it is at a 90-degree angle. NOTICE: If you are installing a microprocessor replacement kit from Dell, reuse the original blower/heat-sink assembly when you turn on the back of the computer. Heat Sink/Blower Assembly Replacement NOTICE: Ground ...the retention base. 19. NOTICE: When you place the microprocessor in the socket, ensure that all pins are not installing a microprocessor upgrade kit from Dell, return the microprocessor to bend the pins. 15. You will feel the lever pause once it to the microprocessor and the computer...
... microprocessor is not fully extended, move it is at a 90-degree angle. NOTICE: If you are installing a microprocessor replacement kit from Dell, reuse the original blower/heat-sink assembly when you turn on the back of the computer. Heat Sink/Blower Assembly Replacement NOTICE: Ground ...the retention base. 19. NOTICE: When you place the microprocessor in the socket, ensure that all pins are not installing a microprocessor upgrade kit from Dell, return the microprocessor to bend the pins. 15. You will feel the lever pause once it to the microprocessor and the computer...
User Guide
Page 132
.... Hard drives should be connected to the connector labeled IDE1, and CD/DVD drives should be connected to Contents Page Drives Dell™ OptiPlex™ GX260 Systems User's Guide Hard Drive Front-Panel Inserts Floppy Drive CD/DVD Drive Your computer supports: Two hard drives Two floppy ...or optional Zip drives Two CD or DVD drives. See the drive documentation in your upgrade kit for information on configuring devices for ...
.... Hard drives should be connected to the connector labeled IDE1, and CD/DVD drives should be connected to Contents Page Drives Dell™ OptiPlex™ GX260 Systems User's Guide Hard Drive Front-Panel Inserts Floppy Drive CD/DVD Drive Your computer supports: Two hard drives Two floppy ...or optional Zip drives Two CD or DVD drives. See the drive documentation in your upgrade kit for information on configuring devices for ...

User Guide
Page 151
a. Pull the release lever straight up until it from Dell, reuse the original heat sink and blower when you are installing a microprocessor upgrade kit from the socket. Bending the pins can permanently damage the microprocessor. 8. Remove the heat sink. Gently rock the heat sink and then slightly twist ...
a. Pull the release lever straight up until it from Dell, reuse the original heat sink and blower when you are installing a microprocessor upgrade kit from the socket. Bending the pins can permanently damage the microprocessor. 8. Remove the heat sink. Gently rock the heat sink and then slightly twist ...

User Guide
Page 203
Click Finish to a new computer). The taskbar includes the Start menu button and a button for instance, when upgrading to remove the shortcuts and close the wizard. If space becomes an issue on a removable medium such as a floppy disk, Zip disk, or writable CD. ... is using an earlier operating system, the wizard can also configure the notification area manually by Windows XP, click the Start button, and then click Dell Solution Center. You transfer the data to run again on your computer. screen, select New Computer, and then click Next>. 4. When clicked, that button expands...
Click Finish to a new computer). The taskbar includes the Start menu button and a button for instance, when upgrading to remove the shortcuts and close the wizard. If space becomes an issue on a removable medium such as a floppy disk, Zip disk, or writable CD. ... is using an earlier operating system, the wizard can also configure the notification area manually by Windows XP, click the Start button, and then click Dell Solution Center. You transfer the data to run again on your computer. screen, select New Computer, and then click Next>. 4. When clicked, that button expands...

Service Manual
Page 73
... unpainted metal surface on the blower to remove it . NOTICE: Do not discard the blower. You will reuse it from Dell, reuse the original heat sink when you are not installing a microprocessor upgrade kit from the heat sink. Bending the pins can permanently damage the microprocessor. 6. Microprocessor Installation Unpack the new microprocessor...
... unpainted metal surface on the blower to remove it . NOTICE: Do not discard the blower. You will reuse it from Dell, reuse the original heat sink when you are not installing a microprocessor upgrade kit from the heat sink. Bending the pins can permanently damage the microprocessor. 6. Microprocessor Installation Unpack the new microprocessor...

Service Manual
Page 74
... socket and make sure that all pins are headed into the correct holes. NOTICE: If you are installing a microprocessor replacement kit from Dell, reuse the original blower/heat-sink assembly when you replace the microprocessor. Reinstall the two screws that position. 9. Raise the retention lever...attach the blower to the heat sink. 13. Heat Sink/Blower Assembly Replacement If you are not installing a microprocessor upgrade kit from Dell, return the microprocessor to Dell in the same package in the socket, pivot the release lever back toward the socket until the heat sink is ...
... socket and make sure that all pins are headed into the correct holes. NOTICE: If you are installing a microprocessor replacement kit from Dell, reuse the original blower/heat-sink assembly when you replace the microprocessor. Reinstall the two screws that position. 9. Raise the retention lever...attach the blower to the heat sink. 13. Heat Sink/Blower Assembly Replacement If you are not installing a microprocessor upgrade kit from Dell, return the microprocessor to Dell in the same package in the socket, pivot the release lever back toward the socket until the heat sink is ...

Service Manual
Page 77
... bend any of the pins when you remove the microprocessor from Dell, discard the original heat sink. Microprocessor Removal NOTICE: If you are not installing a microprocessor upgrade kit from Dell, reuse the original heat sink and blower when you are installing a microprocessor upgrade kit from the socket. 1 heat sink 2 lever 3 retention base NOTICE: Lay...
... bend any of the pins when you remove the microprocessor from Dell, discard the original heat sink. Microprocessor Removal NOTICE: If you are not installing a microprocessor upgrade kit from Dell, reuse the original heat sink and blower when you are installing a microprocessor upgrade kit from the socket. 1 heat sink 2 lever 3 retention base NOTICE: Lay...


