
User's Guide
Page 5
... Expansion Card 69 Removing an Expansion Card 77 Installing an AGP Graphics Card 79 Removing an AGP Card 82 Expansion-Card Cage (Small Desktop Computer Only 83 Removing the Expansion-Card Cage 83 Replacing the Expansion-Card Cage 84 TAPI 86 Installing a TAPI Device 86 Installing a...the Heat Sink or Heat-Sink/Blower Assembly . . . . 100 Front Panel Inserts 101 Removing Front Panel Inserts-Small Form-Factor and Small Desktop Computers 101 Removing Front Panel Inserts-Small Mini-Tower Computer . . 104 Replacing Front Panel Inserts 105 Internal Drives 106 IDE Drive Addressing 108 ...
... Expansion Card 69 Removing an Expansion Card 77 Installing an AGP Graphics Card 79 Removing an AGP Card 82 Expansion-Card Cage (Small Desktop Computer Only 83 Removing the Expansion-Card Cage 83 Replacing the Expansion-Card Cage 84 TAPI 86 Installing a TAPI Device 86 Installing a...the Heat Sink or Heat-Sink/Blower Assembly . . . . 100 Front Panel Inserts 101 Removing Front Panel Inserts-Small Form-Factor and Small Desktop Computers 101 Removing Front Panel Inserts-Small Mini-Tower Computer . . 104 Replacing Front Panel Inserts 105 Internal Drives 106 IDE Drive Addressing 108 ...

User's Guide
Page 9
... Return Policy 250 Ergonomic Computing Habits 1 9 Microsoft® Windows® XP Features Overview 4 Help and Support Center 4 New User Interface 5 Switching to Classic View 5 Clean Desktop Wizard 6 Taskbar Grouping 7 Notification Area Cleanup 7 Files and Settings Transfer Wizard 8 Application and Device Compatibility 9 Program Compatibility Wizard 9 System Restore 10 Using System Restore 11...
... Return Policy 250 Ergonomic Computing Habits 1 9 Microsoft® Windows® XP Features Overview 4 Help and Support Center 4 New User Interface 5 Switching to Classic View 5 Clean Desktop Wizard 6 Taskbar Grouping 7 Notification Area Cleanup 7 Files and Settings Transfer Wizard 8 Application and Device Compatibility 9 Program Compatibility Wizard 9 System Restore 10 Using System Restore 11...
User's Guide
Page 20
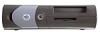
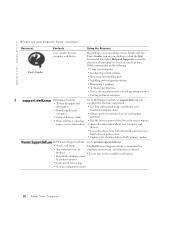
... the User's Guides icon on your desktop or click the Start button and then select Help and Support to access the electronic documentation stored on selected operating systems) • Getting technical assistance Dell Support website • Technical support and information Go to Dell Support website at support.dell.com and complete the one-time...
... the User's Guides icon on your desktop or click the Start button and then select Help and Support to access the electronic documentation stored on selected operating systems) • Getting technical assistance Dell Support website • Technical support and information Go to Dell Support website at support.dell.com and complete the one-time...

User's Guide
Page 21
Small Form-Factor Computer 12 3 4 5 1 USB connectors (2) 2 headphone connector 3 hard drive access lights 4 power button 5 power light A bout Yo ur Computer 19 Front Panel The following figures show the controls, lights, and features located on the front panel of the small form-factor, small desktop, and small mini-tower computers.
Small Form-Factor Computer 12 3 4 5 1 USB connectors (2) 2 headphone connector 3 hard drive access lights 4 power button 5 power light A bout Yo ur Computer 19 Front Panel The following figures show the controls, lights, and features located on the front panel of the small form-factor, small desktop, and small mini-tower computers.

User's Guide
Page 24
Small Desktop Computer 1 23 1 USB connectors (2) 2 headphone connector 3 breakaway hinges (2) 22 About Yo ur Computer if you remove it or accidentally knock it off its hinges, it snaps back in place. www.dell.com | support.dell.com Front Panel Door Open the front panel door to access two Universal Serial Bus (USB) connectors and one headphone connector. This door is removable;
Small Desktop Computer 1 23 1 USB connectors (2) 2 headphone connector 3 breakaway hinges (2) 22 About Yo ur Computer if you remove it or accidentally knock it off its hinges, it snaps back in place. www.dell.com | support.dell.com Front Panel Door Open the front panel door to access two Universal Serial Bus (USB) connectors and one headphone connector. This door is removable;

User's Guide
Page 29
Small Desktop Computer 1 2 1 PCI slots (2) 2 AC adapter A bout Yo ur Computer 27
Small Desktop Computer 1 2 1 PCI slots (2) 2 AC adapter A bout Yo ur Computer 27
User's Guide
Page 31
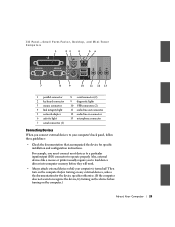
... devices, unless the documentation for specific installation and configuration instructions. For example, you must connect most devices to a particular input/output (I /O Panel-Small Form-Factor, Desktop, and Mini-Tower Computers 1 23 4 56 7 8 9 10 11 12 13 1 parallel connector 2 keyboard connector 3 mouse connector 4 link integrity light 5 network adapter 6 activity light 7 serial connector...
... devices, unless the documentation for specific installation and configuration instructions. For example, you must connect most devices to a particular input/output (I /O Panel-Small Form-Factor, Desktop, and Mini-Tower Computers 1 23 4 56 7 8 9 10 11 12 13 1 parallel connector 2 keyboard connector 3 mouse connector 4 link integrity light 5 network adapter 6 activity light 7 serial connector...

User's Guide
Page 35
Small Desktop Computer 14 1 13 2 12 3 11 4 10 9 8 7 5 6 1 cover release buttons (2) 2 hard drive 3 internal speaker 4 chassis intrusion switch 5 expansion-card cage 6 power supply 7 expansion-card slots 8 AC power connector 9 padlock ring 10 I/O ports and connectors 11 heat sink and blower assembly 12 system board 13 3.5-inch floppy drive 14 CD/DVD drive A bout Yo ur Computer 33
Small Desktop Computer 14 1 13 2 12 3 11 4 10 9 8 7 5 6 1 cover release buttons (2) 2 hard drive 3 internal speaker 4 chassis intrusion switch 5 expansion-card cage 6 power supply 7 expansion-card slots 8 AC power connector 9 padlock ring 10 I/O ports and connectors 11 heat sink and blower assembly 12 system board 13 3.5-inch floppy drive 14 CD/DVD drive A bout Yo ur Computer 33
User's Guide
Page 42
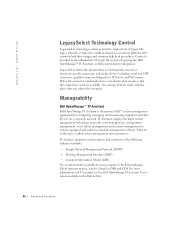
...; Simple Network Management Protocol (SNMP) • Desktop Management Interface (DMI) • Common Information Model (CIM) The instrumentation available for your computer is Dell OpenManage Client instrumentation, which is the premier Dell™ systems management application for systems equipped with ... hard drive images and common help desk procedures. IT Assistant supports instrumentation that are available. www.dell.com | support.dell.com LegacySelect Technology Control LegacySelect technology control permits the deployment of this type is provided to electronically activate...
...; Simple Network Management Protocol (SNMP) • Desktop Management Interface (DMI) • Common Information Model (CIM) The instrumentation available for your computer is Dell OpenManage Client instrumentation, which is the premier Dell™ systems management application for systems equipped with ... hard drive images and common help desk procedures. IT Assistant supports instrumentation that are available. www.dell.com | support.dell.com LegacySelect Technology Control LegacySelect technology control permits the deployment of this type is provided to electronically activate...
User's Guide
Page 50
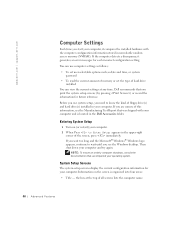
...shipped with the computer configuration information stored in your operating system. Before you need to Enter Setup appears in the Dell Accessories folder. System Setup Screens The system setup screens display the current configuration information for each incorrect configuration setting. the... is located in the upper-right corner of the screen, press immediately. www.dell.com | support.dell.com Computer Settings Each time you are unsure of this information, see the Windows desktop. If the computer detects a discrepancy, it compares the installed hardware with your ...
...shipped with the computer configuration information stored in your operating system. Before you need to Enter Setup appears in the Dell Accessories folder. System Setup Screens The system setup screens display the current configuration information for each incorrect configuration setting. the... is located in the upper-right corner of the screen, press immediately. www.dell.com | support.dell.com Computer Settings Each time you are unsure of this information, see the Windows desktop. If the computer detects a discrepancy, it compares the installed hardware with your ...
User's Guide
Page 53
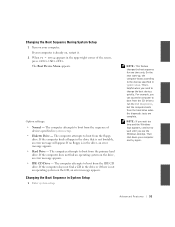
... hard drive when the diagnostic tests are complete. Changing the Boot Sequence in system setup. • Diskette Drive - NOTE: If you see the Windows desktop. Option settings: • Normal - If the computer does not find an operating system on your computer. On the next start-up, the computer boots... according to run the Dell Diagnostics, but the computer boots from the floppy drive. For example, you need to boot from the CD drive to the devices specified in system...
... hard drive when the diagnostic tests are complete. Changing the Boot Sequence in system setup. • Diskette Drive - NOTE: If you see the Windows desktop. Option settings: • Normal - If the computer does not find an operating system on your computer. On the next start-up, the computer boots... according to run the Dell Diagnostics, but the computer boots from the floppy drive. For example, you need to boot from the CD drive to the devices specified in system...
User's Guide
Page 66
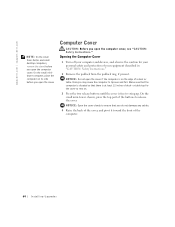
... up. On the small mini-tower chassis, press the top part of the buttons to tip over and fall. www.dell.com | support.dell.com NOTE: On the small form-factor and small desktop computers, remove the stand before you do not damage any cables. 4 Raise the back of the cover, and pivot...
... up. On the small mini-tower chassis, press the top part of the buttons to tip over and fall. www.dell.com | support.dell.com NOTE: On the small form-factor and small desktop computers, remove the stand before you do not damage any cables. 4 Raise the back of the cover, and pivot...

User's Guide
Page 67
Small Form-Factor Computer 1 3 2 1 security cable slot 2 padlock ring 3 release buttons (one on each side) Small Desktop Computer Installing Upgrades 65
Small Form-Factor Computer 1 3 2 1 security cable slot 2 padlock ring 3 release buttons (one on each side) Small Desktop Computer Installing Upgrades 65
User's Guide
Page 70
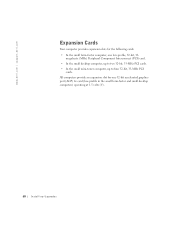
...32-bit accelerated graphics port (AGP) 4x card (low-profile in the small form-factor and small desktop computers) operating at 1.5 volts (V). 68 Installing Upgrades www.dell.com | support.dell.com Expansion Cards Your computer provides expansion slots for one low-profile, 32-bit, 33- megahertz (...MHz) Peripheral Component Interconnect (PCI) card. • In the small desktop computer, up to two 32-bit, 33-MHz ...
...32-bit accelerated graphics port (AGP) 4x card (low-profile in the small form-factor and small desktop computers) operating at 1.5 volts (V). 68 Installing Upgrades www.dell.com | support.dell.com Expansion Cards Your computer provides expansion slots for one low-profile, 32-bit, 33- megahertz (...MHz) Peripheral Component Interconnect (PCI) card. • In the small desktop computer, up to two 32-bit, 33-MHz ...
User's Guide
Page 72
....dell.com | support.dell.com NOTICE: Before disconnecting a device from the computer, wait 10 to 20 seconds. 3 Open the computer cover. 4 If you are replacing an expansion card, remove the current driver for the expansion card from its electrical outlet. To locate this light, see "System Board Components." 1 If you have a small desktop...
....dell.com | support.dell.com NOTICE: Before disconnecting a device from the computer, wait 10 to 20 seconds. 3 Open the computer cover. 4 If you are replacing an expansion card, remove the current driver for the expansion card from its electrical outlet. To locate this light, see "System Board Components." 1 If you have a small desktop...

User's Guide
Page 78
www.dell.com | support.dell.com Retention Arm Closure 4 3 2 1 1 filler bracket 2 alignment guide 3 alignment bar 4 retention arm 11 If you have a small desktop computer, replace the expansion-card cage. 12 Connect any cables that should be attached to their electrical outlets, and turn them on. 76 Installing Upgrades ...
www.dell.com | support.dell.com Retention Arm Closure 4 3 2 1 1 filler bracket 2 alignment guide 3 alignment bar 4 retention arm 11 If you have a small desktop computer, replace the expansion-card cage. 12 Connect any cables that should be attached to their electrical outlets, and turn them on. 76 Installing Upgrades ...
User's Guide
Page 79
... connectors. NOTE: Problems may arise if two expansion cards are trying to 20 seconds. 2 Open the computer cover. 3 In the small desktop computer, remove the expansion-card cage. Installing Upgrades 77 Cover was previously removed. 14 Reset the chassis intrusion detector by someone else, contact your...the system board, verify that came with the card for more information. To avoid this light, see "I /O Panel-Small Form-Factor, Desktop, and Mini-Tower Computers"). 17 If you open and close the cover, the chassis intrusion detector causes the following message to the integrated ...
... connectors. NOTE: Problems may arise if two expansion cards are trying to 20 seconds. 2 Open the computer cover. 3 In the small desktop computer, remove the expansion-card cage. Installing Upgrades 77 Cover was previously removed. 14 Reset the chassis intrusion detector by someone else, contact your...the system board, verify that came with the card for more information. To avoid this light, see "I /O Panel-Small Form-Factor, Desktop, and Mini-Tower Computers"). 17 If you open and close the cover, the chassis intrusion detector causes the following message to the integrated ...

User's Guide
Page 80
...necessary to maintain Federal Communications Commission (FCC) certification of your network administrator for Network Interface Card to On. 78 Installing Upgrades www.dell.com | support.dell.com 4 Press the lever on the retention arm and raise the retention arm (see "I /O panel (see the illustration for ... following steps: a Enter system setup, select Integrated Devices, and change the setting for information on the I /O Panel-Small Form-Factor, Desktop, and MiniTower Computers"). 13 If you removed an add-in the empty card-slot opening. NOTE: If a setup password has been assigned ...
...necessary to maintain Federal Communications Commission (FCC) certification of your network administrator for Network Interface Card to On. 78 Installing Upgrades www.dell.com | support.dell.com 4 Press the lever on the retention arm and raise the retention arm (see "I /O panel (see the illustration for ... following steps: a Enter system setup, select Integrated Devices, and change the setting for information on the I /O Panel-Small Form-Factor, Desktop, and MiniTower Computers"). 13 If you removed an add-in the empty card-slot opening. NOTE: If a setup password has been assigned ...

User's Guide
Page 81
...holding the lever and pull the lever up . AGP Slot Filler Bracket Removal-Small Form-Factor Computer 1 NOTE: The small formfactor and small desktop computers support lowprofile AGP cards. 1 hinged lever Installing Upgrades 79 b Connect the network cable to the integrated connector on the I/O panel (...see "I/O Panel-Small Form-Factor, Desktop, and MiniTower Computers"). On the small desktop computer, press the indented tab with your thumb at an angle toward the system board until you release the tab.
...holding the lever and pull the lever up . AGP Slot Filler Bracket Removal-Small Form-Factor Computer 1 NOTE: The small formfactor and small desktop computers support lowprofile AGP cards. 1 hinged lever Installing Upgrades 79 b Connect the network cable to the integrated connector on the I/O panel (...see "I/O Panel-Small Form-Factor, Desktop, and MiniTower Computers"). On the small desktop computer, press the indented tab with your thumb at an angle toward the system board until you release the tab.

User's Guide
Page 85
Expansion-Card Cage (Small Desktop Computer Only) Removing the Expansion-Card Cage CAUTION: Before you perform this procedure, see "CAUTION: Safety Instructions." 1 Open the computer cover. 2 Check any cables that do not reach the expansion-card cage once it is removed from the computer. 3 Gently pull on the handle and lift the expansion-card cage up and away from the computer. Installing Upgrades 83 Disconnect any cables connected to expansion cards through the backpanel openings.
Expansion-Card Cage (Small Desktop Computer Only) Removing the Expansion-Card Cage CAUTION: Before you perform this procedure, see "CAUTION: Safety Instructions." 1 Open the computer cover. 2 Check any cables that do not reach the expansion-card cage once it is removed from the computer. 3 Gently pull on the handle and lift the expansion-card cage up and away from the computer. Installing Upgrades 83 Disconnect any cables connected to expansion cards through the backpanel openings.


