System Information Guide
Page 5
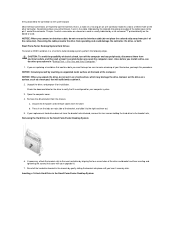
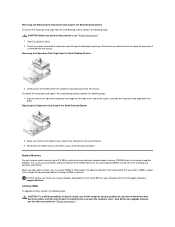
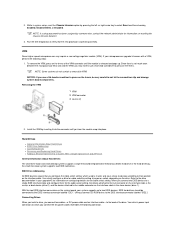
...view system and peripheral documentation. To obtain the latest versions of the documents on your Dell OptiPlex computer. Double-clicking the icon starts your Dell Document Viewer, from which contain updated information about accessing online documentation. System Information Guide 5...and utilities, information on embedded system setup, instructions for performing various system upgrades, diagnostic and troubleshooting information, and technical specifications. • Dell system documentation updates, which you may contain information that supersedes information in other documents.
...view system and peripheral documentation. To obtain the latest versions of the documents on your Dell OptiPlex computer. Double-clicking the icon starts your Dell Document Viewer, from which contain updated information about accessing online documentation. System Information Guide 5...and utilities, information on embedded system setup, instructions for performing various system upgrades, diagnostic and troubleshooting information, and technical specifications. • Dell system documentation updates, which you may contain information that supersedes information in other documents.

User Guide
Page 1
...Advanced Features Manageability Security Password Protection System Settings Additional System Setup Options Jumper Settings Software Installation and Configuration Installing Upgrades Computer Cover Expansion Cards System Memory AGP Graphics Card/GPA Card Microprocessor Hard Drives Diskette Drives Optical Drives ...names other than its own. As an ENERGY STAR partner, Dell has determined that helps you . Dell disclaims any manner whatsoever without notice. © 2000-2002 Dell Computer Corporation. Dell™ OptiPlex™ GX150 System User's Guide Reader Survey We want to change without...
...Advanced Features Manageability Security Password Protection System Settings Additional System Setup Options Jumper Settings Software Installation and Configuration Installing Upgrades Computer Cover Expansion Cards System Memory AGP Graphics Card/GPA Card Microprocessor Hard Drives Diskette Drives Optical Drives ...names other than its own. As an ENERGY STAR partner, Dell has determined that helps you . Dell disclaims any manner whatsoever without notice. © 2000-2002 Dell Computer Corporation. Dell™ OptiPlex™ GX150 System User's Guide Reader Survey We want to change without...
User Guide
Page 25
l Asset info with the cable slot on self-test (POST). allows remote BIOS upgrades to systems on - The Chassis Intrusion option in the coo.mif file. or right-arrow key to select an option setting. l Remote system configuration - Press ...
l Asset info with the cable slot on self-test (POST). allows remote BIOS upgrades to systems on - The Chassis Intrusion option in the coo.mif file. or right-arrow key to select an option setting. l Remote system configuration - Press ...
User Guide
Page 47
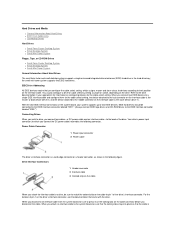
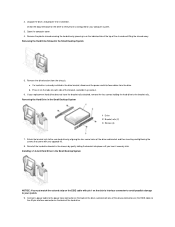
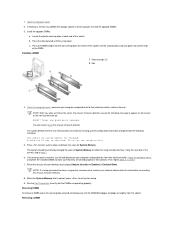
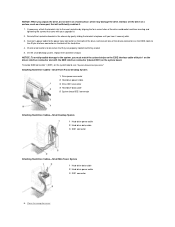
... 1 Header connector 2 Interface cable 3 Colored strip on the cable When you disconnect the cable. With the two EIDE interface connectors on the system board, your upgrade kit for information on configuring devices for the cable select setting, the device attached to the last connector on the cable connector before you attach...
... 1 Header connector 2 Interface cable 3 Colored strip on the cable When you disconnect the cable. With the two EIDE interface connectors on the system board, your upgrade kit for information on configuring devices for the cable select setting, the device attached to the last connector on the cable connector before you attach...
User Guide
Page 48
... surface on a surface, such as a foam pad, that contains data you are keyed for correct insertion; The pin-1 end of your computer system. 3. If your upgrade kit. 7. firmly attached to the connector on a hard surface, which may damage the drive. NOTICE: When you begin this procedure. Inserting a 1.6-Inch Hard Drive in...
... surface on a surface, such as a foam pad, that contains data you are keyed for correct insertion; The pin-1 end of your computer system. 3. If your upgrade kit. 7. firmly attached to the connector on a hard surface, which may damage the drive. NOTICE: When you begin this procedure. Inserting a 1.6-Inch Hard Drive in...
User Guide
Page 50
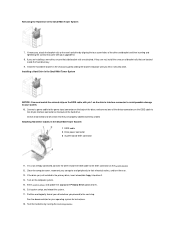
... and then inserting and tightening the screws that it securely click. If a hard drive is configured for your system. 9. Open the computer cover. 4. If your upgrade kit. 8. Reinstall the hard drive bracket in the Small Desktop System 1 Drive 2 Bracket rails (2) 3 Screws (4) 7. Removing the Hard Drive Shroud in on the tabs on...
... and then inserting and tightening the screws that it securely click. If a hard drive is configured for your system. 9. Open the computer cover. 4. If your upgrade kit. 8. Reinstall the hard drive bracket in the Small Desktop System 1 Drive 2 Bracket rails (2) 3 Screws (4) 7. Removing the Hard Drive Shroud in on the tabs on...
User Guide
Page 52
...the Small Mini-Tower System NOTICE: You must match the colored strip on the EIDE cable with your system. 10. Check all connectors to your upgrade kit. 8. Turn on the back of the drive and bracket and then inserting and tightening the screws that are properly cabled and firmly seated.... If it securely click. Installing a Hard Drive in the chassis by running the Dell Diagnostics. See the documentation for your computer and peripherals to the new hard drive by aligning the four screw holes of the hard drive. ...
...the Small Mini-Tower System NOTICE: You must match the colored strip on the EIDE cable with your system. 10. Check all connectors to your upgrade kit. 8. Turn on the back of the drive and bracket and then inserting and tightening the screws that are properly cabled and firmly seated.... If it securely click. Installing a Hard Drive in the chassis by running the Dell Diagnostics. See the documentation for your computer and peripherals to the new hard drive by aligning the four screw holes of the hard drive. ...

User Guide
Page 66
...Temporary file. About Your Computer: Dell OptiPlex GX150 System User's Guide Additional Information: Dell OptiPlex GX150 System User's Guide Advanced Features: Dell OptiPlex GX150 System User's Guide Getting Help: Dell OptiPlex GX150 System User's Guide Contents: Dell OptiPlex GX150 System User's Guide Solving Problems: Dell OptiPlex GX150 System User's Guide Safety Information: Dell OptiPlex GX150 System User's Guide Technical Specifications: Dell OptiPlex GX150 System User's Guide Stand: Dell OptiPlex GX150 System User's Guide Installing Upgrades: Dell OptiPlex GX150 System User's Guide
...Temporary file. About Your Computer: Dell OptiPlex GX150 System User's Guide Additional Information: Dell OptiPlex GX150 System User's Guide Advanced Features: Dell OptiPlex GX150 System User's Guide Getting Help: Dell OptiPlex GX150 System User's Guide Contents: Dell OptiPlex GX150 System User's Guide Solving Problems: Dell OptiPlex GX150 System User's Guide Safety Information: Dell OptiPlex GX150 System User's Guide Technical Specifications: Dell OptiPlex GX150 System User's Guide Stand: Dell OptiPlex GX150 System User's Guide Installing Upgrades: Dell OptiPlex GX150 System User's Guide
User Guide
Page 108
... protection of desk- Open the computer cover as follows: NOTICE: Do not open the cover if the system is free to Contents Page Installing Upgrades: Dell™ OptiPlex™ GX150 System User's Guide Computer Cover Expansion Cards System Memory AGP Graphics Card/GPA (AIMM) Card Microprocessor VRM Hard Drives Diskette Drives Optical Drives Front...
... protection of desk- Open the computer cover as follows: NOTICE: Do not open the cover if the system is free to Contents Page Installing Upgrades: Dell™ OptiPlex™ GX150 System User's Guide Computer Cover Expansion Cards System Memory AGP Graphics Card/GPA (AIMM) Card Microprocessor VRM Hard Drives Diskette Drives Optical Drives Front...
User Guide
Page 117
... you install new memory modules, download the most recent BIOS for your computer from their electrical outlets, and then wait at support.dell.com. " Replacing the Expansion-Card Cage In the Small Desktop System 2. Open the computer cover. 2. Disconnect any cables connected ...to 512 MB by using synchronous dynamic random-access memory (SDRAM) dual in "Safety Information. Make sure that you upgrade memory, see "Safety Information." 1. When you add system memory, you perform this procedure, see the other precautions in -line memory modules...
... you install new memory modules, download the most recent BIOS for your computer from their electrical outlets, and then wait at support.dell.com. " Replacing the Expansion-Card Cage In the Small Desktop System 2. Open the computer cover. 2. Disconnect any cables connected ...to 512 MB by using synchronous dynamic random-access memory (SDRAM) dual in "Safety Information. Make sure that you upgrade memory, see "Safety Information." 1. When you add system memory, you perform this procedure, see the other precautions in -line memory modules...
User Guide
Page 118
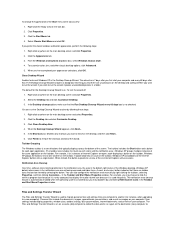
... outward until the securing tabs snap into place around the ends of system memory has changed the value of the socket. Run the Dell Diagnostics to make sure that the DIMMs are seated properly in which you open . NOTE: If a setup password has been assigned ... a DIMM NOTE: After you plan to enter system setup, and check the value for information on resetting the chassis intrusion detector. 8. Press to install the upgrade DIMMs. 3. Locate the plastic securing clips at the next system start-up: ALERT! Then repeat steps 3, 4, and 5. 7. Installing a DIMM 1 Securing clips (2) 2 ...
... outward until the securing tabs snap into place around the ends of system memory has changed the value of the socket. Run the Dell Diagnostics to make sure that the DIMMs are seated properly in which you open . NOTE: If a setup password has been assigned ... a DIMM NOTE: After you plan to enter system setup, and check the value for information on resetting the chassis intrusion detector. 8. Press to install the upgrade DIMMs. 3. Locate the plastic securing clips at the next system start-up: ALERT! Then repeat steps 3, 4, and 5. 7. Installing a DIMM 1 Securing clips (2) 2 ...
User Guide
Page 119
... the AGP Slot Filler Bracket in "Safety Information." On the small desktop computer, press the indented tab with your thumb at least 5 seconds before you upgrade memory, see the back panel for the location of electric shock, turn off the computer and any peripherals, disconnect them from their electrical outlets, and...
... the AGP Slot Filler Bracket in "Safety Information." On the small desktop computer, press the indented tab with your thumb at least 5 seconds before you upgrade memory, see the back panel for the location of electric shock, turn off the computer and any peripherals, disconnect them from their electrical outlets, and...
User Guide
Page 121
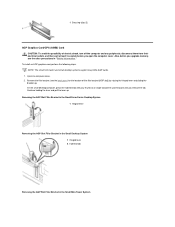
... of the green tab as shown in "Safety Information." 1. CAUTION: The microprocessor and heat sink assembly can get extremely hot. NOTE: Dell recommends that the tab is free from the AGP card clip tab. On the small mini-tower system, remove the airflow shroud as shown.... 1 Anchor tabs (3) 4. Turn off the computer and any peripherals, disconnect them from their electrical outlets, wait 10 to cool before you upgrade the microprocessor, see the other card end is not covering the card edge bottom. 2. Disconnect the cooling fan power cable from the microprocessor. ...
... of the green tab as shown in "Safety Information." 1. CAUTION: The microprocessor and heat sink assembly can get extremely hot. NOTE: Dell recommends that the tab is free from the AGP card clip tab. On the small mini-tower system, remove the airflow shroud as shown.... 1 Anchor tabs (3) 4. Turn off the computer and any peripherals, disconnect them from their electrical outlets, wait 10 to cool before you upgrade the microprocessor, see the other card end is not covering the card edge bottom. 2. Disconnect the cooling fan power cable from the microprocessor. ...
User Guide
Page 124
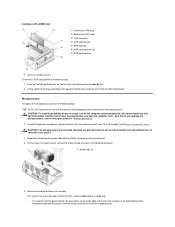
...Install the VRM by inserting it into place. Run the Dell Diagnostics to verify that you configure the cable select setting,...two cables-a DC power cable and an interface cable-to their position on the system board, your microprocessor upgrade kit comes with a VRM, perform the following connector. VRM Some higher-speed microprocessors may have to use...VRM connector 3 Levers (2) 2. EIDE hard drives should be very careful to the drive documentation in your upgrade kit for information on configuring devices for the cable select setting, the device attached to the last connector...
...Install the VRM by inserting it into place. Run the Dell Diagnostics to verify that you configure the cable select setting,...two cables-a DC power cable and an interface cable-to their position on the system board, your microprocessor upgrade kit comes with a VRM, perform the following connector. VRM Some higher-speed microprocessors may have to use...VRM connector 3 Levers (2) 2. EIDE hard drives should be very careful to the drive documentation in your upgrade kit for information on configuring devices for the cable select setting, the device attached to the last connector...
User Guide
Page 127
.... 4. Connect a power cable to the power input connector on the system board. To locate EIDE connector 1 (IDE1) on the drive's interface connector and with your upgrade kit. 2. NOTICE: To avoid possible damage to the 40-pin interface connector on the back of the device connectors on the EIDE cable to the...
.... 4. Connect a power cable to the power input connector on the system board. To locate EIDE connector 1 (IDE1) on the drive's interface connector and with your upgrade kit. 2. NOTICE: To avoid possible damage to the 40-pin interface connector on the back of the device connectors on the EIDE cable to the...
User Guide
Page 149
... Start Menu and click OK. Click the Appearance tab. 3. To customize color, font, and other classic desktop options, click Advanced. 5. The default for instance, when upgrading to a new computer). To turn the wizard off: 1. Right-click anywhere on the desktop and asking whether you want to hide the antivirus program icon...
... Start Menu and click OK. Click the Appearance tab. 3. To customize color, font, and other classic desktop options, click Advanced. 5. The default for instance, when upgrading to a new computer). To turn the wizard off: 1. Right-click anywhere on the desktop and asking whether you want to hide the antivirus program icon...

