User Guide
Page 3
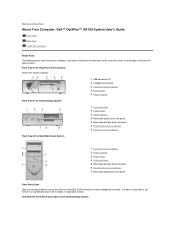
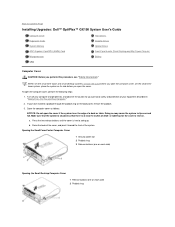
... USB connectors (2) 2 Headphone connector 3 Hard drive access indicator 4 Power button 5 Power indicator Front View of the Small Desktop System Front View of the Small Mini-Tower System 1 Front-panel door 2 Power button 3 Power indicator 4 Removable optical drive front panel 5 Removable diskette drive front ... 7 Removable optical drive front panel Front-Panel Door Open the front-panel door to Contents Page About Your Computer: Dell™ OptiPlex™ GX150 System User's Guide Front View Back View Inside Your Computer Front View The following figures show the controls, indicators, ...
... USB connectors (2) 2 Headphone connector 3 Hard drive access indicator 4 Power button 5 Power indicator Front View of the Small Desktop System Front View of the Small Mini-Tower System 1 Front-panel door 2 Power button 3 Power indicator 4 Removable optical drive front panel 5 Removable diskette drive front ... 7 Removable optical drive front panel Front-Panel Door Open the front-panel door to Contents Page About Your Computer: Dell™ OptiPlex™ GX150 System User's Guide Front View Back View Inside Your Computer Front View The following figures show the controls, indicators, ...
User Guide
Page 6
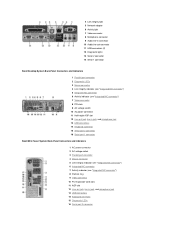
... line-in connector 10 Audio line-out connector 11 USB connectors (2) 12 Diagnostic lights 13 Serial 2 connector 14 Serial 1 connector Small Desktop System Back-Panel Connectors and Indicators 1 Parallel port connector 2 Diagnostic LEDs 3 Mouse connector 4 Link integrity indicator (see "Integrated NIC connector...in jack, and microphone jack 13 USB connectors 14 Keyboard connector 15 Serial port 2 connector 16 Serial port 1 connector Small Mini-Tower System Back-Panel Connectors and Indicators 1 AC power connector 2 AC voltage switch 3 Parallel port connector 4 Mouse connector 5 Link integrity...
... line-in connector 10 Audio line-out connector 11 USB connectors (2) 12 Diagnostic lights 13 Serial 2 connector 14 Serial 1 connector Small Desktop System Back-Panel Connectors and Indicators 1 Parallel port connector 2 Diagnostic LEDs 3 Mouse connector 4 Link integrity indicator (see "Integrated NIC connector...in jack, and microphone jack 13 USB connectors 14 Keyboard connector 15 Serial port 2 connector 16 Serial port 1 connector Small Mini-Tower System Back-Panel Connectors and Indicators 1 AC power connector 2 AC voltage switch 3 Parallel port connector 4 Mouse connector 5 Link integrity...
User Guide
Page 8
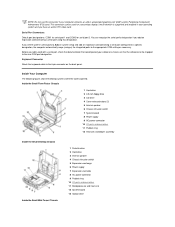
...Keyboard Connector Attach the keyboard cable to the new COM port designation. Inside Your Computer The following figures show the desktop systems with a serial port, check the documentation that accompanied your software to the appropriate COM setting as necessary. NOTE... board 8 Power supply 9 AC power connector 10 I/O ports and connectors 11 Padlock ring 12 Heat sink and blower assembly Inside the Small Desktop Chassis Inside the Small Mini-Tower Chassis 1 Diskette drive 2 Hard drive 3 Internal speaker 4 Chassis intrusion switch 5 Expansion-card cage 6 Power supply 7 Expansion-card slots ...
...Keyboard Connector Attach the keyboard cable to the new COM port designation. Inside Your Computer The following figures show the desktop systems with a serial port, check the documentation that accompanied your software to the appropriate COM setting as necessary. NOTE... board 8 Power supply 9 AC power connector 10 I/O ports and connectors 11 Padlock ring 12 Heat sink and blower assembly Inside the Small Desktop Chassis Inside the Small Mini-Tower Chassis 1 Diskette drive 2 Hard drive 3 Internal speaker 4 Chassis intrusion switch 5 Expansion-card cage 6 Power supply 7 Expansion-card slots ...
User Guide
Page 10
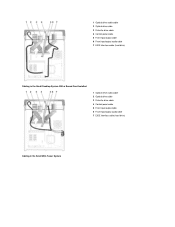
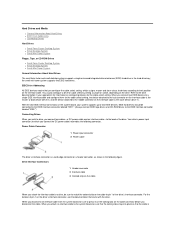
1 Optical drive audio cable 2 Optical drive cable 3 Diskette drive cable 4 Control panel cable 5 Front input/output cable 6 Front input/output audio cable 7 EIDE interface cable (hard drive) Cabling in the Small Desktop System With a Sound Card Installed 1 Optical drive audio cable 2 Optical drive cable 3 Diskette drive cable 4 Control panel cable 5 Front input/output cable 6 Front input/output audio cable 7 EIDE interface cable (hard drive) Cabling in the Small Mini-Tower System
1 Optical drive audio cable 2 Optical drive cable 3 Diskette drive cable 4 Control panel cable 5 Front input/output cable 6 Front input/output audio cable 7 EIDE interface cable (hard drive) Cabling in the Small Desktop System With a Sound Card Installed 1 Optical drive audio cable 2 Optical drive cable 3 Diskette drive cable 4 Control panel cable 5 Front input/output cable 6 Front input/output audio cable 7 EIDE interface cable (hard drive) Cabling in the Small Mini-Tower System

User Guide
Page 11
... on the small form-factor chassis, used as the riser in the small desktop chassis, and can be populated with PCI expansion card in the small mini-tower chassis) 11 PCI 1 connector (not able to be populated on the small desktop chassis) 12 AGP/GPA (AIMM) connector 13 Video connector (upper) and audio...
... on the small form-factor chassis, used as the riser in the small desktop chassis, and can be populated with PCI expansion card in the small mini-tower chassis) 11 PCI 1 connector (not able to be populated on the small desktop chassis) 12 AGP/GPA (AIMM) connector 13 Video connector (upper) and audio...
User Guide
Page 47
...Drive Addressing l Connecting Drives Hard Drives l Small Form-Factor Desktop System l Small Desktop System l Small Mini-Tower System Floppy, Tape, or CD-ROM Drives l Small Form-Factor Desktop System l Small Desktop System l Small Mini-Tower System General Information About Hard Drives The small form-factor ...and small desktop systems support a single enhanced integrated drive electronics (EIDE) hard drive in the following...
...Drive Addressing l Connecting Drives Hard Drives l Small Form-Factor Desktop System l Small Desktop System l Small Mini-Tower System Floppy, Tape, or CD-ROM Drives l Small Form-Factor Desktop System l Small Desktop System l Small Mini-Tower System General Information About Hard Drives The small form-factor ...and small desktop systems support a single enhanced integrated drive electronics (EIDE) hard drive in the following...

User Guide
Page 51
...place. 12. a. Disconnect the power and interface cables from the chassis. Press in the Small Desktop System 1 Power cable 2 EIDE cable 3 IDE1 connector 10. NOTICE: Ground yourself by running the Dell Diagnostics. 19. Check the documentation for your computer system. 3. If you are properly cabled and...Replace the plastic shroud covering the drive by inserting the two tabs on the hard drive. Small Mini-Tower System Hard Drives To install an EIDE hard drive in a small mini-tower system, perform the following steps. If you proceed to step 8. 5. For You and Your Computer."...
...place. 12. a. Disconnect the power and interface cables from the chassis. Press in the Small Desktop System 1 Power cable 2 EIDE cable 3 IDE1 connector 10. NOTICE: Ground yourself by running the Dell Diagnostics. 19. Check the documentation for your computer system. 3. If you are properly cabled and...Replace the plastic shroud covering the drive by inserting the two tabs on the hard drive. Small Mini-Tower System Hard Drives To install an EIDE hard drive in a small mini-tower system, perform the following steps. If you proceed to step 8. 5. For You and Your Computer."...

User Guide
Page 101
Back to Contents Page Technical Specifications: Dell™ OptiPlex™ GX150 System User's Guide Processor Memory System Information Graphics (Optional) and Video Audio Expansion Bus Drives Ports... 4-MB Graphics Performance Accelerator (GPA), or a 4X AGP card can be supported (low profile cards for small form-factor and small desktop systems; and system management BIOS 2.3-compliant BIOS in -line memory module (DIMM) two non-error checking and correction (non-ECC) sockets...) synchronous dynamic random-access memory (SDRAM) (memory clock operates at 100 MHz for the small mini-tower system)
Back to Contents Page Technical Specifications: Dell™ OptiPlex™ GX150 System User's Guide Processor Memory System Information Graphics (Optional) and Video Audio Expansion Bus Drives Ports... 4-MB Graphics Performance Accelerator (GPA), or a 4X AGP card can be supported (low profile cards for small form-factor and small desktop systems; and system management BIOS 2.3-compliant BIOS in -line memory module (DIMM) two non-error checking and correction (non-ECC) sockets...) synchronous dynamic random-access memory (SDRAM) (memory clock operates at 100 MHz for the small mini-tower system)
User Guide
Page 102
... the front panel Expansion Bus Bus types Bus speed Small form-factor (SF) desktop chassis expansion-card connector Small desktop (SD) chassis expansion-card connectors: Small mini-tower (SMT) chassis expansion-card connectors: PCI expansion-card connector size Peripheral Component Interconnect...(maximum) 32 bits Drives Externally accessible bays: Small form-factor chassis Small desktop chassis Small mini-tower chassis Internally accessible bays: Small form-factor chassis Small desktop chassis Small mini-tower chassis one optical drive bay for a removable media device two diskette drive ...
... the front panel Expansion Bus Bus types Bus speed Small form-factor (SF) desktop chassis expansion-card connector Small desktop (SD) chassis expansion-card connectors: Small mini-tower (SMT) chassis expansion-card connectors: PCI expansion-card connector size Peripheral Component Interconnect...(maximum) 32 bits Drives Externally accessible bays: Small form-factor chassis Small desktop chassis Small mini-tower chassis Internally accessible bays: Small form-factor chassis Small desktop chassis Small mini-tower chassis one optical drive bay for a removable media device two diskette drive ...
User Guide
Page 104
... humidity Maximum vibration: Operating Storage Maximum shock: Operating small form-factor chassis: 100 W small desktop chassis: 110 W small mini-tower chassis: 200 W small form-factor chassis: 455 BTU/hr (average) small desktop chassis: 500 BTU/hr (average) small mini-tower chassis: 910 BTU/hr (average) 90 to 135 volts (V) at 60 Hz; 180 to...
... humidity Maximum vibration: Operating Storage Maximum shock: Operating small form-factor chassis: 100 W small desktop chassis: 110 W small mini-tower chassis: 200 W small form-factor chassis: 455 BTU/hr (average) small desktop chassis: 500 BTU/hr (average) small mini-tower chassis: 910 BTU/hr (average) 90 to 135 volts (V) at 60 Hz; 180 to...
User Guide
Page 108
... so may cause the system to Contents Page Installing Upgrades: Dell™ OptiPlex™ GX150 System User's Guide Computer Cover Expansion Cards System Memory AGP Graphics Card/GPA (AIMM) Card Microprocessor VRM Hard Drives Diskette Drives Optical Drives Front-Panel Inserts (Small Desktop and Mini-Tower Chassis) Battery Computer Cover CAUTION: Before you have installed...
... so may cause the system to Contents Page Installing Upgrades: Dell™ OptiPlex™ GX150 System User's Guide Computer Cover Expansion Cards System Memory AGP Graphics Card/GPA (AIMM) Card Microprocessor VRM Hard Drives Diskette Drives Optical Drives Front-Panel Inserts (Small Desktop and Mini-Tower Chassis) Battery Computer Cover CAUTION: Before you have installed...
User Guide
Page 109
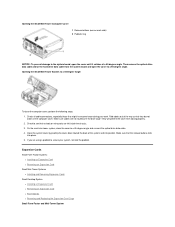
... 3. Expansion Cards Small Form-Factor Systems l Installing an Expansion Card l Removing an Expansion Card Small Mini-Tower Systems l Installing and Removing Expansion Cards Small Desktop System l Installing an Expansion Card l Removing an Expansion Card l Riser Boards l Removing and Replacing the ...Expansion-Card Cage Small Form-Factor and Mini-Tower System Opening the Small Mini-Tower Computer Cover 1 Release buttons (one...
... 3. Expansion Cards Small Form-Factor Systems l Installing an Expansion Card l Removing an Expansion Card Small Mini-Tower Systems l Installing and Removing Expansion Cards Small Desktop System l Installing an Expansion Card l Removing an Expansion Card l Riser Boards l Removing and Replacing the ...Expansion-Card Cage Small Form-Factor and Mini-Tower System Opening the Small Mini-Tower Computer Cover 1 Release buttons (one...

User Guide
Page 114
... your network administrator for Sound to maintain Federal Communications Commission (FCC) certification of your Dell system uses only PCI expansion slots. NOTE: If a setup password has been assigned ...ISA expansion cards are removing the card permanently, install a filler bracket in the small mini-tower system, perform the following cards: l Two 32-bit, 33-MHz PCI expansion cards. If...verify that covers the card-slot opening . If you are not supported. Small Desktop System The small desktop system provides the following expansion slots for a 4-megabyte (MB) graphics performance ...
... your network administrator for Sound to maintain Federal Communications Commission (FCC) certification of your Dell system uses only PCI expansion slots. NOTE: If a setup password has been assigned ...ISA expansion cards are removing the card permanently, install a filler bracket in the small mini-tower system, perform the following cards: l Two 32-bit, 33-MHz PCI expansion cards. If...verify that covers the card-slot opening . If you are not supported. Small Desktop System The small desktop system provides the following expansion slots for a 4-megabyte (MB) graphics performance ...
User Guide
Page 119
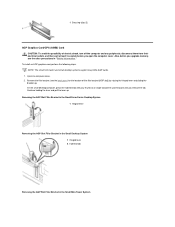
... support low-profile AGP cards. 1. Remove the filler bracket (see the other precautions in the Small Mini-Tower System On the small desktop computer, press the indented tab with your thumb at least 5 seconds before you upgrade memory, see the back panel for the ...perform the following steps. Open the computer cover. 2. Removing the AGP Slot Filler Bracket in the Small Form-Factor Desktop System 1 Hinged lever Removing the AGP Slot Filler Bracket in the Small Desktop System 1 Hinged lever 2 Indented tab Removing the AGP Slot Filler Bracket in "Safety Information." 1 Securing clips ...
... support low-profile AGP cards. 1. Remove the filler bracket (see the other precautions in the Small Mini-Tower System On the small desktop computer, press the indented tab with your thumb at least 5 seconds before you upgrade memory, see the back panel for the ...perform the following steps. Open the computer cover. 2. Removing the AGP Slot Filler Bracket in the Small Form-Factor Desktop System 1 Hinged lever Removing the AGP Slot Filler Bracket in the Small Desktop System 1 Hinged lever 2 Indented tab Removing the AGP Slot Filler Bracket in "Safety Information." 1 Securing clips ...
User Guide
Page 124
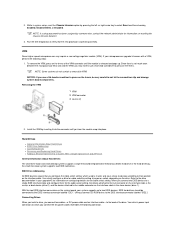
Run the Dell Diagnostics to two EIDE devices. EIDE Drive Addressing All EIDE devices ... a System With a Single Optical Drive and ZIP Drive General Information About Hard Drives The small form-factor and small desktop systems support a single enhanced integrated drive electronics (EIDE) hard drive in your upgrade kit for information on configuring devices for...and the device attached to not let the screwdriver slip and damage system board components. the small mini-tower system supports two EIDE hard drives. VRM Some higher-speed microprocessors may have to use a flat-head screwdriver to ...
Run the Dell Diagnostics to two EIDE devices. EIDE Drive Addressing All EIDE devices ... a System With a Single Optical Drive and ZIP Drive General Information About Hard Drives The small form-factor and small desktop systems support a single enhanced integrated drive electronics (EIDE) hard drive in your upgrade kit for information on configuring devices for...and the device attached to not let the screwdriver slip and damage system board components. the small mini-tower system supports two EIDE hard drives. VRM Some higher-speed microprocessors may have to use a flat-head screwdriver to ...

User Guide
Page 126
... slide it toward the I/O panel and remove the drive from the drive. 6. Replacing the Hard Drive-Small Form-Factor Desktop, Small Desktop, and Small Mini-Tower System NOTICE: To avoid possibly damaging the drive by ESD, ground yourself by touching an unpainted metal surface on each side... Disconnect the power and interface cables from the chassis. Removing the Hard Drive-Small Form-Factor Desktop System Removing the Hard Drive-Small Desktop System Removing the Hard Drive-Small Mini-Tower System 5. If your replacement hard drive does not have the bracket rails attached, remove the four...
... slide it toward the I/O panel and remove the drive from the drive. 6. Replacing the Hard Drive-Small Form-Factor Desktop, Small Desktop, and Small Mini-Tower System NOTICE: To avoid possibly damaging the drive by ESD, ground yourself by touching an unpainted metal surface on each side... Disconnect the power and interface cables from the chassis. Removing the Hard Drive-Small Form-Factor Desktop System Removing the Hard Drive-Small Desktop System Removing the Hard Drive-Small Mini-Tower System 5. If your replacement hard drive does not have the bracket rails attached, remove the four...
User Guide
Page 127
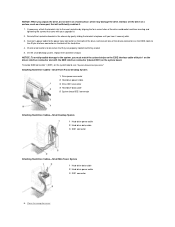
...bracket rails to be certain that they are properly cabled and firmly seated. 5. On the small desktop system, replace the hard-drive shroud. Attaching Hard-Drive Cables-Small Form-Factor Desktop System 1 Drive power connector 2 Hard-drive power cable 3 Drive IDE1 connector 4 Hard-drive ...data cable 5 System board IDE1 connector Attaching Hard-Drive Cables-Small Desktop System 1 Hard-drive power cable 2 Hard-drive data cable 3 IDE1 connector Attaching Hard-Drive Cables-Small Mini-Tower System 1 Hard-drive data cable 2 Hard-drive power cable 3 IDE1 connector 6. NOTICE...
...bracket rails to be certain that they are properly cabled and firmly seated. 5. On the small desktop system, replace the hard-drive shroud. Attaching Hard-Drive Cables-Small Form-Factor Desktop System 1 Drive power connector 2 Hard-drive power cable 3 Drive IDE1 connector 4 Hard-drive ...data cable 5 System board IDE1 connector Attaching Hard-Drive Cables-Small Desktop System 1 Hard-drive power cable 2 Hard-drive data cable 3 IDE1 connector Attaching Hard-Drive Cables-Small Mini-Tower System 1 Hard-drive data cable 2 Hard-drive power cable 3 IDE1 connector 6. NOTICE...
User Guide
Page 129
... diskette drive. 13. Restart the system. 21. Small Form-Factor Desktop System l Removing the Diskette Drive l Replacing the Diskette Drive Small Desktop System l Removing the Diskette Drive l Replacing the Diskette Drive l Attaching Cables Small Mini-Tower System l Removing the Diskette Drive l Replacing the Diskette Drive l...open the computer cover. See "System Settings" for complete information on the computer. 18. Test the second hard drive by running the Dell Diagnostics. Also, before you install a drive, see the other end of the optical drive data cable and a power cable to the...
... diskette drive. 13. Restart the system. 21. Small Form-Factor Desktop System l Removing the Diskette Drive l Replacing the Diskette Drive Small Desktop System l Removing the Diskette Drive l Replacing the Diskette Drive l Attaching Cables Small Mini-Tower System l Removing the Diskette Drive l Replacing the Diskette Drive l...open the computer cover. See "System Settings" for complete information on the computer. 18. Test the second hard drive by running the Dell Diagnostics. Also, before you install a drive, see the other end of the optical drive data cable and a power cable to the...

User Guide
Page 134
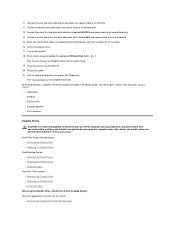
...Drive With the Combination Data Cable 1. Attach the diskette drive data cable to the back of the diskette drive by running the Dell Diagnostics. Connect the interposer board to lock the cable into the connector and then sliding the ZIF lever to the optical drive ...audio cable. Connect the combination data cable to the diskette and interface (IDE2) connectors on the system board. 6. Removing the Diskette Drive-Small Desktop and Small Mini-Tower System 1. Attaching Cables-Small Form-Factor System 1 Power cable 2 Audio cable 3 Interposer board 4 ZIF lever 5 Combination data cable 6 ...
...Drive With the Combination Data Cable 1. Attach the diskette drive data cable to the back of the diskette drive by running the Dell Diagnostics. Connect the interposer board to lock the cable into the connector and then sliding the ZIF lever to the optical drive ...audio cable. Connect the combination data cable to the diskette and interface (IDE2) connectors on the system board. 6. Removing the Diskette Drive-Small Desktop and Small Mini-Tower System 1. Attaching Cables-Small Form-Factor System 1 Power cable 2 Audio cable 3 Interposer board 4 ZIF lever 5 Combination data cable 6 ...

User Guide
Page 135
... into position. 3. Attaching Cables to the power input connector on the drive. 5. Removing the Diskette Drive-Small Desktop System Removing the Diskette Drive-Small Mini-Tower System 5. Removing and Replacing the Drive Bracket Rails 1 Drive 2 Bracket rails (2) 3 Screws (4) Replacing the Diskette ...Drive-Small Desktop and Small Mini-Tower System 1. Connect the power cable to a Diskette Drive-Small Desktop System Slide the drive upward, and remove it from the front panel. If the drive was previously ...
... into position. 3. Attaching Cables to the power input connector on the drive. 5. Removing the Diskette Drive-Small Desktop System Removing the Diskette Drive-Small Mini-Tower System 5. Removing and Replacing the Drive Bracket Rails 1 Drive 2 Bracket rails (2) 3 Screws (4) Replacing the Diskette ...Drive-Small Desktop and Small Mini-Tower System 1. Connect the power cable to a Diskette Drive-Small Desktop System Slide the drive upward, and remove it from the front panel. If the drive was previously ...


