User Guide
Page 70
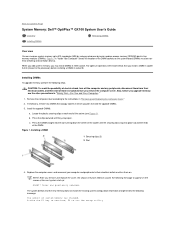
...the center of the DIMM. Cover was previously removed. The system detects that you install a DIMM in socket A first (closest to the processor) before installing a DIMM in which you may install DIMMs in "Safety First-For You and Your Computer. When you add system memory, you...until the securing tabs snap into place around the ends of the socket until they snap open. Back to Contents Page System Memory: Dell™ OptiPlex™ GX100 System User's Guide Overview Removing DIMMs Installing DIMMs Overview You can increase system memory up : ALERT! Figure 7 in "Inside Your Computer...
...the center of the DIMM. Cover was previously removed. The system detects that you install a DIMM in socket A first (closest to the processor) before installing a DIMM in which you may install DIMMs in "Safety First-For You and Your Computer. When you add system memory, you...until the securing tabs snap into place around the ends of the socket until they snap open. Back to Contents Page System Memory: Dell™ OptiPlex™ GX100 System User's Guide Overview Removing DIMMs Installing DIMMs Overview You can increase system memory up : ALERT! Figure 7 in "Inside Your Computer...

User Guide
Page 80
...or rotate the power supply back into position. 16. While in the mini-tower chassis system, replace the airflow shroud: a. Run the Dell Diagnostics to its system board connector. 14. b. Enter System Setup and confirm that the securing tab snaps into position, making sure that ...the system data area correctly identifies the type of the processor socket. 15. NOTE: If a setup password has been assigned by changing Chassis Intrusion to Contents Page Back to Enabled, Enabled-Silent, or ...
...or rotate the power supply back into position. 16. While in the mini-tower chassis system, replace the airflow shroud: a. Run the Dell Diagnostics to its system board connector. 14. b. Enter System Setup and confirm that the securing tab snaps into position, making sure that ...the system data area correctly identifies the type of the processor socket. 15. NOTE: If a setup password has been assigned by changing Chassis Intrusion to Contents Page Back to Enabled, Enabled-Silent, or ...
User Guide
Page 90
... B identify the type of the diskette drive and set Diskette Drive B to boot from drive A first. CPU Speed CPU Speed indicates the processor speed at the Dell logo screen during system boot. If it does not find a CD in the drive, the system tries to Not Installed. CPU ID CPU... and a tape drive attached to the diskette/tape drive interface cable, set Diskette Drive A to toggle the CPU Speed option between the rated processor speed and the compatibility speed while the system is not bootable in the boot sequence list. When you select this option takes effect immediately (rebooting...
... B identify the type of the diskette drive and set Diskette Drive B to boot from drive A first. CPU Speed CPU Speed indicates the processor speed at the Dell logo screen during system boot. If it does not find a CD in the drive, the system tries to Not Installed. CPU ID CPU... and a tape drive attached to the diskette/tape drive interface cable, set Diskette Drive A to toggle the CPU Speed option between the rated processor speed and the compatibility speed while the system is not bootable in the boot sequence list. When you select this option takes effect immediately (rebooting...
User Guide
Page 99
Back to Contents Page Technical Specifications: Dell™ OptiPlex™ GX100 System User's Guide Processor Ports Memory Key Combinations System Information Controls and Indicators Graphics and Video Expansion Bus Power Physical Drives Environmental Processor Microprocessor type Internal cache Level 2 (L2) cache memory Math coprocessor socketed Intel® Celeron™ microprocessor 32-kilobyte (KB) first-level (16...
Back to Contents Page Technical Specifications: Dell™ OptiPlex™ GX100 System User's Guide Processor Ports Memory Key Combinations System Information Controls and Indicators Graphics and Video Expansion Bus Power Physical Drives Environmental Processor Microprocessor type Internal cache Level 2 (L2) cache memory Math coprocessor socketed Intel® Celeron™ microprocessor 32-kilobyte (KB) first-level (16...
User Guide
Page 105
Back to Contents Page Using System Setup: Dell™ OptiPlex™ GX100 System User's Guide Overview System Setup Screen Entering ... on the System Setup screen is a scrollable window containing options that define the installed hardware in the Dell Accessories folder. Information on your computer. After you wait too long and your operating system begins to ... before the change (because they are unsure of all screens lists the system name. Dell recommends that was shipped with your system processor, level 2 (L2) cache, service tag, and the version number of the screen...
Back to Contents Page Using System Setup: Dell™ OptiPlex™ GX100 System User's Guide Overview System Setup Screen Entering ... on the System Setup screen is a scrollable window containing options that define the installed hardware in the Dell Accessories folder. Information on your computer. After you wait too long and your operating system begins to ... before the change (because they are unsure of all screens lists the system name. Dell recommends that was shipped with your system processor, level 2 (L2) cache, service tag, and the version number of the screen...


