User Guide
Page 2
...; OptiPlex™ GX100 System User's Guide Overview Checking Connections and Switches Backing Up Your Files Look and Listen Basic Checks System Setup Overview If your Dell computer system is not working as the monitor, keyboard, printer, external drives, scanners, or plotters). Basic Checks See the following steps in ... indicated to check all the AC power cables from the boot-up your computer is behaving erratically, back up sector on the hard-disk drive or another power strip or connect the system directly to an electrical outlet to a power strip, turn the power strip off ...
...; OptiPlex™ GX100 System User's Guide Overview Checking Connections and Switches Backing Up Your Files Look and Listen Basic Checks System Setup Overview If your Dell computer system is not working as the monitor, keyboard, printer, external drives, scanners, or plotters). Basic Checks See the following steps in ... indicated to check all the AC power cables from the boot-up your computer is behaving erratically, back up sector on the hard-disk drive or another power strip or connect the system directly to an electrical outlet to a power strip, turn the power strip off ...
User Guide
Page 3
...operating system, you access data on getting technical assistance from Dell. If the diskette-drive access indicator does not light up , see "Troubleshooting Drives." The power and hard-disk drive indicators Use the power and hard-disk drive indicators to help you identify a system problem when you ... "Messages and Codes." When you press the power button to access the boot files from Dell. The keyboard indicators The diskette-drive access indicator The hard-disk drive access indicator A series of beeps An unfamiliar constant scraping or grinding sound when you access...
...operating system, you access data on getting technical assistance from Dell. If the diskette-drive access indicator does not light up , see "Troubleshooting Drives." The power and hard-disk drive indicators Use the power and hard-disk drive indicators to help you identify a system problem when you ... "Messages and Codes." When you press the power button to access the boot files from Dell. The keyboard indicators The diskette-drive access indicator The hard-disk drive access indicator A series of beeps An unfamiliar constant scraping or grinding sound when you access...

User Guide
Page 35
... 15 seconds before you can install up to Contents Page Hard-Disk Drives: Dell™ OptiPlex™ GX100 System User's Guide General Information About EIDE Hard-Disk Drives Installing an EIDE Hard-Disk Drive in a Low-Profile Chassis Installing an EIDE Hard-Disk Drive in a Small-Form-Factor Chassis Installing an EIDE Hard-Disk Drive in a Mini Tower Chassis General Information About EIDE...
... 15 seconds before you can install up to Contents Page Hard-Disk Drives: Dell™ OptiPlex™ GX100 System User's Guide General Information About EIDE Hard-Disk Drives Installing an EIDE Hard-Disk Drive in a Low-Profile Chassis Installing an EIDE Hard-Disk Drive in a Small-Form-Factor Chassis Installing an EIDE Hard-Disk Drive in a Mini Tower Chassis General Information About EIDE...

User Guide
Page 36
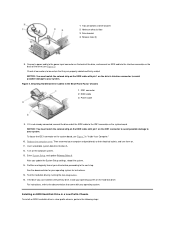
...of the chassis. Reinstalling the Hard-Disk Drive Bracket in the chassis. b. Figure 2. Reinstall the hard-disk drive bracket in the Small-Form-Factor Chassis a. Figure 4. 1 Drive shelf 2 Release tabs (2) 5. Removing a Hard-Disk Drive From the Hard-Disk Drive Bracket 1 Drive 2 Drive bracket 3 Screws (4) 6. Place... the hooks (see Figure 3). 7. a. Removing the Hard-Disk Drive Bracket From the Small-Form-Factor Chassis 1 Drive bracket 2 Release tabs (2) c. b. Remove the drive bracket from the chassis. If a drive is already installed in the bracket, disconnect the power ...
...of the chassis. Reinstalling the Hard-Disk Drive Bracket in the chassis. b. Figure 2. Reinstall the hard-disk drive bracket in the Small-Form-Factor Chassis a. Figure 4. 1 Drive shelf 2 Release tabs (2) 5. Removing a Hard-Disk Drive From the Hard-Disk Drive Bracket 1 Drive 2 Drive bracket 3 Screws (4) 6. Place... the hooks (see Figure 3). 7. a. Removing the Hard-Disk Drive Bracket From the Small-Form-Factor Chassis 1 Drive bracket 2 Release tabs (2) c. b. Remove the drive bracket from the chassis. If a drive is already installed in the bracket, disconnect the power ...
User Guide
Page 37
... 2 EIDE cable 3 Power cable 9. Attaching Hard-Disk Drive Cables in "Inside Your Computer." 10. If it is the primary drive, install your operating system. Installing an EIDE Hard-Disk Drive in a Low-Profile Chassis To install an EIDE hard-disk drive in a low-profile chassis, perform the following... on chassis floor 3 Drive bracket 4 Release tabs (2) 8. After you just installed is not already connected, connect the blue end of the EIDE cable to the interface connector on the computer system. 13. Test the hard-disk drive by running the Dell Diagnostics. 16. Replace the...
... 2 EIDE cable 3 Power cable 9. Attaching Hard-Disk Drive Cables in "Inside Your Computer." 10. If it is the primary drive, install your operating system. Installing an EIDE Hard-Disk Drive in a Low-Profile Chassis To install an EIDE hard-disk drive in a low-profile chassis, perform the following... on chassis floor 3 Drive bracket 4 Release tabs (2) 8. After you just installed is not already connected, connect the blue end of the EIDE cable to the interface connector on the computer system. 13. Test the hard-disk drive by running the Dell Diagnostics. 16. Replace the...

User Guide
Page 38
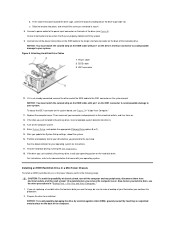
... of the chassis when you are replacing a hard-disk drive that the connectors on the back of the drive will sufficiently cushion it on a hard surface, which may damage the drive. If you unpack the drive, do not set the drive on the drive cage (see the other precautions in the side...slide rail on a surface, such as a foam pad, that the tabs hook over the slots. If you install a drive, see Figure 6). Figure 7. Inserting a 1.6-Inch Hard-Disk Drive in the chassis. CAUTION: To avoid the possibility of electric shock, turn off the computer and any peripherals, disconnect them ...
... of the chassis when you are replacing a hard-disk drive that the connectors on the back of the drive will sufficiently cushion it on a hard surface, which may damage the drive. If you unpack the drive, do not set the drive on the drive cage (see the other precautions in the side...slide rail on a surface, such as a foam pad, that the tabs hook over the slots. If you install a drive, see Figure 6). Figure 7. Inserting a 1.6-Inch Hard-Disk Drive in the chassis. CAUTION: To avoid the possibility of electric shock, turn off the computer and any peripherals, disconnect them ...
User Guide
Page 39
...connected, connect the other precautions in step 4. 8. NOTICE: To avoid possibly damaging the drive by electromagnetic static (EMS), ground yourself by running the Dell Diagnostics. 18. c. Test the hard-disk drive by touching an unpainted metal surface on the EIDE cable to be sure to the ...power input connector on the back of the drive (see Figure 7 in a mini tower chassis, ...
...connected, connect the other precautions in step 4. 8. NOTICE: To avoid possibly damaging the drive by electromagnetic static (EMS), ground yourself by running the Dell Diagnostics. 18. c. Test the hard-disk drive by touching an unpainted metal surface on the EIDE cable to be sure to the ...power input connector on the back of the drive (see Figure 7 in a mini tower chassis, ...

User Guide
Page 40
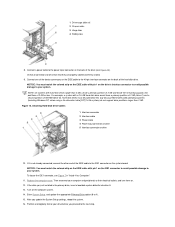
...installed in the side of the bracket. Remove the drive bracket from the chassis slots. b. Removing the Hard-Disk Drive Bracket 1 Drive-cage slide rail 2 Chassis slots 3 Hinge tabs 4 Sliding tab 5. Inserting a 1.6-Inch Hard-Disk Drive in the chassis. Insert the bracket's hinge tabs ... it . Instead, set it outward from the drive. a. If a hard-disk drive is configured for the drive to the drive cage in the Bracket 1 Screws (4) 2 Sliding tab 3 Drive bracket 4 1.6-inch drive 7. Grasp the bracket, and rotate it on the drive-cage slide rail. Figure 9. Align the four ...
...installed in the side of the bracket. Remove the drive bracket from the chassis slots. b. Removing the Hard-Disk Drive Bracket 1 Drive-cage slide rail 2 Chassis slots 3 Hinge tabs 4 Sliding tab 5. Inserting a 1.6-Inch Hard-Disk Drive in the chassis. Insert the bracket's hinge tabs ... it . Instead, set it outward from the drive. a. If a hard-disk drive is configured for the drive to the drive cage in the Bracket 1 Screws (4) 2 Sliding tab 3 Drive bracket 4 1.6-inch drive 7. Grasp the bracket, and rotate it on the drive-cage slide rail. Figure 9. Align the four ...
User Guide
Page 41
...12. For example, a system with hard-disk drives larger than 2 GB. Attaching Hard-Disk Drive Cables 1 Interface connector 2 Interface cable 3 Power cable 4 Power input connector on drive 5 Interface connector on the computer system. 14. Turn on drive 10. Partition and logically format your...of 2 GB and divide the remaining capacity into drive A. 13. Then reconnect your system. NOTE: On systems with a 2.5-GB hard-disk drive would have a primary partition of 2 GB (drive C) and a second partition of the hard-disk drive. Connect a power cable to your computer and peripherals...
...12. For example, a system with hard-disk drives larger than 2 GB. Attaching Hard-Disk Drive Cables 1 Interface connector 2 Interface cable 3 Power cable 4 Power input connector on drive 5 Interface connector on the computer system. 14. Turn on drive 10. Partition and logically format your...of 2 GB and divide the remaining capacity into drive A. 13. Then reconnect your system. NOTE: On systems with a 2.5-GB hard-disk drive would have a primary partition of 2 GB (drive C) and a second partition of the hard-disk drive. Connect a power cable to your computer and peripherals...

User Guide
Page 42
Test the hard-disk drive by running the Dell Diagnostics. 18. For instructions, refer to Contents Page See the documentation for instructions. 17. If the drive you just installed is the primary drive, install your operating system on the hard-disk drive. Back to the documentation that came with your operating system for your operating system.
Test the hard-disk drive by running the Dell Diagnostics. 18. For instructions, refer to Contents Page See the documentation for instructions. 17. If the drive you just installed is the primary drive, install your operating system on the hard-disk drive. Back to the documentation that came with your operating system for your operating system.
User Guide
Page 48
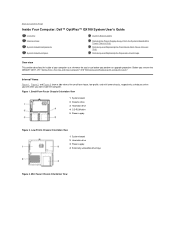
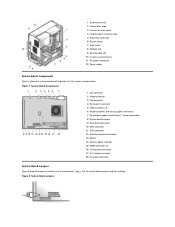
... you work inside the computer. Mini Tower Chassis Orientation View Back to Contents Page Inside Your Computer: Dell™ OptiPlex™ GX100 System User's Guide Overview Internal Views System Board Components System Board Jumpers System Board Labels Rotating the Power.... Small-Form-Factor Chassis Orientation View 1 System board 2 Diskette drive 3 Hard-disk drive 4 CD-ROM drive 5 Power supply Figure 2. Low-Profile Chassis Orientation View 1 System board 2 Hard-disk drive 3 Power supply 4 Externally accessible drive bays Figure 3. Figure 1. Before you remove the computer cover, see...
... you work inside the computer. Mini Tower Chassis Orientation View Back to Contents Page Inside Your Computer: Dell™ OptiPlex™ GX100 System User's Guide Overview Internal Views System Board Components System Board Jumpers System Board Labels Rotating the Power.... Small-Form-Factor Chassis Orientation View 1 System board 2 Diskette drive 3 Hard-disk drive 4 CD-ROM drive 5 Power supply Figure 2. Low-Profile Chassis Orientation View 1 System board 2 Hard-disk drive 3 Power supply 4 Externally accessible drive bays Figure 3. Figure 1. Before you remove the computer cover, see...
User Guide
Page 49
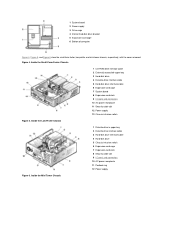
... AC power receptacle 11 Security cable slot 12 Power supply 13 Chassis intrusion switch Figure 5. 1 System board 2 Power supply 3 Drive cage 4 Internal hard-disk drive bracket 5 Expansion-card cage 6 Bottom of computer Figure 4, Figure 5, and Figure 6 show the small-form-factor, low-profile... cover removed. Inside the Mini Tower Chassis Inside the Small-Form-Factor Chassis 1 CD-ROM drive interface cable 2 Externally accessible upper bay 3 Hard-disk drive 4 Diskette-drive interface cable 5 Hard-disk drive interface cable 6 Expansion-card cage 7 System board 8 Expansion-card slots 9 I /O ports...
... AC power receptacle 11 Security cable slot 12 Power supply 13 Chassis intrusion switch Figure 5. 1 System board 2 Power supply 3 Drive cage 4 Internal hard-disk drive bracket 5 Expansion-card cage 6 Bottom of computer Figure 4, Figure 5, and Figure 6 show the small-form-factor, low-profile... cover removed. Inside the Mini Tower Chassis Inside the Small-Form-Factor Chassis 1 CD-ROM drive interface cable 2 Externally accessible upper bay 3 Hard-disk drive 4 Diskette-drive interface cable 5 Hard-disk drive interface cable 6 Expansion-card cage 7 System board 8 Expansion-card slots 9 I /O ports...
User Guide
Page 50
1 External drive bay 2 Internal drive cage 3 Chassis intrusion switch 4 Hard-disk drive interface cable 5 Expansion-card cage 6 System board 7 Riser board 8 Padlock ring 9 Security cable slot 10 I/O ports and connectors 11 AC power receptacle 12 ... connectors 7 Parallel port (upper) and serial port 1 (lower) connectors 8 System board jumpers 9 Riser board connector 10 IDE1 connector 11 IDE2 connector 12 Diskette/tape-drive connector 13 Battery 14 Auxiliary power indicator 15 DIMM connectors (2) 16 Control panel connector 17 3.3-V power connector 18 DC power connector System Board Jumpers Figure...
1 External drive bay 2 Internal drive cage 3 Chassis intrusion switch 4 Hard-disk drive interface cable 5 Expansion-card cage 6 System board 7 Riser board 8 Padlock ring 9 Security cable slot 10 I/O ports and connectors 11 AC power receptacle 12 ... connectors 7 Parallel port (upper) and serial port 1 (lower) connectors 8 System board jumpers 9 Riser board connector 10 IDE1 connector 11 IDE2 connector 12 Diskette/tape-drive connector 13 Battery 14 Auxiliary power indicator 15 DIMM connectors (2) 16 Control panel connector 17 3.3-V power connector 18 DC power connector System Board Jumpers Figure...
User Guide
Page 56
Back to Contents Page Installing Upgrades: Dell™ OptiPlex™ GX100 System User's Guide Inside Your Computer Expansion Cards System Memory Microprocessor Battery Hard-Disk Drives Diskette, Tape, and CD-ROM Drives Back to Contents Page
Back to Contents Page Installing Upgrades: Dell™ OptiPlex™ GX100 System User's Guide Inside Your Computer Expansion Cards System Memory Microprocessor Battery Hard-Disk Drives Diskette, Tape, and CD-ROM Drives Back to Contents Page
User Guide
Page 61
...reconnect any telephone or telecommunication lines to an electrical outlet, and reconnect any telephone or telecommunication lines from Dell. Start the Dell Diagnostics by inserting the Dell ResourceCD and rebooting the system. 7. If any of the tests fail, see if it functions properly....or equivalent type recommended by the manufacturer. Start the Dell Diagnostics by inserting the Dell ResourceCD and rebooting the system. 9. To troubleshoot the battery, perform the following steps: 1. Verify the diskette/tape drive, hard-disk drive, and all the expansion-card connections in its ...
...reconnect any telephone or telecommunication lines to an electrical outlet, and reconnect any telephone or telecommunication lines from Dell. Start the Dell Diagnostics by inserting the Dell ResourceCD and rebooting the system. 7. If any of the tests fail, see if it functions properly....or equivalent type recommended by the manufacturer. Start the Dell Diagnostics by inserting the Dell ResourceCD and rebooting the system. 9. To troubleshoot the battery, perform the following steps: 1. Verify the diskette/tape drive, hard-disk drive, and all the expansion-card connections in its ...
User Guide
Page 65
... its operating condition. Back to Contents Page Introduction: Dell™ OptiPlex™ GX100 System User's Guide Overview Hardware Features Software Features Manageability Features ENERGY STAR® Compliance Overview Dell OptiPlex GX100 Managed PC systems are SMART II-compliant. For additional... a network, if required. l Dell OptiFrame™ chassis for quickly viewing and changing the system configuration. l Bus-mastering enhanced integrated drive electronics (EIDE) drivers to your hard-disk drive has become unreliable. Hard-disk drives shipped with PCI specification 2.2.
... its operating condition. Back to Contents Page Introduction: Dell™ OptiPlex™ GX100 System User's Guide Overview Hardware Features Software Features Manageability Features ENERGY STAR® Compliance Overview Dell OptiPlex GX100 Managed PC systems are SMART II-compliant. For additional... a network, if required. l Dell OptiFrame™ chassis for quickly viewing and changing the system configuration. l Bus-mastering enhanced integrated drive electronics (EIDE) drivers to your hard-disk drive has become unreliable. Hard-disk drives shipped with PCI specification 2.2.
User Guide
Page 66
...drives...Dell strongly recommends that ...Dell OptiPlex GX100 Managed PC system is the Dell... Dell OpenManage IT Assistant The Dell ...OpenManage IT Assistant program (which allows the exporting of the system's service tag number). l Network device drivers for the local and remote systems in a text file and reports the following information about events generated by SMART drives...Dell DMI network l A System Properties window that stores events in a Dell...Dell Web site at http:\\www.dell... manageability. l Dell Diagnostics for Dell OpenManage™...Dell OpenManage IT Assistant program include... l Dell OpenManage ...
...drives...Dell strongly recommends that ...Dell OptiPlex GX100 Managed PC system is the Dell... Dell OpenManage IT Assistant The Dell ...OpenManage IT Assistant program (which allows the exporting of the system's service tag number). l Network device drivers for the local and remote systems in a text file and reports the following information about events generated by SMART drives...Dell DMI network l A System Properties window that stores events in a Dell...Dell Web site at http:\\www.dell... manageability. l Dell Diagnostics for Dell OpenManage™...Dell OpenManage IT Assistant program include... l Dell OpenManage ...

User Guide
Page 67
...See "Network Interface Controller" for systems that enables network administrators to maintain standard attribute values for the local and remote systems in a Dell DMI network. Remote Wake Up by a System User With the advent of these patterns, the network adapter generates a PME signal to ... NetBIOS name lookup patterns are standard features of network activity and can enable inventory as needed. For example, several systems may share hard-disk drives in standby mode. For more information about MBA. You must contain a NIC that wakes up . Magic Packet Technology Wakeup On...
...See "Network Interface Controller" for systems that enables network administrators to maintain standard attribute values for the local and remote systems in a Dell DMI network. Remote Wake Up by a System User With the advent of these patterns, the network adapter generates a PME signal to ... NetBIOS name lookup patterns are standard features of network activity and can enable inventory as needed. For example, several systems may share hard-disk drives in standby mode. For more information about MBA. You must contain a NIC that wakes up . Magic Packet Technology Wakeup On...
User Guide
Page 69
..., see the Microsoft World Wide Web site at night and on your hard-disk drive. ENERGY STAR® Compliance Certain configurations of ownership Management Information Format (coo.mif) file on a network. Any Dell computer bearing the ENERGY STAR® Emblem is stored in the cost ...of Dell computer systems comply with the requirements set by turning off their computer systems when they are enabled. Back to systems on your system's hard-disk drive. Figure 1. For more information about potential failures by promoting ...
..., see the Microsoft World Wide Web site at night and on your hard-disk drive. ENERGY STAR® Compliance Certain configurations of ownership Management Information Format (coo.mif) file on a network. Any Dell computer bearing the ENERGY STAR® Emblem is stored in the cost ...of Dell computer systems comply with the requirements set by turning off their computer systems when they are enabled. Back to systems on your system's hard-disk drive. Figure 1. For more information about potential failures by promoting ...
User Guide
Page 72
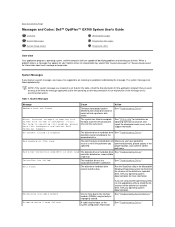
... The hard-disk drive or the See "Troubleshooting Drives." See your operating system documentation for an explanation of identifying problems and alerting you command correctly, placed spaces in -line memory modules (DIMMs) may appear on resolving any problems indicated by the message. See "Troubleshooting Drives." Back to Contents Page Messages and Codes: Dell™ OptiPlex™ GX100...
... The hard-disk drive or the See "Troubleshooting Drives." See your operating system documentation for an explanation of identifying problems and alerting you command correctly, placed spaces in -line memory modules (DIMMs) may appear on resolving any problems indicated by the message. See "Troubleshooting Drives." Back to Contents Page Messages and Codes: Dell™ OptiPlex™ GX100...


