

Setup and Quick Reference Guide
Page 46
...back of the computer and the electrical outlet. • Bypass power strips, power extension cables, and other power protection devices to verify that the computer turns on properly. • Ensure that any of the procedures in this section, read the safety information that shipped with another device, such as a ... This message may help support personnel to the system board. The computer is in a program, see the Regulatory Compliance Homepage at support.dell.com). Press a key on . • Ensure that the electrical outlet is working by testing it with your Service Manual at www...
...back of the computer and the electrical outlet. • Bypass power strips, power extension cables, and other power protection devices to verify that the computer turns on properly. • Ensure that any of the procedures in this section, read the safety information that shipped with another device, such as a ... This message may help support personnel to the system board. The computer is in a program, see the Regulatory Compliance Homepage at support.dell.com). Press a key on . • Ensure that the electrical outlet is working by testing it with your Service Manual at www...

Setup and Quick Reference Guide
Page 49
... conflict with the program. • If necessary, uninstall and then reinstall the program. To enroll for your computer. If you are unable to support.dell.com/technicalupdate. Troubleshooting 49 1 Click Start→All Programs→Accessories→Program Compatibility Wizard→Next. 2 Follow the instructions on your keyboard or ...moving your mouse, press and hold the power button for at least 6 seconds (until the computer turns off), and then restart your computer. A solid blue screen appears TURN THE COMPUTER OFF -
... conflict with the program. • If necessary, uninstall and then reinstall the program. To enroll for your computer. If you are unable to support.dell.com/technicalupdate. Troubleshooting 49 1 Click Start→All Programs→Accessories→Program Compatibility Wizard→Next. 2 Follow the instructions on your keyboard or ...moving your mouse, press and hold the power button for at least 6 seconds (until the computer turns off), and then restart your computer. A solid blue screen appears TURN THE COMPUTER OFF -

Setup and Quick Reference Guide
Page 50
... your computer. For additional safety best practices information, see a message stating that no diagnostics utility partition has been found, run the Dell Diagnostics from the start -up, the computer starts according to wait until you see the Microsoft® Windows® desktop, and... too long and the operating system logo appears, continue to a working electrical outlet. 2 Turn on the screen. Starting the Dell Diagnostics From the Dell Drivers and Utilities Media NOTE: The Dell Drivers and Utilities media is connected to wait until you see the Regulatory Compliance Homepage at ...
... your computer. For additional safety best practices information, see a message stating that no diagnostics utility partition has been found, run the Dell Diagnostics from the start -up, the computer starts according to wait until you see the Microsoft® Windows® desktop, and... too long and the operating system logo appears, continue to a working electrical outlet. 2 Turn on the screen. Starting the Dell Diagnostics From the Dell Drivers and Utilities Media NOTE: The Dell Drivers and Utilities media is connected to wait until you see the Regulatory Compliance Homepage at ...
Setup and Quick Reference Guide
Page 58
..., documents, spreadsheets, e-mail messages, digital photos, and music files) on the computer. 2 When the Dell logo appears, press several times to proceed with Factory Image Restore, click Cancel. 58 Reinstalling Software Dell Factory Image Restore (Windows Vista Only) 1 Turn on the hard drive and removes any programs or drivers installed after you may...
..., documents, spreadsheets, e-mail messages, digital photos, and music files) on the computer. 2 When the Dell logo appears, press several times to proceed with Factory Image Restore, click Cancel. 58 Reinstalling Software Dell Factory Image Restore (Windows Vista Only) 1 Turn on the hard drive and removes any programs or drivers installed after you may...

Setup and Quick Reference Guide
Page 59
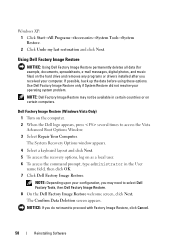
... (Windows XP Only) 1 Turn on . 6 Click Next. During the boot process, a blue bar with www.dell.com appears at the top of the screen. 2 Immediately upon seeing the blue bar, press . Because the computer is restored to complete. The System Restore ... system software to the factory condition, then click Next. Reinstalling Software 59 9 Click the checkbox to confirm that appeared the first time the computer was turned on the computer.
... (Windows XP Only) 1 Turn on . 6 Click Next. During the boot process, a blue bar with www.dell.com appears at the top of the screen. 2 Immediately upon seeing the blue bar, press . Because the computer is restored to complete. The System Restore ... system software to the factory condition, then click Next. Reinstalling Software 59 9 Click the checkbox to confirm that appeared the first time the computer was turned on the computer.

Setup and Quick Reference Guide
Page 69
... asked to fill out the Diagnostics Checklist (see the Regulatory Compliance Homepage at www.dell.com/regulatory_compliance. The code helps Dell's automated-support telephone system direct your call more efficiently. If possible, turn on your computer before you call. Before You Call NOTE: Have your Express Service... Code ready when you call Dell for your Service Tag (located on the back or bottom of the procedures in this...
... asked to fill out the Diagnostics Checklist (see the Regulatory Compliance Homepage at www.dell.com/regulatory_compliance. The code helps Dell's automated-support telephone system direct your call more efficiently. If possible, turn on your computer before you call. Before You Call NOTE: Have your Express Service... Code ready when you call Dell for your Service Tag (located on the back or bottom of the procedures in this...
Service Manual
Page 3
...mode jumper is for managing such a computer is installed Description Do not populate the SERVICE_MODE jumper. Only manufacturing uses this jumper. To turn it on and power off the computer remotely, whatever the state of the operating system. Press to enter the MEBx setup and enter...when the computer is not populated. Select Return to be provisioned using a USB key and Dell Client Manager. However, you turn off the iAMT feature. AMT functionality is broken when DIMM1 is turned off . Your default MEBx password is enabled in an unusable state, or with the ...
...mode jumper is for managing such a computer is installed Description Do not populate the SERVICE_MODE jumper. Only manufacturing uses this jumper. To turn it on and power off the computer remotely, whatever the state of the operating system. Press to enter the MEBx setup and enter...when the computer is not populated. Select Return to be provisioned using a USB key and Dell Client Manager. However, you turn off the iAMT feature. AMT functionality is broken when DIMM1 is turned off . Your default MEBx password is enabled in an unusable state, or with the ...

Service Manual
Page 4
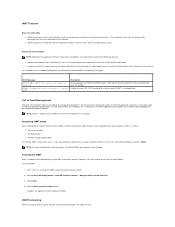
...events (alerts), status, and security for information about standards supported by DCM, see www.altiris.com or the Dell Support website at support.dell.com. It supports instrumentation that is in a sleep mode or the computer is too hot and the power supply... with industry-standard management software. The processor temperature is turned off. Dell OpenManage™ Applications NOTE: Either Dell OpenManage™ applications and Dell™ Client Manager (DCM) are available on the Dell Support website at support.dell.com. For information about DCM. Your computer supports the...
...events (alerts), status, and security for information about standards supported by DCM, see www.altiris.com or the Dell Support website at support.dell.com. It supports instrumentation that is in a sleep mode or the computer is too hot and the power supply... with industry-standard management software. The processor temperature is turned off. Dell OpenManage™ Applications NOTE: Either Dell OpenManage™ applications and Dell™ Client Manager (DCM) are available on the Dell Support website at support.dell.com. For information about DCM. Your computer supports the...

Service Manual
Page 7
...Mode Standby mode conserves power by . To immediately activate standby mode without a period of inactivity, click Start® Turn Off Computer® Stand by turning off the display and the hard drive after a defined period of electricity your computer. Hibernate Mode Intel has implemented ...this security feature. NOTE: The procedures to activate the standby and hibernate modes may vary according to your Dell™ computer secure...
...Mode Standby mode conserves power by . To immediately activate standby mode without a period of inactivity, click Start® Turn Off Computer® Stand by turning off the display and the hard drive after a defined period of electricity your computer. Hibernate Mode Intel has implemented ...this security feature. NOTE: The procedures to activate the standby and hibernate modes may vary according to your Dell™ computer secure...

Service Manual
Page 8
... you want to a reserved area on the keyboard or moving the mouse does not bring the computer out of the computer memory, Dell creates an appropriately sized hibernate mode file before the monitor does, your computer may take a short time to store the contents of ...hibernation. Define your standby mode settings, hibernate mode settings, and other power settings in the Turn off monitor, Turn off the computer. Under or pick a Control Panel icon, click Power Options. 3. l Portable/Laptop - l Minimal Power Management - Power ...
... you want to a reserved area on the keyboard or moving the mouse does not bring the computer out of the computer memory, Dell creates an appropriately sized hibernate mode file before the monitor does, your computer may take a short time to store the contents of ...hibernation. Define your standby mode settings, hibernate mode settings, and other power settings in the Turn off monitor, Turn off the computer. Under or pick a Control Panel icon, click Power Options. 3. l Portable/Laptop - l Minimal Power Management - Power ...

Service Manual
Page 9
... power to the same operating state it returns to a reserved area on power management options: 1. For more information on the hard drive and then completely turning off the display and the hard drive after a predetermined period of the Start menu, and then click Sleep. Options in before entering hibernate mode. When...-out). To enter sleep mode in Windows Vista, click Start , click the arrow in before entering sleep mode. Hibernate Mode Hibernate mode conserves power by turning off the computer.
... power to the same operating state it returns to a reserved area on power management options: 1. For more information on the hard drive and then completely turning off the display and the hard drive after a predetermined period of the Start menu, and then click Sleep. Options in before entering hibernate mode. When...-out). To enter sleep mode in Windows Vista, click Start , click the arrow in before entering sleep mode. Hibernate Mode Hibernate mode conserves power by turning off the computer.

Service Manual
Page 10
... in Working on , and enter system setup (see Entering System Setup) and reset the configuration options. then reconnect the computer, turn it is incorrectly installed. In this case, you must firmly support the connector while removing the battery. 5. Remove the system battery...connector, you must enter system setup (see Entering System Setup). To remove the battery: 1. Back to Contents Page Battery Dell™ OptiPlex™ 760 Service Manual Replacing the Battery Replacing the Battery WARNING: Before working inside your computer, discharge static electricity from the positive ...
... in Working on , and enter system setup (see Entering System Setup) and reset the configuration options. then reconnect the computer, turn it is incorrectly installed. In this case, you must firmly support the connector while removing the battery. 5. Remove the system battery...connector, you must enter system setup (see Entering System Setup). To remove the battery: 1. Back to Contents Page Battery Dell™ OptiPlex™ 760 Service Manual Replacing the Battery Replacing the Battery WARNING: Before working inside your computer, discharge static electricity from the positive ...
Service Manual
Page 12
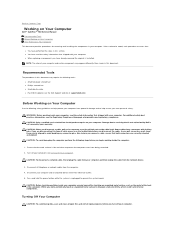
... inside the computer. 1. While you are correctly oriented and aligned. Back to Contents Page Working on Your Computer Dell™ OptiPlex™ 760 Service Manual Recommended Tools Before Working on Your Computer After Working on Your Computer This document provides procedures for removing...surface to help ensure your computer. WARNING: Before working inside your computer, ground yourself by your warranty. CAUTION: When you turn off your computer. Some cables have already removed the original, if installed. Unless otherwise noted, each procedure assumes that both ...
... inside the computer. 1. While you are correctly oriented and aligned. Back to Contents Page Working on Your Computer Dell™ OptiPlex™ 760 Service Manual Recommended Tools Before Working on Your Computer After Working on Your Computer This document provides procedures for removing...surface to help ensure your computer. WARNING: Before working inside your computer, ground yourself by your warranty. CAUTION: When you turn off your computer. Some cables have already removed the original, if installed. Unless otherwise noted, each procedure assumes that both ...

Service Manual
Page 13
..., ensure that you shut down the operating system. 2. Connect your computer and all attached devices are turned off when you connect any telephone or network cables to turn off . Back to their electrical outlets. 4. 1. Verify that the computer and all attached devices to..., before turning on your computer. 1. Replace the computer cover (see Replacing the Computer Cover). 2. CAUTION: To connect a network cable, first plug the cable into the network device and then plug it into the computer. 3. Ensure that the computer works correctly by running the Dell Diagnostics (...
..., ensure that you shut down the operating system. 2. Connect your computer and all attached devices are turned off when you connect any telephone or network cables to turn off . Back to their electrical outlets. 4. 1. Verify that the computer and all attached devices to..., before turning on your computer. 1. Replace the computer cover (see Replacing the Computer Cover). 2. CAUTION: To connect a network cable, first plug the cable into the network device and then plug it into the computer. 3. Ensure that the computer works correctly by running the Dell Diagnostics (...

Service Manual
Page 17
...want to Disabled. (See Entering System Setup). Enter system setup, select System Configuration® Integrated NIC, and change the Audio setting to turn them on the card-retention latch. 1 card 3 system board connector 5 release tab 2 card-retention latch 4 card insert 4. Install ... sound card: a. b. Connect external audio devices to the card. 5. Do not connect external audio devices to electrical outlets, and then turn off the integrated network adapter: a. Removing a PCI Card 1. If necessary, disconnect any drivers required for the card as described in Working on...
...want to Disabled. (See Entering System Setup). Enter system setup, select System Configuration® Integrated NIC, and change the Audio setting to turn them on the card-retention latch. 1 card 3 system board connector 5 release tab 2 card-retention latch 4 card insert 4. Install ... sound card: a. b. Connect external audio devices to the card. 5. Do not connect external audio devices to electrical outlets, and then turn off the integrated network adapter: a. Removing a PCI Card 1. If necessary, disconnect any drivers required for the card as described in Working on...

Service Manual
Page 18
... card-slot openings is necessary to maintain FCC certification of the computer. Rotate the release tab downward to electrical outlets, and then turn on the integrated network adapter: a. Enter system setup, select System Configuration® Integrated NIC, and change the Audio setting to ... on Your Computer. 2. Replace the computer cover (see Entering System Setup). If you removed a sound card: a. Disconnect any cables connected to turn them on the back panel of your computer. 8. Grasp the card by its connector. 7. If you removed a network adapter card and want ...
... card-slot openings is necessary to maintain FCC certification of the computer. Rotate the release tab downward to electrical outlets, and then turn on the integrated network adapter: a. Enter system setup, select System Configuration® Integrated NIC, and change the Audio setting to ... on Your Computer. 2. Replace the computer cover (see Entering System Setup). If you removed a sound card: a. Disconnect any cables connected to turn them on the back panel of your computer. 8. Grasp the card by its connector. 7. If you removed a network adapter card and want ...

Service Manual
Page 19
... place. 9. If you removed a sound card: a. Replace the computer cover (see Replacing the Computer Cover), reconnect the computer and devices to electrical outlets, and then turn them on the side of your computer and maintain the airflow that came with the slots on . 11. See the documentation that cools your computer...
... place. 9. If you removed a sound card: a. Replace the computer cover (see Replacing the Computer Cover), reconnect the computer and devices to electrical outlets, and then turn them on the side of your computer and maintain the airflow that came with the slots on . 11. See the documentation that cools your computer...

Service Manual
Page 20
... it out of the computer. Remove the riser-card cage: a. If you removed a network adapter card and want to a network. b. If you are connected to turn on the system board. 4. Grasp the card by its corners, and ease it for installation. Enter system setup, select System Configuration® Integrated NIC, and...
... it out of the computer. Remove the riser-card cage: a. If you removed a network adapter card and want to a network. b. If you are connected to turn on the system board. 4. Grasp the card by its corners, and ease it for installation. Enter system setup, select System Configuration® Integrated NIC, and...

Service Manual
Page 21
...® Miscellaneous Devices, and change the Audio setting to Disabled (see Replacing the Computer Cover), reconnect the computer and devices to electrical outlets, and then turn them on the system board. 1 riser-card cage 3 riser cards 2 slots 4 system board connectors 11. 1 release tab 3 card 5 card connector 2 card-retention latch 4 card-edge...
...® Miscellaneous Devices, and change the Audio setting to Disabled (see Replacing the Computer Cover), reconnect the computer and devices to electrical outlets, and then turn them on the system board. 1 riser-card cage 3 riser cards 2 slots 4 system board connectors 11. 1 release tab 3 card 5 card connector 2 card-retention latch 4 card-edge...

Service Manual
Page 22
... or filler bracket fits around the alignment guide. 7. CAUTION: To prevent static damage to components inside to turn off the integrated network adapter: a. Remove the computer cover (see the Regulatory Compliance Homepage at www.dell.com/regulatory_compliance. Pivot the latch until it snaps into place. Before you touch any drivers required for...
... or filler bracket fits around the alignment guide. 7. CAUTION: To prevent static damage to components inside to turn off the integrated network adapter: a. Remove the computer cover (see the Regulatory Compliance Homepage at www.dell.com/regulatory_compliance. Pivot the latch until it snaps into place. Before you touch any drivers required for...


