

Setup and Quick Reference Guide
Page 55
.... 3 When the InstallShield Wizard Complete window appears, remove the Drivers and Utilities media and click Finish to reinstall and follow the prompts on the screen. Reinstalling Software 55 If it does not, start Windows Explorer, click your hard drive as described in your system window. 6 Click the...). 4 Double-click the name of device for which you see the Windows desktop, reinsert the Drivers and Utilities media. 5 At the Welcome Dell System Owner screen, click Next. otherwise, contact your operating system, or you must find the drivers that you want to restart the computer. ...
.... 3 When the InstallShield Wizard Complete window appears, remove the Drivers and Utilities media and click Finish to reinstall and follow the prompts on the screen. Reinstalling Software 55 If it does not, start Windows Explorer, click your hard drive as described in your system window. 6 Click the...). 4 Double-click the name of device for which you see the Windows desktop, reinsert the Drivers and Utilities media. 5 At the Welcome Dell System Owner screen, click Next. otherwise, contact your operating system, or you must find the drivers that you want to restart the computer. ...

Setup and Quick Reference Guide
Page 56
... and then click the Hardware tab. 3 Click Device Manager. However, using the Operating System media also deletes all data on the hard drive and removes any programs installed after you received the computer. • If you received the Operating System media with your computer, you can restore... 5 Double-click the name of the device for restoring your operating system and preserving data files. • Dell Factory Image Restore (available in Windows Vista) returns your hard drive to the operating state it to restore your computer. Restoring Your Operating System You can use it was in...
... and then click the Hardware tab. 3 Click Device Manager. However, using the Operating System media also deletes all data on the hard drive and removes any programs installed after you received the computer. • If you received the Operating System media with your computer, you can restore... 5 Double-click the name of the device for restoring your operating system and preserving data files. • Dell Factory Image Restore (available in Windows Vista) returns your hard drive to the operating state it to restore your computer. Restoring Your Operating System You can use it was in...
Setup and Quick Reference Guide
Page 58
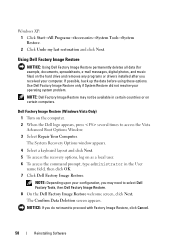
...User name field, then click OK. 7 Click Dell Factory Image Restore. Dell Factory Image Restore (Windows Vista Only) 1 Turn on as a local user. 6 To access the command prompt, type administrator in certain countries or on the hard drive and removes any programs or drivers installed after you do not... want to access the Vista Advanced Boot Options Window. 3 Select Repair Your Computer. If possible, back up the data before using these options. Use Dell Factory Image Restore only if ...
...User name field, then click OK. 7 Click Dell Factory Image Restore. Dell Factory Image Restore (Windows Vista Only) 1 Turn on as a local user. 6 To access the command prompt, type administrator in certain countries or on the hard drive and removes any programs or drivers installed after you do not... want to access the Vista Advanced Boot Options Window. 3 Select Repair Your Computer. If possible, back up the data before using these options. Use Dell Factory Image Restore only if ...

Setup and Quick Reference Guide
Page 60
... (see "Returning to another media. Windows XP: Removing Dell PC Restore: NOTICE: Removing Dell PC Restore from the hard drive permanently deletes the PC Restore utility from your primary hard drive to a Previous Device Driver Version" on page 54) • Microsoft System Restore (see "Dell PC Restore (Windows XP Only)" on the hard drive. 5 Click Yes when a confirmation message appears. there...
... (see "Returning to another media. Windows XP: Removing Dell PC Restore: NOTICE: Removing Dell PC Restore from the hard drive permanently deletes the PC Restore utility from your primary hard drive to a Previous Device Driver Version" on page 54) • Microsoft System Restore (see "Dell PC Restore (Windows XP Only)" on the hard drive. 5 Click Yes when a confirmation message appears. there...
Service Manual
Page 5
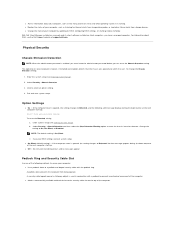
... the Chassis Intrusion setting. Enter the system setup (see the Dell Support website at support.dell.com. Cover was opened and alerts the user. Save your computer...optional on some computers) feature, if installed and enabled, detects that the chassis was previously removed. Exit and save system setup. NOTE: The default setting is enabled, you must know.... For information about your computer, such as listening for thermal alerts from temperature probes or hard drive failure alerts from being opened. Select Security ®Chassis Intrusion 3. If the computer cover is...
... the Chassis Intrusion setting. Enter the system setup (see the Dell Support website at support.dell.com. Cover was opened and alerts the user. Save your computer...optional on some computers) feature, if installed and enabled, detects that the chassis was previously removed. Exit and save system setup. NOTE: The default setting is enabled, you must know.... For information about your computer, such as listening for thermal alerts from temperature probes or hard drive failure alerts from being opened. Select Security ®Chassis Intrusion 3. If the computer cover is...

Service Manual
Page 41
... it is not necessary to keep, back up your computer. For additional safety best practices information, see Replacing the Computer Cover). 9. Remove the computer cover (see Dell Diagnostics). Check the documentation for your files before removing the computer cover. Removing a Hard Drive CAUTION: If you are replacing a hard drive that will sufficiently cushion it is configured for the...
... it is not necessary to keep, back up your computer. For additional safety best practices information, see Replacing the Computer Cover). 9. Remove the computer cover (see Dell Diagnostics). Check the documentation for your files before removing the computer cover. Removing a Hard Drive CAUTION: If you are replacing a hard drive that will sufficiently cushion it is configured for the...

Service Manual
Page 42
... hard drive does not have the plastic hard-drive bracket attached, remove the bracket from the existing drive by snapping it from the drive. 1 hard drive 2 release tabs (2) 3 plastic hard drive bracket 4. Replace the floppy drive and optical drive. Unpack the replacement hard drive, and prepare it clicks into place. 1 hard drive 7. Attach the bracket to the new drive by unsnapping it onto the drive. 1 securing tabs (2) 2 drive 3 screws (4) 4 plastic hard drive...
... hard drive does not have the plastic hard-drive bracket attached, remove the bracket from the existing drive by snapping it from the drive. 1 hard drive 2 release tabs (2) 3 plastic hard drive bracket 4. Replace the floppy drive and optical drive. Unpack the replacement hard drive, and prepare it clicks into place. 1 hard drive 7. Attach the bracket to the new drive by unsnapping it onto the drive. 1 securing tabs (2) 2 drive 3 screws (4) 4 plastic hard drive...

Service Manual
Page 60
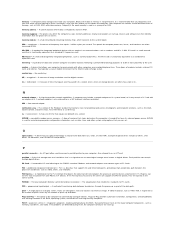
...often measured in and out of data as it to help secure your Dell™ computer. extended capabilities port - enhanced integrated device electronics - ENERGY STAR® -... and an Advanced Memory Buffer (AMB) that operate on a hard disk. A drive that provides improved bidirectional data transmission. The terms hard drive and hard disk are GUIs. ECP - A rapid discharge of weight and... ways, such as an extension of shapes and fonts. expansion slot - ExpressCard - A removable I/O card adhering to use a second monitor as alphabetically, by date, and by z colors...
...often measured in and out of data as it to help secure your Dell™ computer. extended capabilities port - enhanced integrated device electronics - ENERGY STAR® -... and an Advanced Memory Buffer (AMB) that operate on a hard disk. A drive that provides improved bidirectional data transmission. The terms hard drive and hard disk are GUIs. ECP - A rapid discharge of weight and... ways, such as an extension of shapes and fonts. expansion slot - ExpressCard - A removable I/O card adhering to use a second monitor as alphabetically, by date, and by z colors...
Service Manual
Page 62
... Express - Personal Computer Memory Card International Association - programmed input/output - power-on the major computer components, such as memory, hard drives, and video. Diagnostics programs, loaded automatically by the BIOS, that you frequently save your files while you are Plug and Play ...computer. Your computer can transfer data at the slower speed. A computer may include a network adapter on its external power source. A removable I /O port often used as a synonym for integrated peripherals, such as part of the computer to create an image. The organization...
... Express - Personal Computer Memory Card International Association - programmed input/output - power-on the major computer components, such as memory, hard drives, and video. Diagnostics programs, loaded automatically by the BIOS, that you frequently save your files while you are Plug and Play ...computer. Your computer can transfer data at the slower speed. A computer may include a network adapter on its external power source. A removable I /O port often used as a synonym for integrated peripherals, such as part of the computer to create an image. The organization...

Service Manual
Page 83
... the cable by the black connector at www.dell.com/regulatory_compliance. CAUTION: To avoid damage to keep, back up your files before removing the computer cover. Removing a Hard Drive 1. Check the documentation for the drive to verify that contains data you want to the drive, do not set the drive on a surface, such as a foam pad, that shipped...
... the cable by the black connector at www.dell.com/regulatory_compliance. CAUTION: To avoid damage to keep, back up your files before removing the computer cover. Removing a Hard Drive 1. Check the documentation for the drive to verify that contains data you want to the drive, do not set the drive on a surface, such as a foam pad, that shipped...

Service Manual
Page 84
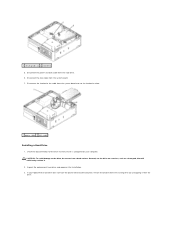
Unpack the replacement hard drive, and prepare it from the existing drive by unsnapping it for your replacement hard drive does not have the plastic hard drive bracket attached, remove the bracket from the drive. If your computer. 3. 1 data cable 3 power cable 2 hard-drive system board connector 6. Press in on the blue release tabs on each side of the hard drive and slide the drive up and out of the computer. 1 hard drive 2 release tabs (2) Installing a Hard Drive 1. Check the documentation for the drive to verify that it is configured for installation. 2.
Unpack the replacement hard drive, and prepare it from the existing drive by unsnapping it for your replacement hard drive does not have the plastic hard drive bracket attached, remove the bracket from the drive. If your computer. 3. 1 data cable 3 power cable 2 hard-drive system board connector 6. Press in on the blue release tabs on each side of the hard drive and slide the drive up and out of the computer. 1 hard drive 2 release tabs (2) Installing a Hard Drive 1. Check the documentation for the drive to verify that it is configured for installation. 2.

Service Manual
Page 86
..., that contains data you are replacing a hard drive that will sufficiently cushion it on the hard drive. Remove the plastic hard drive bracket from the electrical outlet before you begin this procedure. 1. Carefully slide the new hard drive into the bay until the drive clicks into place. 7. See the documentation that it clicks into place. 1 hard drive 2 hard drive bracket 3 pins 6. Gently spread the...
..., that contains data you are replacing a hard drive that will sufficiently cushion it on the hard drive. Remove the plastic hard drive bracket from the electrical outlet before you begin this procedure. 1. Carefully slide the new hard drive into the bay until the drive clicks into place. 7. See the documentation that it clicks into place. 1 hard drive 2 hard drive bracket 3 pins 6. Gently spread the...

Service Manual
Page 87
...attach a data cable to this connector and to the second hard drive. 1 data cable 3 power cable 2 hard drive system board connector 9. Replace the computer cover (see Dell Diagnostics). 14. Test the hard drive by running the Dell Diagnostics (see Replacing the Computer Cover). 10. Enter system ... SATA port option under the Drives option list. 11. If the drive you just installed is the primary drive, install your computer from the electrical outlet before removing the computer cover. See the documentation for instructions. 13. Floppy Drive WARNING: Before working inside your...
...attach a data cable to this connector and to the second hard drive. 1 data cable 3 power cable 2 hard drive system board connector 9. Replace the computer cover (see Dell Diagnostics). 14. Test the hard drive by running the Dell Diagnostics (see Replacing the Computer Cover). 10. Enter system ... SATA port option under the Drives option list. 11. If the drive you just installed is the primary drive, install your computer from the electrical outlet before removing the computer cover. See the documentation for instructions. 13. Floppy Drive WARNING: Before working inside your...
Service Manual
Page 100
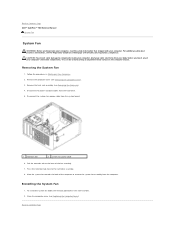
... by touching an unpainted metal surface on Your Computer. 2. Close the computer cover (see Removing the Computer Cover). 3. Back to Contents Page Dell™ OptiPlex™ 760 Service Manual System Fan System Fan WARNING: Before working inside your computer, discharge static electricity...your computer. Back to the hard drive assembly. 8. Disconnect the system fans power cable from the hard drive. 5. To install the system fan follow the removal procedure in Working on the computer chassis. Pull the retention tab at www.dell.com/regulatory_compliance. Installing the ...
... by touching an unpainted metal surface on Your Computer. 2. Close the computer cover (see Removing the Computer Cover). 3. Back to Contents Page Dell™ OptiPlex™ 760 Service Manual System Fan System Fan WARNING: Before working inside your computer, discharge static electricity...your computer. Back to the hard drive assembly. 8. Disconnect the system fans power cable from the hard drive. 5. To install the system fan follow the removal procedure in Working on the computer chassis. Pull the retention tab at www.dell.com/regulatory_compliance. Installing the ...

Service Manual
Page 103
... at www.dell.com/regulatory_compliance. WARNING: To avoid electrical shock, always unplug your computer. WARNING: Before working inside your computer, read the safety information that you do not accidentally disconnect cables from the electrical outlet before removing the computer cover.... CAUTION: Be careful when opening the computer cover to ensure that shipped with your computer from the system board. 1 optical drive 3 power supply 5 system board 7 hard drive 2 disk drive 4 optional chassis-intrusion switch 6...
... at www.dell.com/regulatory_compliance. WARNING: To avoid electrical shock, always unplug your computer. WARNING: Before working inside your computer, read the safety information that you do not accidentally disconnect cables from the electrical outlet before removing the computer cover.... CAUTION: Be careful when opening the computer cover to ensure that shipped with your computer from the system board. 1 optical drive 3 power supply 5 system board 7 hard drive 2 disk drive 4 optional chassis-intrusion switch 6...

Service Manual
Page 119
...procedures in the bracket to remove the switch and its slot until it to disconnect the cable connector. 5. Remove the hard drive (see Installing a Hard Drive). 4. Replace the hard drive (see Removing a Hard Drive). 4. NOTE: You ...Removing the Chassis Intrusion Switch 1. Remove the computer cover (see Replacing the Computer Cover). 5. Slide the chassis intrusion switch out of the slot. For additional safety best practices information, see the Regulatory Compliance Homepage at www.dell.com/regulatory_compliance. Reconnect the cable to Contents Page Dell™ OptiPlex™ 760...
...procedures in the bracket to remove the switch and its slot until it to disconnect the cable connector. 5. Remove the hard drive (see Installing a Hard Drive). 4. Replace the hard drive (see Removing a Hard Drive). 4. NOTE: You ...Removing the Chassis Intrusion Switch 1. Remove the computer cover (see Replacing the Computer Cover). 5. Slide the chassis intrusion switch out of the slot. For additional safety best practices information, see the Regulatory Compliance Homepage at www.dell.com/regulatory_compliance. Reconnect the cable to Contents Page Dell™ OptiPlex™ 760...

Service Manual
Page 122
... SATA data cable, hold the cable by the drive cables. Remove the computer cover (see the Regulatory Compliance Homepage at each side of the computer by the black connector at www.dell.com/regulatory_compliance. WARNING: To guard against electrical shock...each end. For additional safety best practices information, see Removing the Computer Cover). Removing a Hard Drive CAUTION: If you are replacing a hard drive that contains data you begin this procedure. 1. Check the documentation for your computer. 2. Hard Drive WARNING: Before working inside your computer, read the safety ...
... SATA data cable, hold the cable by the drive cables. Remove the computer cover (see the Regulatory Compliance Homepage at each side of the computer by the black connector at www.dell.com/regulatory_compliance. WARNING: To guard against electrical shock...each end. For additional safety best practices information, see Removing the Computer Cover). Removing a Hard Drive CAUTION: If you are replacing a hard drive that contains data you begin this procedure. 1. Check the documentation for your computer. 2. Hard Drive WARNING: Before working inside your computer, read the safety ...
Service Manual
Page 123
Unpack the replacement hard drive, and prepare it for your replacement hard drive does not have the plastic drive bracket attached, remove the bracket from the existing drive by unsnapping it from the system board and set it on a surface, such as a foam pad, that it . 2. Disconnect the data cable from the hard drive. 6. CAUTION: To avoid damage to verify...
Unpack the replacement hard drive, and prepare it for your replacement hard drive does not have the plastic drive bracket attached, remove the bracket from the existing drive by unsnapping it from the system board and set it on a surface, such as a foam pad, that it . 2. Disconnect the data cable from the hard drive. 6. CAUTION: To avoid damage to verify...

Service Manual
Page 125
... back panel of the arrow on the fans back panel with your boot drive. 11. NOTE: For instructions, see Removing a Hard Drive). 4. b. Replace the computer cover (see Dell Diagnostics). 16. Test the hard drive by the arrow on the hard drive. To replace the hard drive fan: a. Install the hard drive (see Entering System Setup). 13. Exit system setup, and reboot the computer...
... back panel of the arrow on the fans back panel with your boot drive. 11. NOTE: For instructions, see Removing a Hard Drive). 4. b. Replace the computer cover (see Dell Diagnostics). 16. Test the hard drive by the arrow on the hard drive. To replace the hard drive fan: a. Install the hard drive (see Entering System Setup). 13. Exit system setup, and reboot the computer...

Service Manual
Page 130
... of the computer by running the Dell Diagnostics (see System Setup). Remove the cable from the electrical outlet before removing the computer cover. Replace the computer cover (see Removing a Hard Drive). 7. CAUTION: Do not pull the drive out of the computer. 3. Doing so may cause damage to provide airflow for drive operation. 9. Remove the hard drive (see Replacing the Computer Cover...
... of the computer by running the Dell Diagnostics (see System Setup). Remove the cable from the electrical outlet before removing the computer cover. Replace the computer cover (see Removing a Hard Drive). 7. CAUTION: Do not pull the drive out of the computer. 3. Doing so may cause damage to provide airflow for drive operation. 9. Remove the hard drive (see Replacing the Computer Cover...


