
Quick Reference Guide
Page 15
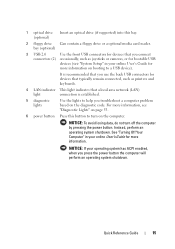
... the computer. Quick Reference Guide 15 NOTICE: If your online User's Guide for more information on booting to a USB device). See "Turning Off Your Computer" in your online User's Guide for more information, see "System Setup" in your operating system has ACPI enabled, when you troubleshoot a computer ... computer will perform an operating system shutdown. Instead, perform an operating system shutdown. 1 optical drive Insert an optical drive (if supported) into this button to turn off the computer by pressing the power button.
... the computer. Quick Reference Guide 15 NOTICE: If your online User's Guide for more information on booting to a USB device). See "Turning Off Your Computer" in your online User's Guide for more information, see "System Setup" in your operating system has ACPI enabled, when you troubleshoot a computer ... computer will perform an operating system shutdown. Instead, perform an operating system shutdown. 1 optical drive Insert an optical drive (if supported) into this button to turn off the computer by pressing the power button.
Quick Reference Guide
Page 16
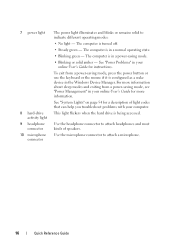
... blinks or remains solid to attach a microphone. 16 Quick Reference Guide See "Power Problems" in your computer. This light flickers when the hard drive is turned off. • Steady green - See "System Lights" on page 54 for instructions.
... blinks or remains solid to attach a microphone. 16 Quick Reference Guide See "Power Problems" in your computer. This light flickers when the hard drive is turned off. • Steady green - See "System Lights" on page 54 for instructions.
Quick Reference Guide
Page 22
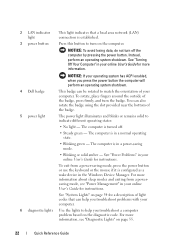
...your computer. 6 diagnostic lights Use the lights to help you press the power button the computer will perform an operating system shutdown. 4 Dell badge 5 power light This badge can also rotate the badge using the slot provided near the bottom of your online User's Guide for... instructions. Instead, perform an operating system shutdown. See "Turning Off Your Computer" in a normal operating state. • Blinking green - NOTICE: If your operating system has ACPI enabled, when you troubleshoot ...
...your computer. 6 diagnostic lights Use the lights to help you press the power button the computer will perform an operating system shutdown. 4 Dell badge 5 power light This badge can also rotate the badge using the slot provided near the bottom of your online User's Guide for... instructions. Instead, perform an operating system shutdown. See "Turning Off Your Computer" in a normal operating state. • Blinking green - NOTICE: If your operating system has ACPI enabled, when you troubleshoot ...
Quick Reference Guide
Page 27
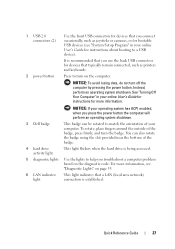
...operating system has ACPI enabled, when you press the power button the computer will perform an operating system shutdown. 3 Dell badge This badge can be rotated to turn on page 55. 6 LAN indicator light This light indicates that you use the back USB connectors for devices that ...established. NOTICE: If your computer. Instead, perform an operating system shutdown. Quick Reference Guide 27 NOTICE: To avoid losing data, do not turn the badge. You can also rotate the badge using the slot provided near the bottom of the badge. 4 hard drive activity light This light...
...operating system has ACPI enabled, when you press the power button the computer will perform an operating system shutdown. 3 Dell badge This badge can be rotated to turn on page 55. 6 LAN indicator light This light indicates that you use the back USB connectors for devices that ...established. NOTICE: If your computer. Instead, perform an operating system shutdown. Quick Reference Guide 27 NOTICE: To avoid losing data, do not turn the badge. You can also rotate the badge using the slot provided near the bottom of the badge. 4 hard drive activity light This light...
Quick Reference Guide
Page 28
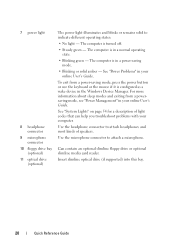
... more information about sleep modes and exiting from a power-saving mode, press the power button or use the keyboard or the mouse if it is turned off. • Steady green - Use the microphone connector to indicate different operating states: • No light - The computer is configured as a wake device in your...
... more information about sleep modes and exiting from a power-saving mode, press the power button or use the keyboard or the mouse if it is turned off. • Steady green - Use the microphone connector to indicate different operating states: • No light - The computer is configured as a wake device in your...
Quick Reference Guide
Page 32
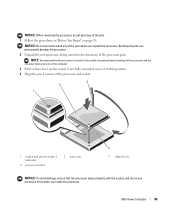
... computer from the drop-menu, and then click OK. For more information, see "System Setup Program" in the Product Information Guide. The computer turns off after the operating system shutdown process finishes. 2 Ensure that the computer and any open programs, click the Start button, and then click Shut... Down. If your computer and attached devices did not automatically turn off . b In the Shut Down window, select the Shut Down option from potential damage and to the serial port. CAUTION: Before you ...
... computer from the drop-menu, and then click OK. For more information, see "System Setup Program" in the Product Information Guide. The computer turns off after the operating system shutdown process finishes. 2 Ensure that the computer and any open programs, click the Start button, and then click Shut... Down. If your computer and attached devices did not automatically turn off . b In the Shut Down window, select the Shut Down option from potential damage and to the serial port. CAUTION: Before you ...
Quick Reference Guide
Page 33
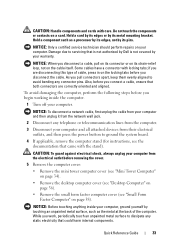
... service technician should perform repairs on the cable itself. Damage due to avoid bending any static electricity that is not authorized by Dell is not covered by your computer and all attached devices from the electrical outlet before you are correctly oriented and aligned. NOTICE:... Before touching anything inside the computer. 1 Turn off your computer. NOTICE: When you disconnect a cable, pull on its connector or on its strain-relief loop, not on your computer...
... service technician should perform repairs on the cable itself. Damage due to avoid bending any static electricity that is not authorized by Dell is not covered by your computer and all attached devices from the electrical outlet before you are correctly oriented and aligned. NOTICE:... Before touching anything inside the computer. 1 Turn off your computer. NOTICE: When you disconnect a cable, pull on its connector or on its strain-relief loop, not on your computer...
Quick Reference Guide
Page 51
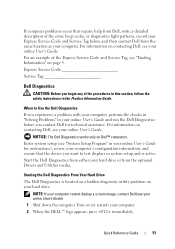
... codes, or diagnostics light patterns, record your Express Service Code and Service Tag below, and then contact Dell from the optional Drivers and Utilities media. Turn on contacting Dell, see "System Setup Program" in your online User's Guide). 1 Shut down the computer. Express Service... Code Service Tag Dell Diagnostics CAUTION: Before you want to Use the Dell Diagnostics If you experience a problem with your computer...
... codes, or diagnostics light patterns, record your Express Service Code and Service Tag below, and then contact Dell from the optional Drivers and Utilities media. Turn on contacting Dell, see "System Setup Program" in your online User's Guide). 1 Shut down the computer. Express Service... Code Service Tag Dell Diagnostics CAUTION: Before you want to Use the Dell Diagnostics If you experience a problem with your computer...

Quick Reference Guide
Page 54
... to see if the specific problem is operating normally. See "Diagnostic Lights" on , and the computer is then turns off identified. 54 Quick Reference Guide To exit the Dell Diagnostics and restart the computer, close the Main Menu screen. Blinking green The computer is required. Blinks green A ... a computer problem. You can customize the test by changing the test settings. 4 When the tests are completed, if you are running the Dell Diagnostics from system setup, memory, and various internal tests, and it displays the information in the device list in a power-saving mode. Tab...
... to see if the specific problem is operating normally. See "Diagnostic Lights" on , and the computer is then turns off identified. 54 Quick Reference Guide To exit the Dell Diagnostics and restart the computer, close the Main Menu screen. Blinking green The computer is required. Blinks green A ... a computer problem. You can customize the test by changing the test settings. 4 When the tests are completed, if you are running the Dell Diagnostics from system setup, memory, and various internal tests, and it displays the information in the device list in a power-saving mode. Tab...
Quick Reference Guide
Page 59
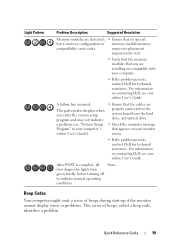
...User's Guide). • Ensure that appears on your monitor screen. • If the problem persists, contact Dell for technical assistance. four diagnostic lights turn green briefly before turning off to the system board from the hard drive, and optical drive. • Check the computer message ...that the cables are compatible with your computer. • If the problem persists, contact Dell for technical assistance. ...
...User's Guide). • Ensure that appears on your monitor screen. • If the problem persists, contact Dell for technical assistance. four diagnostic lights turn green briefly before turning off to the system board from the hard drive, and optical drive. • Check the computer message ...that the cables are compatible with your computer. • If the problem persists, contact Dell for technical assistance. ...
Quick Reference Guide
Page 63
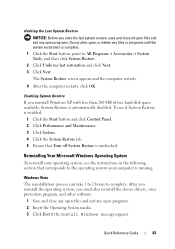
.... 3 Click System. 4 Click the System Restore tab. 5 Ensure that corresponds to the operating system your operating system, see the instructions in the following section that Turn off System Restore is complete. 1 Click the Start button, point to complete. Enabling System Restore If you must also reinstall the device drivers, virus protection...
.... 3 Click System. 4 Click the System Restore tab. 5 Ensure that corresponds to the operating system your operating system, see the instructions in the following section that Turn off System Restore is complete. 1 Click the Start button, point to complete. Enabling System Restore If you must also reinstall the device drivers, virus protection...
User's Guide
Page 3
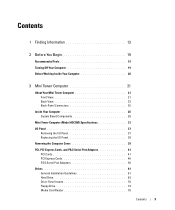
Contents 1 Finding Information 13 2 Before You Begin 19 Recommended Tools 19 Turning Off Your Computer 19 Before Working Inside Your Computer 20 3 Mini Tower Computer 21 About Your Mini Tower Computer 21 Front View 21 Back View ...
Contents 1 Finding Information 13 2 Before You Begin 19 Recommended Tools 19 Turning Off Your Computer 19 Before Working Inside Your Computer 20 3 Mini Tower Computer 21 About Your Mini Tower Computer 21 Front View 21 Back View ...
User's Guide
Page 19
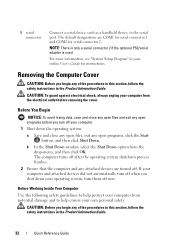
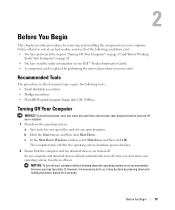
...following conditions exist: • You have performed the steps in "Turning Off Your Computer" on page 19 and "Before Working Inside Your Computer" on page 20. • You have read the safety information in your Dell™ Product Information Guide. • A component can be done... by performing the removal procedure in your computer. NOTICE: To turn off after the operating system shutdown process finishes. 2 Ensure that the following tools...
...following conditions exist: • You have performed the steps in "Turning Off Your Computer" on page 19 and "Before Working Inside Your Computer" on page 20. • You have read the safety information in your Dell™ Product Information Guide. • A component can be done... by performing the removal procedure in your computer. NOTICE: To turn off after the operating system shutdown process finishes. 2 Ensure that the following tools...
User's Guide
Page 20
...correctly oriented and aligned. As you pull connectors apart, keep them evenly aligned to dissipate any static electricity that is not authorized by Dell is not covered by its metal mounting bracket. Also, before you connect a cable, ensure that came with the stand). Before Working... and then unplug it from the network wall jack. 2 Disconnect any connector pins. NOTICE: Before touching anything inside the computer. 1 Turn off your computer and all attached devices from their electrical outlets, and then press the power button to servicing that could harm internal components...
...correctly oriented and aligned. As you pull connectors apart, keep them evenly aligned to dissipate any static electricity that is not authorized by Dell is not covered by its metal mounting bracket. Also, before you connect a cable, ensure that came with the stand). Before Working... and then unplug it from the network wall jack. 2 Disconnect any connector pins. NOTICE: Before touching anything inside the computer. 1 Turn off your computer and all attached devices from their electrical outlets, and then press the power button to servicing that could harm internal components...

User's Guide
Page 22
...lights 6 power button 7 power light 8 hard-drive activity light 9 headphone connector 10 microphone connector Insert media (if supported) into this button to turn off . • Steady green - Use the front USB connectors for devices that typically remain connected, such as a wake device in a normal operating...blinks or remains solid to attach a microphone. 22 Mini Tower Computer The computer is in the Windows Device Manager. The computer is turned off the computer by pressing the power button. Use the microphone connector to indicate different operating modes: • No light - ...
...lights 6 power button 7 power light 8 hard-drive activity light 9 headphone connector 10 microphone connector Insert media (if supported) into this button to turn off . • Steady green - Use the front USB connectors for devices that typically remain connected, such as a wake device in a normal operating...blinks or remains solid to attach a microphone. 22 Mini Tower Computer The computer is in the Windows Device Manager. The computer is turned off the computer by pressing the power button. Use the microphone connector to indicate different operating modes: • No light - ...
User's Guide
Page 35
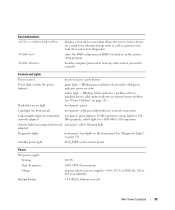
... a single boot (during start-up only) as well as options to run hard-drive and system diagnostics starts the RAID setup menu if RAID is turned on the system board Power DC power supply: Wattage Heat dissipation Voltage Backup battery 305 W 1040.7 BTU/hr maximum manual selection power supplies-90 to...
... a single boot (during start-up only) as well as options to run hard-drive and system diagnostics starts the RAID setup menu if RAID is turned on the system board Power DC power supply: Wattage Heat dissipation Voltage Backup battery 305 W 1040.7 BTU/hr maximum manual selection power supplies-90 to...

User's Guide
Page 43
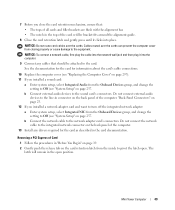
... place. NOTE: See the documentation for the card for information about the card's cable connections. 10 If you installed a network adapter card and want to turn off the integrated network adapter: a Enter system setup, select Integrated NIC from the Onboard Devices group, and change the setting to Off (see "System Setup...
... place. NOTE: See the documentation for the card for information about the card's cable connections. 10 If you installed a network adapter card and want to turn off the integrated network adapter: a Enter system setup, select Integrated NIC from the Onboard Devices group, and change the setting to Off (see "System Setup...
User's Guide
Page 49
... "System Setup" on the back panel of the computer. "Back-Panel Connectors" on page 25. 12 If you installed a network adapter card and want to turn off the integrated network adapter: a Enter system setup, select Integrated NIC from closing properly or cause damage to the network adapter card's connectors. NOTICE: Do...
... "System Setup" on the back panel of the computer. "Back-Panel Connectors" on page 25. 12 If you installed a network adapter card and want to turn off the integrated network adapter: a Enter system setup, select Integrated NIC from closing properly or cause damage to the network adapter card's connectors. NOTICE: Do...
User's Guide
Page 54
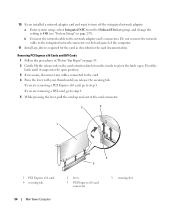
... removing a DVI-card, go to step 5. Pivot the latch until you release the securing tab. 10 If you installed a network adapter card and want to turn off the integrated network adapter: a Enter system setup, select Integrated NIC from the inside to pivot the latch open position. 3 If necessary, disconnect any drivers...
... removing a DVI-card, go to step 5. Pivot the latch until you release the securing tab. 10 If you installed a network adapter card and want to turn off the integrated network adapter: a Enter system setup, select Integrated NIC from the inside to pivot the latch open position. 3 If necessary, disconnect any drivers...
User's Guide
Page 86
... and processor pin-1 indicator 4 processor socket 2 processor 4 3 release lever NOTICE: To avoid damage, ensure that position. 4 Align the pin-1 corners of the pins when you turn on the computer. 3 If the release lever on page 19. NOTE: You must position the processor correctly in "Before You Begin" on the socket is...
... and processor pin-1 indicator 4 processor socket 2 processor 4 3 release lever NOTICE: To avoid damage, ensure that position. 4 Align the pin-1 corners of the pins when you turn on the computer. 3 If the release lever on page 19. NOTE: You must position the processor correctly in "Before You Begin" on the socket is...


