
Quick Reference
Page 11
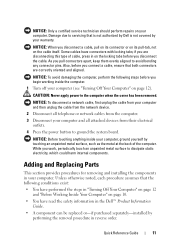
... not on page 10. • You have read the safety information in the Dell™ Product Information Guide. • A component can be replaced or-if purchased separately-installed by performing the removal procedure in "Turning Off Your Computer" on page 12 and "Before Working Inside Your Computer" on ... your computer (see "Turning Off Your Computer" on the locking tabs before you are correctly oriented and aligned. Quick Reference Guide 11 if you connect a cable, ensure that is not authorized by Dell is not covered by touching an unpainted metal surface, such as the metal at the ...
... not on page 10. • You have read the safety information in the Dell™ Product Information Guide. • A component can be replaced or-if purchased separately-installed by performing the removal procedure in "Turning Off Your Computer" on page 12 and "Before Working Inside Your Computer" on ... your computer (see "Turning Off Your Computer" on the locking tabs before you are correctly oriented and aligned. Quick Reference Guide 11 if you connect a cable, ensure that is not authorized by Dell is not covered by touching an unpainted metal surface, such as the metal at the ...
Quick Reference
Page 12
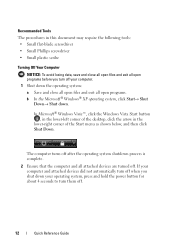
...the arrow in this document may require the following tools: • Small flat-blade screwdriver • Small Phillips screwdriver • Small plastic scribe Turning Off Your Computer NOTICE: To avoid losing data, save and close all open files and exit all open programs before you shut down . The computer... Microsoft® Windows® XP operating system, click Start→ Shut Down→ Shut down your computer and attached devices did not automatically turn them off. 12 Quick Reference Guide If your operating system, press and hold the power button for about 4 seconds to...
...the arrow in this document may require the following tools: • Small flat-blade screwdriver • Small Phillips screwdriver • Small plastic scribe Turning Off Your Computer NOTICE: To avoid losing data, save and close all open files and exit all open programs before you shut down . The computer... Microsoft® Windows® XP operating system, click Start→ Shut Down→ Shut down your computer and attached devices did not automatically turn them off. 12 Quick Reference Guide If your operating system, press and hold the power button for about 4 seconds to...

Quick Reference
Page 26
... end of viewable work space. The Microsoft® Windows® desktop displays on the computer. In extended desktop mode, you connect the monitor(s) or TV, turn on the primary monitor. 2 Enable extended desktop mode in the display settings. Connecting a TV NOTE: You must purchase an S-video cable, available at most consumer...
... end of viewable work space. The Microsoft® Windows® desktop displays on the computer. In extended desktop mode, you connect the monitor(s) or TV, turn on the primary monitor. 2 Enable extended desktop mode in the display settings. Connecting a TV NOTE: You must purchase an S-video cable, available at most consumer...
Quick Reference
Page 28
... the computer. It is recommended that you use the power button to a USB device). The light might also be on booting to turn on when the computer reads data from or writes data to the hard drive. Instead, perform an operating system shutdown. 28 Quick Reference Guide Desktop ...
... the computer. It is recommended that you use the power button to a USB device). The light might also be on booting to turn on when the computer reads data from or writes data to the hard drive. Instead, perform an operating system shutdown. 28 Quick Reference Guide Desktop ...

Quick Reference
Page 29
...can also rotate the badge using the slot provided near the bottom of speakers. The computer is in the Windows Device Manager. The computer is turned off. • Steady green - To exit from a power-saving mode, see "Diagnostic Lights" on page 56" for a description of light ...operating state. • Blinking green - For more information, see the online User's Guide. This light indicates that can help you access the Dell Support website or call Support. Quick Reference Guide 29 For more information about sleep modes and exiting from a power-saving mode, press the ...
...can also rotate the badge using the slot provided near the bottom of speakers. The computer is in the Windows Device Manager. The computer is turned off. • Steady green - To exit from a power-saving mode, see "Diagnostic Lights" on page 56" for a description of light ...operating state. • Blinking green - For more information, see the online User's Guide. This light indicates that can help you access the Dell Support website or call Support. Quick Reference Guide 29 For more information about sleep modes and exiting from a power-saving mode, press the ...

Quick Reference
Page 39
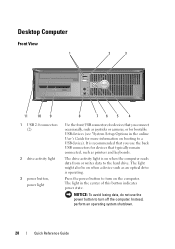
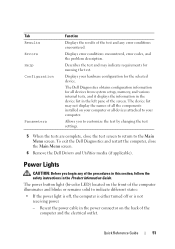
... lights Use these lights to help you connect occasionally, such as joysticks or cameras, or for devices that you use the power button to turn on the diagnostic code. Instead, perform an operating system shutdown. 8 headphone connector Use the headphone connector to attach headphones and most kinds of...the front USB connectors for bootable USB devices (see "Diagnostic Lights" on page 56. 7 power button, power light Press the power button to turn off the computer. On computers with a sound card, the microphone connector is on when the computer reads data from or writes data to the ...
... lights Use these lights to help you connect occasionally, such as joysticks or cameras, or for devices that you use the power button to turn on the diagnostic code. Instead, perform an operating system shutdown. 8 headphone connector Use the headphone connector to attach headphones and most kinds of...the front USB connectors for bootable USB devices (see "Diagnostic Lights" on page 56. 7 power button, power light Press the power button to turn off the computer. On computers with a sound card, the microphone connector is on when the computer reads data from or writes data to the ...
Quick Reference
Page 49
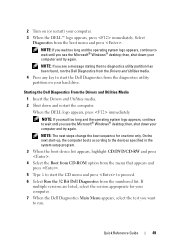
...the Drivers and Utilities media. 4 Press any key to start the CD menu and press to start the Dell Diagnostics from the numbered list. Quick Reference Guide 49 Starting the Dell Diagnostics From the Drivers and Utilities Media 1 Insert the Drivers and Utilities media. 2 Shut down your computer... CD-ROM option from the boot menu and press . If multiple versions are listed, select the version appropriate for one time only. 2 Turn on your hard drive. then, shut down your computer and try again. Select Diagnostics from the menu that no diagnostics utility partition has been...
...the Drivers and Utilities media. 4 Press any key to start the CD menu and press to start the Dell Diagnostics from the numbered list. Quick Reference Guide 49 Starting the Dell Diagnostics From the Drivers and Utilities Media 1 Insert the Drivers and Utilities media. 2 Shut down your computer... CD-ROM option from the boot menu and press . If multiple versions are listed, select the version appropriate for one time only. 2 Turn on your hard drive. then, shut down your computer and try again. Select Diagnostics from the menu that no diagnostics utility partition has been...
Quick Reference
Page 51
...the safety instructions in the Product Information Guide. Allows you begin any error conditions encountered. The Dell Diagnostics obtains configuration information for the selected device. To exit the Dell Diagnostics and restart the computer, close the test screen to return to your hardware configuration for all... computer illuminates and blinks or remains solid to indicate different states: • If the power light is off, the computer is either turned off or is not receiving power. - The power button light (bi-color LED) located on the back of the screen. Displays error...
...the safety instructions in the Product Information Guide. Allows you begin any error conditions encountered. The Dell Diagnostics obtains configuration information for the selected device. To exit the Dell Diagnostics and restart the computer, close the test screen to return to your hardware configuration for all... computer illuminates and blinks or remains solid to indicate different states: • If the power light is off, the computer is either turned off or is not receiving power. - The power button light (bi-color LED) located on the back of the screen. Displays error...

Quick Reference
Page 52
...outlet is working by testing it with another device, such as a lamp. • If the power light is steady green and the computer is turned on . - Ensure that the display is blinking amber, there may be malfunctioning or incorrectly installed. - Remove and then reinstall the memory modules.... and then reinstall the graphics card, if applicable. • If the power light is connected and powered on . Ensure that the computer turns on page 36). 52 Quick Reference Guide Also, bypass power protection devices, power strips, and power extension cables to verify that all power cables...
...outlet is working by testing it with another device, such as a lamp. • If the power light is steady green and the computer is turned on . - Ensure that the display is blinking amber, there may be malfunctioning or incorrectly installed. - Remove and then reinstall the memory modules.... and then reinstall the graphics card, if applicable. • If the power light is connected and powered on . Ensure that the computer turns on page 36). 52 Quick Reference Guide Also, bypass power protection devices, power strips, and power extension cables to verify that all power cables...
Quick Reference
Page 60
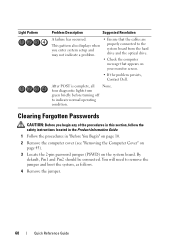
four diagnostic lights turn green briefly before turning off to the system board from the hard drive and the optical drive. • Check the computer message that appears on the system board. This ... cover (see "Removing the Computer Cover" on page 43). 3 Locate the 2-pin password jumper (PSWD) on your monitor screen. • If the problem persists, Contact Dell. By default, Pin1 and Pin2 should be connected. After POST is complete, all None. Clearing Forgotten Passwords CAUTION: Before you enter system setup and may...
four diagnostic lights turn green briefly before turning off to the system board from the hard drive and the optical drive. • Check the computer message that appears on the system board. This ... cover (see "Removing the Computer Cover" on page 43). 3 Locate the 2-pin password jumper (PSWD) on your monitor screen. • If the problem persists, Contact Dell. By default, Pin1 and Pin2 should be connected. After POST is complete, all None. Clearing Forgotten Passwords CAUTION: Before you enter system setup and may...

Quick Reference
Page 61
... cable, first plug the cable into the network device and then plug it into the computer. 6 Connect your computer and devices to electrical outlets, and turn them on. 7 After the Microsoft® Windows® desktop appears on your computer, shut down your computer (see... "Turning Off Your Computer" on page 12). 8 Turn off the monitor and disconnect it from the electrical outlet. 9 Disconnect the computer power cable from the electrical outlet, and press the power button to ...
... cable, first plug the cable into the network device and then plug it into the computer. 6 Connect your computer and devices to electrical outlets, and turn them on. 7 After the Microsoft® Windows® desktop appears on your computer, shut down your computer (see... "Turning Off Your Computer" on page 12). 8 Turn off the monitor and disconnect it from the electrical outlet. 9 Disconnect the computer power cable from the electrical outlet, and press the power button to ...

Quick Reference
Page 62
... the cable into the network port or device and then plug it into the computer. 13 Connect your computer and devices to electrical outlets, and turn them on. NOTE: This procedure enables the password feature. b Remove the password jumper plug from the RTCRST pins and place it back on the password..., first plug the cable into the network wall jack and then plug it into the computer. 6 Connect your computer and devices to electrical outlets, and turn them on. 62 Quick Reference Guide
... the cable into the network port or device and then plug it into the computer. 13 Connect your computer and devices to electrical outlets, and turn them on. NOTE: This procedure enables the password feature. b Remove the password jumper plug from the RTCRST pins and place it back on the password..., first plug the cable into the network wall jack and then plug it into the computer. 6 Connect your computer and devices to electrical outlets, and turn them on. 62 Quick Reference Guide
Quick Reference
Page 63
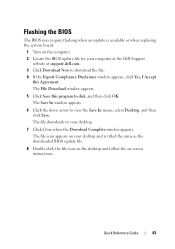
...BIOS update file for your desktop. 7 Click Close when the Download Complete window appears. The file downloads to your computer at the Dell Support website at support.dell.com. 3 Click Download Now to download the file. 4 If the Export Compliance Disclaimer window appears, click Yes, I Accept ...this program to view the Save In menu, select Desktop, and then click Save. The file icon appears on your desktop and is available or when replacing the system board. 1 Turn...
...BIOS update file for your desktop. 7 Click Close when the Download Complete window appears. The file downloads to your computer at the Dell Support website at support.dell.com. 3 Click Download Now to download the file. 4 If the Export Compliance Disclaimer window appears, click Yes, I Accept ...this program to view the Save In menu, select Desktop, and then click Save. The file icon appears on your desktop and is available or when replacing the system board. 1 Turn...
Quick Reference
Page 66
turning off your computer, 12 Internet connection about, 17 options, 17 setting up , 15, 23 problems beep codes, 53 Dell Diagnostics, 48 Product Information Guide, 6 R regulatory information, 6 ResourceCD Dell Diagnostics, 48 66 Index See system board N network Network Setup Wizard, 16 Network Setup Wizard, 16 O operating system reinstalling, 9 Operating System CD, 9 P password clearing, 60...
turning off your computer, 12 Internet connection about, 17 options, 17 setting up , 15, 23 problems beep codes, 53 Dell Diagnostics, 48 Product Information Guide, 6 R regulatory information, 6 ResourceCD Dell Diagnostics, 48 66 Index See system board N network Network Setup Wizard, 16 Network Setup Wizard, 16 O operating system reinstalling, 9 Operating System CD, 9 P password clearing, 60...

User's Guide
Page 8
Turning Off Your Computer 143 Before Working Inside Your Computer 144 12 Mini Tower Computer Parts 147 Removing the Computer Cover 147 Inside View of Your ...
Turning Off Your Computer 143 Before Working Inside Your Computer 144 12 Mini Tower Computer Parts 147 Removing the Computer Cover 147 Inside View of Your ...

User's Guide
Page 22
... be on when a device such as an optical drive is operating. 5 USB 2.0 connectors (2) Use the front USB connectors for devices that you access the Dell Support website or call Support. 2 optical drive Use the optical drive to play a CD/DVD. 3 floppy drive The floppy drive is optional. 4 drive...as joysticks or cameras, or for bootable USB devices (see "Diagnostic Lights" on page 106. 7 power button, power light Press the power button to turn off the computer. For more information, see "System Setup Options" on page 80 for devices that a LAN (local area network) connection is on when...
... be on when a device such as an optical drive is operating. 5 USB 2.0 connectors (2) Use the front USB connectors for devices that you access the Dell Support website or call Support. 2 optical drive Use the optical drive to play a CD/DVD. 3 floppy drive The floppy drive is optional. 4 drive...as joysticks or cameras, or for bootable USB devices (see "Diagnostic Lights" on page 106. 7 power button, power light Press the power button to turn off the computer. For more information, see "System Setup Options" on page 80 for devices that a LAN (local area network) connection is on when...
User's Guide
Page 33
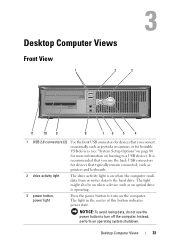
... shutdown. Desktop Computer Views Front View 1 2 3 11 10 9 8 76 5 4 1 USB 2.0 connectors (2) Use the front USB connectors for devices that you use the power button to turn on the computer. It is operating. 3 power button, power light Press the power button to...
... shutdown. Desktop Computer Views Front View 1 2 3 11 10 9 8 76 5 4 1 USB 2.0 connectors (2) Use the front USB connectors for devices that you use the power button to turn on the computer. It is operating. 3 power button, power light Press the power button to...
User's Guide
Page 34
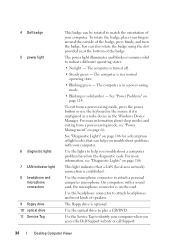
...card, the microphone connector is in the Windows Device Manager. The computer is optional. This light indicates that can help you access the Dell Support website or call Support. 34 Desktop Computer Views The floppy drive is in a normal operating state. • Blinking green -...the orientation of your computer. Use the optical drive to identify your fingers around the outside of the badge, press firmly, and turn the badge. 4 Dell badge 5 power light 6 diagnostic lights 7 LAN indicator light 8 headphone and microphone connectors 9 floppy drive 10 optical drive 11 ...
...card, the microphone connector is in the Windows Device Manager. The computer is optional. This light indicates that can help you access the Dell Support website or call Support. 34 Desktop Computer Views The floppy drive is in a normal operating state. • Blinking green -...the orientation of your computer. Use the optical drive to identify your fingers around the outside of the badge, press firmly, and turn the badge. 4 Dell badge 5 power light 6 diagnostic lights 7 LAN indicator light 8 headphone and microphone connectors 9 floppy drive 10 optical drive 11 ...
User's Guide
Page 57
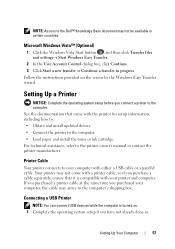
...Start a new transfer or Continue a transfer in certain countries. For technical assistance, refer to the computer. See the documentation that it is turned on the screen by the Windows Easy Transfer wizard. Printer Cable Your printer connects to your computer with a printer cable, so if you ... and computer. Setting Up a Printer NOTICE: Complete the operating system setup before you have not already done so. NOTE: Access to the Dell™ Knowledge Base document may not come with either a USB cable or a parallel cable. Follow the instructions provided on . 1 Complete ...
...Start a new transfer or Continue a transfer in certain countries. For technical assistance, refer to the computer. See the documentation that it is turned on the screen by the Windows Easy Transfer wizard. Printer Cable Your printer connects to your computer with a printer cable, so if you ... and computer. Setting Up a Printer NOTICE: Complete the operating system setup before you have not already done so. NOTE: Access to the Dell™ Knowledge Base document may not come with either a USB cable or a parallel cable. Follow the instructions provided on . 1 Complete ...

User's Guide
Page 58
... New Hardware Wizard window appears, click Cancel. The USB connectors fit only one way. 1 2 3 1 USB connector on computer 3 USB printer cable 2 USB connector on printer 3 Turn on the printer and then turn on the computer. 4 Depending on the computer and the printer.
... New Hardware Wizard window appears, click Cancel. The USB connectors fit only one way. 1 2 3 1 USB connector on computer 3 USB printer cable 2 USB connector on printer 3 Turn on the printer and then turn on the computer. 4 Depending on the computer and the printer.


