
User's Guide
Page 66
... the computer, and the memory contents are restored. Operation then resumes where the computer left off for most components, including the cooling fans. As long as the computer remains connected to a minimum by writing all power from storage devices. • Change the state... hibernation mode. • Shutdown. For example, the Auto Power On option in Windows® XP. • Access information about Dell OpenManage Client Instrumentation, see the manufacturer's documentation for thermal alerts from temperature probes or hard-drive failure alerts from the computer except ...
... the computer, and the memory contents are restored. Operation then resumes where the computer left off for most components, including the cooling fans. As long as the computer remains connected to a minimum by writing all power from storage devices. • Change the state... hibernation mode. • Shutdown. For example, the Auto Power On option in Windows® XP. • Access information about Dell OpenManage Client Instrumentation, see the manufacturer's documentation for thermal alerts from temperature probes or hard-drive failure alerts from the computer except ...
User's Guide
Page 158
.... Otherwise, your card could overheat and damage your computer and you are installing a graphics card that run higher than 75 W require an additional cooling fan installed. Installing PCI and PCI Express x16 Cards 1 Follow the procedures in the next section. • If you are removing but not replacing ...Cover" on page 150 for the card from the operating system. NOTICE: PCI Express graphics cards that runs at 75 W or higher, Contact Dell to purchase a card fan. • If you are installing or replacing a card, follow the procedures in "Before You Begin" on page 143. 2 Remove the...
.... Otherwise, your card could overheat and damage your computer and you are installing a graphics card that run higher than 75 W require an additional cooling fan installed. Installing PCI and PCI Express x16 Cards 1 Follow the procedures in the next section. • If you are removing but not replacing ...Cover" on page 150 for the card from the operating system. NOTICE: PCI Express graphics cards that runs at 75 W or higher, Contact Dell to purchase a card fan. • If you are installing or replacing a card, follow the procedures in "Before You Begin" on page 143. 2 Remove the...

User's Guide
Page 184
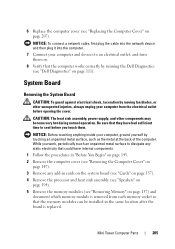
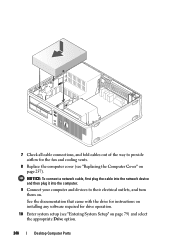
1 2 3 1 power cable 3 floppy-drive connector (FLOPPY) 2 floppy-drive cable 9 Replace the bezel (see "Replacing the Bezel" on page 166). 10 Check all cable connections, and fold cables out of the way to their electrical outlets, and turn them on page 207). NOTICE: To connect a network cable, first plug the cable into the network device and then plug it into the computer. 12 Connect your computer and devices to avoid blocking airflow between the fan and cooling vents. 11 Replace the computer cover (see "Replacing the Computer Cover" on . 184 Mini Tower Computer Parts
1 2 3 1 power cable 3 floppy-drive connector (FLOPPY) 2 floppy-drive cable 9 Replace the bezel (see "Replacing the Bezel" on page 166). 10 Check all cable connections, and fold cables out of the way to their electrical outlets, and turn them on page 207). NOTICE: To connect a network cable, first plug the cable into the network device and then plug it into the computer. 12 Connect your computer and devices to avoid blocking airflow between the fan and cooling vents. 11 Replace the computer cover (see "Replacing the Computer Cover" on . 184 Mini Tower Computer Parts

User's Guide
Page 189
Mini Tower Computer Parts 189 1 2 3 1 power cable 3 optical drive connector 2 optical drive data cable 8 Check all cable connections, and fold cables out of the way to avoid blocking airflow between the fan and cooling vents. 9 Replace the drive panel by aligning its hinges and rotating it up until it into place. 10 Replace the bezel (see "Replacing the Bezel" on page 166). 11 Replace the computer cover (see "Replacing the Computer Cover" on page 207). NOTICE: To connect a network cable, first plug the cable into the network device and then plug it snaps into the computer.
Mini Tower Computer Parts 189 1 2 3 1 power cable 3 optical drive connector 2 optical drive data cable 8 Check all cable connections, and fold cables out of the way to avoid blocking airflow between the fan and cooling vents. 9 Replace the drive panel by aligning its hinges and rotating it up until it into place. 10 Replace the bezel (see "Replacing the Bezel" on page 166). 11 Replace the computer cover (see "Replacing the Computer Cover" on page 207). NOTICE: To connect a network cable, first plug the cable into the network device and then plug it snaps into the computer.

User's Guide
Page 203
... Computer Cover" on page 147). 3 Remove the bezel (see "Removing the Bezel" on the computer chassis. Be sure that they have had sufficient time to cool before you touch them so that secures the I/O panel. 6 Slide the I/O panel down to release the I/O panel clamp from the I/O panel clamp slot. 7 ...any of all the cables that are connected to the I/O panel from the system board. 5 Remove the screw that you can do so by moving fan blades, or other components may become very hot during normal operation. I/O Panel CAUTION: Before you begin any of the computer, be extremely careful to...
... Computer Cover" on page 147). 3 Remove the bezel (see "Removing the Bezel" on the computer chassis. Be sure that they have had sufficient time to cool before you touch them so that secures the I/O panel. 6 Slide the I/O panel down to release the I/O panel clamp from the I/O panel clamp slot. 7 ...any of all the cables that are connected to the I/O panel from the system board. 5 Remove the screw that you can do so by moving fan blades, or other components may become very hot during normal operation. I/O Panel CAUTION: Before you begin any of the computer, be extremely careful to...
User's Guide
Page 205
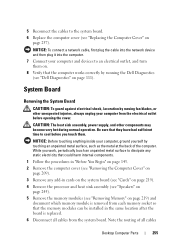
... The heat sink assembly, power supply, and other unexpected injuries, always unplug your computer, ground yourself by running the Dell Diagnostics (see "Dell Diagnostics" on page 111). Mini Tower Computer Parts 205 Be sure that the computer works correctly by touching an unpainted ...While you touch them on. 8 Verify that they have had sufficient time to cool before opening the cover. System Board Removing the System Board CAUTION: To guard against electrical shock, laceration by moving fan blades, or other components may become very hot during normal operation. NOTICE: Before...
... The heat sink assembly, power supply, and other unexpected injuries, always unplug your computer, ground yourself by running the Dell Diagnostics (see "Dell Diagnostics" on page 111). Mini Tower Computer Parts 205 Be sure that the computer works correctly by touching an unpainted ...While you touch them on. 8 Verify that they have had sufficient time to cool before opening the cover. System Board Removing the System Board CAUTION: To guard against electrical shock, laceration by moving fan blades, or other components may become very hot during normal operation. NOTICE: Before...
User's Guide
Page 220
...cardslot opening. 5 If you are replacing a card that run higher than 75 W require an additional cooling fan installed. NOTICE: PCI Express graphics cards that is already installed in your computer. Your Dell™ computer provides the following slots for PCI and PCI Express cards: • One PCI Express...Otherwise, your card could overheat and damage your computer and you are installing a graphics card that runs at 75 W or higher, Contact Dell to purchase a card fan. • If you are installing or replacing a card, follow the procedures in "Before You Begin" on page 143. 2 Remove ...
...cardslot opening. 5 If you are replacing a card that run higher than 75 W require an additional cooling fan installed. NOTICE: PCI Express graphics cards that is already installed in your computer. Your Dell™ computer provides the following slots for PCI and PCI Express cards: • One PCI Express...Otherwise, your card could overheat and damage your computer and you are installing a graphics card that runs at 75 W or higher, Contact Dell to purchase a card fan. • If you are installing or replacing a card, follow the procedures in "Before You Begin" on page 143. 2 Remove ...
User's Guide
Page 240
See the documentation that came with the drive for instructions on installing any software required for the fan and cooling vents. 8 Replace the computer cover (see "Entering System Setup" on page 257). 7 Check all cable connections, and fold cables out of the way to their ...
See the documentation that came with the drive for instructions on installing any software required for the fan and cooling vents. 8 Replace the computer cover (see "Entering System Setup" on page 257). 7 Check all cable connections, and fold cables out of the way to their ...
User's Guide
Page 253
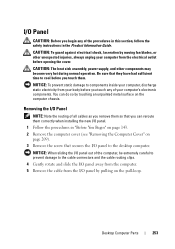
CAUTION: To guard against electrical shock, laceration by moving fan blades, or other components may become very hot during normal operation. Desktop Computer Parts 253 Removing the I/O Panel NOTE: Note the routing of all cables ... (see "Removing the Computer Cover" on the pull-loop. NOTICE: When sliding the I/O panel out of the computer, be extremely careful to prevent damage to cool before opening the cover. I/O Panel CAUTION: Before you begin any of your computer's electronic components.
CAUTION: To guard against electrical shock, laceration by moving fan blades, or other components may become very hot during normal operation. Desktop Computer Parts 253 Removing the I/O Panel NOTE: Note the routing of all cables ... (see "Removing the Computer Cover" on the pull-loop. NOTICE: When sliding the I/O panel out of the computer, be extremely careful to prevent damage to cool before opening the cover. I/O Panel CAUTION: Before you begin any of your computer's electronic components.
User's Guide
Page 255
...touch them on. 8 Verify that the computer works correctly by running the Dell Diagnostics (see "Removing the Computer Cover" on page 209). 3 Remove any static electricity that they have had sufficient time to cool before opening the cover. CAUTION: The heat sink assembly, power supply, and... other unexpected injuries, always unplug your computer and devices to an electrical outlet, and turn them . NOTICE: Before touching anything inside your computer, ground yourself by moving fan blades, or...
...touch them on. 8 Verify that the computer works correctly by running the Dell Diagnostics (see "Removing the Computer Cover" on page 209). 3 Remove any static electricity that they have had sufficient time to cool before opening the cover. CAUTION: The heat sink assembly, power supply, and... other unexpected injuries, always unplug your computer and devices to an electrical outlet, and turn them . NOTICE: Before touching anything inside your computer, ground yourself by moving fan blades, or...


