
Quick Reference Guide
Page 6
...optional Drivers and Utilities CD. What Are You Looking For? • How to remove and replace parts • Specifications • How to configure system settings • How to troubleshoot and solve problems • Service Tag and Express Service Code • Microsoft Windows License Label •... How to reinstall my operating system 6 Quick Reference Guide Find It Here Dell™ OptiPlex™ User's Guide Microsoft Windows XP Help and Support Center 1 Click Start→ Help and Support→ Dell User and System Guides→ System Guides. 2 Click the User's Guide for ...
...optional Drivers and Utilities CD. What Are You Looking For? • How to remove and replace parts • Specifications • How to configure system settings • How to troubleshoot and solve problems • Service Tag and Express Service Code • Microsoft Windows License Label •... How to reinstall my operating system 6 Quick Reference Guide Find It Here Dell™ OptiPlex™ User's Guide Microsoft Windows XP Help and Support Center 1 Click Start→ Help and Support→ Dell User and System Guides→ System Guides. 2 Click the User's Guide for ...
Quick Reference Guide
Page 7
.... 2 Type a word or phrase that describes your problem and click the arrow icon. 3 Click the topic that describes your region or business segment to support.dell.com, select your region or business segment, and enter your configuration. Computer documentation, details on the screen. Quick Reference Guide 7 What Are You Looking For? support...
.... 2 Type a word or phrase that describes your problem and click the arrow icon. 3 Click the topic that describes your region or business segment to support.dell.com, select your region or business segment, and enter your configuration. Computer documentation, details on the screen. Quick Reference Guide 7 What Are You Looking For? support...

Quick Reference Guide
Page 12
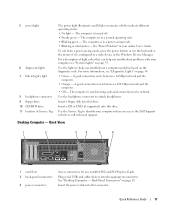
...; Blinking green - For more information, see "Diagnostic Lights" on page 34). 7 power button Press this button to turn off . • Steady green - The computer is configured as joysticks or cameras, or for bootable USB devices. NOTICE: If your operating system has ACPI enabled, when you troubleshoot a computer problem based on the...
...; Blinking green - For more information, see "Diagnostic Lights" on page 34). 7 power button Press this button to turn off . • Steady green - The computer is configured as joysticks or cameras, or for bootable USB devices. NOTICE: If your operating system has ACPI enabled, when you troubleshoot a computer problem based on the...

Quick Reference Guide
Page 14
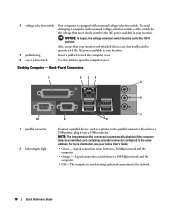
... printer, plug it into the appropriate connector. NOTE: The integrated parallel connector is automatically disabled if the computer detects an installed card containing a parallel connector configured to the parallel connector. The computer is not detecting a physical connection to operate with the AC power available in your location. 5 back-panel connectors Plug...
... printer, plug it into the appropriate connector. NOTE: The integrated parallel connector is automatically disabled if the computer detects an installed card containing a parallel connector configured to the parallel connector. The computer is not detecting a physical connection to operate with the AC power available in your location. 5 back-panel connectors Plug...
Quick Reference Guide
Page 17
... A good connection exists between a 10-Mbps network and the computer. • Orange - The computer is in your computer when you access the Dell Support website or call technical support. Plug serial, USB, and other devices into this connector. Insert the power cable into the appropriate connector. See...power-saving mode, press the power button or use the keyboard or the mouse if it is turned off. • Steady green - The computer is configured as a wake device in a power-saving mode. • Blinking or solid amber - Use the Service Tag to attach headphones. Insert a CD or...
... A good connection exists between a 10-Mbps network and the computer. • Orange - The computer is in your computer when you access the Dell Support website or call technical support. Plug serial, USB, and other devices into this connector. Insert the power cable into the appropriate connector. See...power-saving mode, press the power button or use the keyboard or the mouse if it is turned off. • Steady green - The computer is configured as a wake device in a power-saving mode. • Blinking or solid amber - Use the Service Tag to attach headphones. Insert a CD or...
Quick Reference Guide
Page 18
... exists between a 10-Mbps network and the computer. • Orange - The computer is automatically disabled if the computer detects an installed card containing a parallel connector configured to operate with a manual voltage-selection switch, set to the parallel connector. Desktop Computer - Also, ensure that your monitor and attached devices are electrically rated...
... exists between a 10-Mbps network and the computer. • Orange - The computer is automatically disabled if the computer detects an installed card containing a parallel connector configured to operate with a manual voltage-selection switch, set to the parallel connector. Desktop Computer - Also, ensure that your monitor and attached devices are electrically rated...
Quick Reference Guide
Page 31
... to test displays in system setup and is active. Quick Reference Guide 31 When the DELL logo appears, press immediately. Enter system setup (see "System Setup" in your online User's Guide for instructions), review your computer's configuration information, and ensure that appears. 6 Type 1 to start the Drivers and Utilities CD menu. 7 Type...
... to test displays in system setup and is active. Quick Reference Guide 31 When the DELL logo appears, press immediately. Enter system setup (see "System Setup" in your online User's Guide for instructions), review your computer's configuration information, and ensure that appears. 6 Type 1 to start the Drivers and Utilities CD menu. 7 Type...
Quick Reference Guide
Page 32
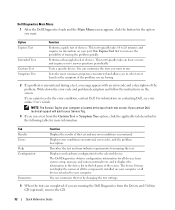
... all devices attached to increase the possibility of the test and any error conditions encountered. The Dell Diagnostics obtains configuration information for the selected device. Tab Results Errors Help Configuration Parameters Function Displays the results of tracing the problem quickly. For information on the symptom of the problem you to run a test from...
... all devices attached to increase the possibility of the test and any error conditions encountered. The Dell Diagnostics obtains configuration information for the selected device. Tab Results Errors Help Configuration Parameters Function Displays the results of tracing the problem quickly. For information on the symptom of the problem you to run a test from...

Quick Reference Guide
Page 33
...No corrective action is identified. Also, check Diagnostic Lights to the Main Menu screen. problem is required. For information on contacting Dell, see your online User's Guide. 5 Close the test screen to return to see if the specific problem is identified. Blinking...the specific problem is identified. Blinks green several A configuration error exists. If the computer does not boot, contact Dell for technical assistance. For information on contacting Dell, see your online User's Guide. To exit the Dell Diagnostics and restart the computer, close the Main Menu...
...No corrective action is identified. Also, check Diagnostic Lights to the Main Menu screen. problem is required. For information on contacting Dell, see your online User's Guide. 5 Close the test screen to return to see if the specific problem is identified. Blinking...the specific problem is identified. Blinks green several A configuration error exists. If the computer does not boot, contact Dell for technical assistance. For information on contacting Dell, see your online User's Guide. To exit the Dell Diagnostics and restart the computer, close the Main Menu...

Quick Reference Guide
Page 36
... are compatible with your online User's Guide. For information on contacting Dell, see your online User's Guide. For information on contacting Dell, see your online User's Guide. If the computer starts normally, reinstall an additional module. Memory modules are detected, but a memory configuration or compatibility error exists. • Ensure that no special memory...
... are compatible with your online User's Guide. For information on contacting Dell, see your online User's Guide. For information on contacting Dell, see your online User's Guide. If the computer starts normally, reinstall an additional module. Memory modules are detected, but a memory configuration or compatibility error exists. • Ensure that no special memory...
Quick Reference Guide
Page 37
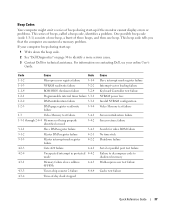
... Beep Codes Your computer might emit a series of beeps during start -up : 1 Write down the beep code. 2 See "Dell Diagnostics" on contacting Dell, see your computer beeps during start -up if the monitor cannot display errors or problems. This series of beeps, called a beep... clock stopped Cause Slave interrupt mask register failure Interrupt vector loading failure Keyboard Controller test failure NVRAM power loss Invalid NVRAM configuration Video Memory test failure Screen initialization failure Screen retrace failure Search for video ROM failure No timer tick Shutdown failure Serial ...
... Beep Codes Your computer might emit a series of beeps during start -up : 1 Write down the beep code. 2 See "Dell Diagnostics" on contacting Dell, see your computer beeps during start -up if the monitor cannot display errors or problems. This series of beeps, called a beep... clock stopped Cause Slave interrupt mask register failure Interrupt vector loading failure Keyboard Controller test failure NVRAM power loss Invalid NVRAM configuration Video Memory test failure Screen initialization failure Screen retrace failure Search for video ROM failure No timer tick Shutdown failure Serial ...

Quick Reference Guide
Page 38
... the Start button, point to All Programs→ Accessories→ System Tools, and then click System Restore. 2 Ensure that restore point is detected but incorrectly configured, you prefer. 38 Quick Reference Guide The Select a Restore Point screen provides a calendar that you can use the Hardware Troubleshooter to resolve the incompatibility. 1 Click...
... the Start button, point to All Programs→ Accessories→ System Tools, and then click System Restore. 2 Ensure that restore point is detected but incorrectly configured, you prefer. 38 Quick Reference Guide The Select a Restore Point screen provides a calendar that you can use the Hardware Troubleshooter to resolve the incompatibility. 1 Click...

Quick Reference Guide
Page 40
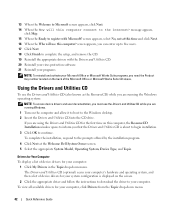
...before you need the following sections in the order in which the new driver was in the following items: • Dell Operating System CD • Dell Drivers and Utilities CD To reinstall Windows XP, perform all data files on your primary hard drive. Use the Drivers and...Pack 1 or later when you reinstall Windows XP. For conventional hard drive configurations, the primary hard drive is the first drive detected by the computer. Therefore, do not reinstall Windows XP unless a Dell technical support representative instructs you must use System Restore to return your operating system...
...before you need the following sections in the order in which the new driver was in the following items: • Dell Operating System CD • Dell Drivers and Utilities CD To reinstall Windows XP, perform all data files on your primary hard drive. Use the Drivers and...Pack 1 or later when you reinstall Windows XP. For conventional hard drive configurations, the primary hard drive is the first drive detected by the computer. Therefore, do not reinstall Windows XP unless a Dell technical support representative instructs you must use System Restore to return your operating system...

Quick Reference Guide
Page 41
...the speed of your computer. NOTICE: Do not press any key when the following message appears: Press any key. 4 Press immediately after the DELL logo appears. If the operating system logo appears, wait until you are reinstalling Windows XP Professional and you want to recover your selections. The ...-ROM, and press . 6 When the Press any key to boot from CD message appears, press any key to provide further information regarding your network configuration, enter your current Windows XP data, type r to select the repair option, and remove the CD. 4 If you are prompted to boot from ...
...the speed of your computer. NOTICE: Do not press any key when the following message appears: Press any key. 4 Press immediately after the DELL logo appears. If the operating system logo appears, wait until you are reinstalling Windows XP Professional and you want to recover your selections. The ...-ROM, and press . 6 When the Press any key to boot from CD message appears, press any key to provide further information regarding your network configuration, enter your current Windows XP data, type r to select the repair option, and remove the CD. 4 If you are prompted to boot from ...
Quick Reference Guide
Page 42
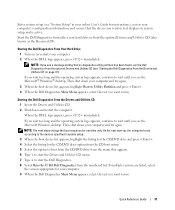
... to complete the setup, and remove the CD. 19 Reinstall the appropriate drivers with Microsoft? To view all available drivers for your system configuration is displayed on the back of the Microsoft Office or Microsoft Works Suite CD sleeve. 13 When the Welcome to Microsoft screen appears, click... this time and click Next. 16 When the Who will this computer connect to the Internet? screen appears, select No, not at the Welcome Dell System Owner screen. 5 Select the appropriate System Model, Operating System, Device Type, and Topic. If you are running the Windows operating system: NOTE...
... to complete the setup, and remove the CD. 19 Reinstall the appropriate drivers with Microsoft? To view all available drivers for your system configuration is displayed on the back of the Microsoft Office or Microsoft Works Suite CD sleeve. 13 When the Welcome to Microsoft screen appears, click... this time and click Next. 16 When the Who will this computer connect to the Internet? screen appears, select No, not at the Welcome Dell System Owner screen. 5 Select the appropriate System Model, Operating System, Device Type, and Topic. If you are running the Windows operating system: NOTE...

User Guide
Page 2
It supports instrumentation that uses IT Assistant. Back to Contents Page Advanced Features Dell™ OptiPlex™ 320 User's Guide LegacySelect Technology Control Manageability Security Password Protection System Setup Booting to a USB Device Clearing Forgotten Passwords... documentation that it . NOTE: Before you purchase an antitheft device, make sure that comes with the padlock ring. IT Assistant manages assets, configurations, events (alerts), and security for your computer: l Use a padlock alone or a padlock and looped security cable with the device contains ...
It supports instrumentation that uses IT Assistant. Back to Contents Page Advanced Features Dell™ OptiPlex™ 320 User's Guide LegacySelect Technology Control Manageability Security Password Protection System Setup Booting to a USB Device Clearing Forgotten Passwords... documentation that it . NOTE: Before you purchase an antitheft device, make sure that comes with the padlock ring. IT Assistant manages assets, configurations, events (alerts), and security for your computer: l Use a padlock alone or a padlock and looped security cable with the device contains ...
User Guide
Page 5
...unauthorized changes. or right-arrow key to highlight an option. Entering System Setup 1. System Setup Screens The system setup screen displays current or changeable configuration information for future reference. To assign a new administrator password, perform the steps in conjunction with Admin Password to your current settings and make that... l To read the current amount of your computer. Type the administrator password at the prompt. 3. Turn on the left - When the blue DELL™ logo appears, press immediately. Then shut down arrow keys.
...unauthorized changes. or right-arrow key to highlight an option. Entering System Setup 1. System Setup Screens The system setup screen displays current or changeable configuration information for future reference. To assign a new administrator password, perform the steps in conjunction with Admin Password to your current settings and make that... l To read the current amount of your computer. Type the administrator password at the prompt. 3. Turn on the left - When the blue DELL™ logo appears, press immediately. Then shut down arrow keys.
User Guide
Page 7
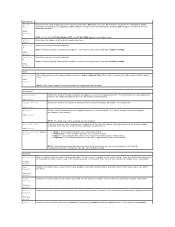
...valid Admin (On default) LPT Port Mode (PS/2 default) Determines the mode of operation of some applications improves with additional logical processors. AT configures the port for PS/2 compatibility. LPT Port Address Serial Port #1 (Auto default) Serial Port #2 (Auto default) NOTE: If you to verify...or two logical processors. Off disables the port. Your computer does not test or change the current acoustics mode setting. PS/2 configures the port for AT compatibility. Enables Intel® SpeedStep® for all supported processors in parallel port uses. Security Unlock Setup...
...valid Admin (On default) LPT Port Mode (PS/2 default) Determines the mode of operation of some applications improves with additional logical processors. AT configures the port for PS/2 compatibility. LPT Port Address Serial Port #1 (Auto default) Serial Port #2 (Auto default) NOTE: If you to verify...or two logical processors. Off disables the port. Your computer does not test or change the current acoustics mode setting. PS/2 configures the port for AT compatibility. Enables Intel® SpeedStep® for all supported processors in parallel port uses. Security Unlock Setup...

User Guide
Page 13
... Page Battery Dell™ OptiPlex™ 320 User's Guide... CAUTION: Before you begin any of your desktop computer, see System Board Components). The battery may damage the system board by prying off the socket or by pressing down firmly on , and enter system setup (see Entering System Setup). Ensure that the object is turned off your configuration... the electrical outlet for your computer's electronic components. A coin-cell battery maintains computer configuration, date, and time information. If the date and time are not correct in Before...
... Page Battery Dell™ OptiPlex™ 320 User's Guide... CAUTION: Before you begin any of your desktop computer, see System Board Components). The battery may damage the system board by prying off the socket or by pressing down firmly on , and enter system setup (see Entering System Setup). Ensure that the object is turned off your configuration... the electrical outlet for your computer's electronic components. A coin-cell battery maintains computer configuration, date, and time information. If the date and time are not correct in Before...

User Guide
Page 19
Back to Contents Page Connecting Multiple Monitors Dell™ OptiPlex™ 320 User's Guide Before Connecting Mutiple Monitors or a Monitor and a Television to Your Computer Connecting Two to Three Monitors Using Surround View Connecting Dual Monitors ...connector on one monitor, ensure that you have an optional graphics card. Follow the procedures in Before You Begin. 2. See the documentation that you properly configure and connect the TV. For a desktop computer, see Back-Panel Connectors. You may connect only one monitor and a television. 1. Follow the procedures in...
Back to Contents Page Connecting Multiple Monitors Dell™ OptiPlex™ 320 User's Guide Before Connecting Mutiple Monitors or a Monitor and a Television to Your Computer Connecting Two to Three Monitors Using Surround View Connecting Dual Monitors ...connector on one monitor, ensure that you have an optional graphics card. Follow the procedures in Before You Begin. 2. See the documentation that you properly configure and connect the TV. For a desktop computer, see Back-Panel Connectors. You may connect only one monitor and a television. 1. Follow the procedures in...


