
User Guide
Page 4
Using the Control Panel 18 Using the Remote Control 21 Installing the Remote Control Batteries 24 Operating Range With Remote Control 25 Using the On-Screen Display 26 Main Menu 26 AUTO-ADJUST 26 INPUT SELECT 27 PICTURE (in PC Mode 28 PICTURE (in Video Mode 28 DISPLAY (in PC Mode 30 DISPLAY (in Video Mode 31 LAMP 32 SET UP 32 INFORMATION 34 OTHERS 34 4 Troubleshooting Your Projector 41 Guiding Signals 45 Changing the Lamp 47 5 Specifications 49 6 Contacting Dell 53 7 Appendix: Glossary 54 4 Contents
Using the Control Panel 18 Using the Remote Control 21 Installing the Remote Control Batteries 24 Operating Range With Remote Control 25 Using the On-Screen Display 26 Main Menu 26 AUTO-ADJUST 26 INPUT SELECT 27 PICTURE (in PC Mode 28 PICTURE (in Video Mode 28 DISPLAY (in PC Mode 30 DISPLAY (in Video Mode 31 LAMP 32 SET UP 32 INFORMATION 34 OTHERS 34 4 Troubleshooting Your Projector 41 Guiding Signals 45 Changing the Lamp 47 5 Specifications 49 6 Contacting Dell 53 7 Appendix: Glossary 54 4 Contents
User Guide
Page 5
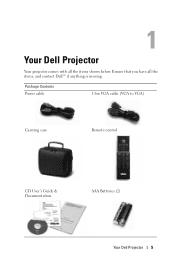
Package Contents Power cable 1.8m VGA cable (VGA to VGA) Carrying case Remote control CD User's Guide & Documentation AAA Batteries (2) Your Dell Projector 5 1 Your Dell Projector Your projector comes with all the items, and contact Dell™ if anything is missing. Ensure that you have all the items shown below.
Package Contents Power cable 1.8m VGA cable (VGA to VGA) Carrying case Remote control CD User's Guide & Documentation AAA Batteries (2) Your Dell Projector 5 1 Your Dell Projector Your projector comes with all the items, and contact Dell™ if anything is missing. Ensure that you have all the items shown below.
User Guide
Page 9
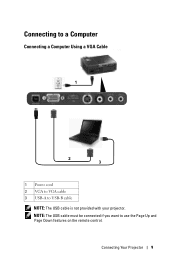
Connecting to a Computer Connecting a Computer Using a VGA Cable 1 2 3 1 Power cord 2 VGA to VGA cable 3 USB-A to use the Page Up and Page Down features on the remote control. NOTE: The USB cable must be connected if you want to USB-B cable NOTE: The USB cable is not provided with your projector. Connecting Your Projector 9
Connecting to a Computer Connecting a Computer Using a VGA Cable 1 2 3 1 Power cord 2 VGA to VGA cable 3 USB-A to use the Page Up and Page Down features on the remote control. NOTE: The USB cable must be connected if you want to USB-B cable NOTE: The USB cable is not provided with your projector. Connecting Your Projector 9
User Guide
Page 14
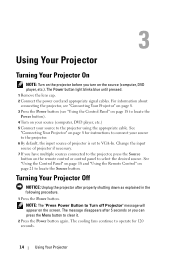
See "Connecting Your Projector" on page 21 to locate the Source button. See "Using the Control Panel" on page 18 and "Using the Remote Control" on page 8 for 120 seconds. 14 Using Your Projector The message disappears after properly shutting down as explained in the following procedure. 1 Press ... of projector is set to VGA-In. 3 Using Your Projector Turning Your Projector On NOTE: Turn on the projector before you turn on the remote control or control panel to select the desired source. The Power button light blinks blue until pressed. 1 Remove the lens cap. 2 Connect the power cord and...
See "Connecting Your Projector" on page 21 to locate the Source button. See "Using the Control Panel" on page 18 and "Using the Remote Control" on page 8 for 120 seconds. 14 Using Your Projector The message disappears after properly shutting down as explained in the following procedure. 1 Press ... of projector is set to VGA-In. 3 Using Your Projector Turning Your Projector On NOTE: Turn on the projector before you turn on the remote control or control panel to select the desired source. The Power button light blinks blue until pressed. 1 Remove the lens cap. 2 Connect the power cord and...
User Guide
Page 19
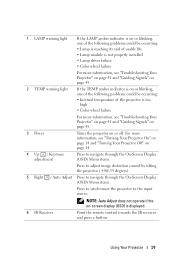
... indicator is on or blinking, one of the following problems could be occurring: • Internal temperature of the projector is displayed. 6 IR Receiver Point the remote control towards the IR receiver and press a button. Using Your Projector 19 NOTE: Auto Adjust does not operate if the on-screen display (OSD) is too...
... indicator is on or blinking, one of the following problems could be occurring: • Internal temperature of the projector is displayed. 6 IR Receiver Point the remote control towards the IR receiver and press a button. Using Your Projector 19 NOTE: Auto Adjust does not operate if the on-screen display (OSD) is too...
User Guide
Page 21
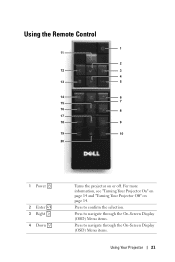
Press to navigate through the On-Screen Display (OSD) Menu items. Press to confirm the selection. Using the Remote Control 1 11 2 12 3 4 13 5 14 6 15 7 16 8 17 18 9 19 10 20 1 Power 2 Enter 3 Right 4 Down Turns the projector on page 14. Press to navigate through the On-Screen Display (OSD) Menu items. Using Your Projector 21 For more information, see "Turning Your Projector On" on page 14 and "Turning Your Projector Off" on or off.
Press to navigate through the On-Screen Display (OSD) Menu items. Press to confirm the selection. Using the Remote Control 1 11 2 12 3 4 13 5 14 6 15 7 16 8 17 18 9 19 10 20 1 Power 2 Enter 3 Right 4 Down Turns the projector on page 14. Press to navigate through the On-Screen Display (OSD) Menu items. Using Your Projector 21 For more information, see "Turning Your Projector On" on page 14 and "Turning Your Projector Off" on or off.
User Guide
Page 22
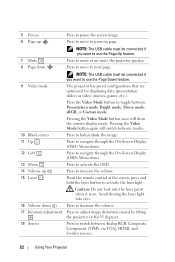
... the laser point when it is on. 5 Freeze Press to pause the screen image. 6 Page up Press to increase the volume. 15 Laser Point the remote control at the screen, press and hold the laser button to next page. NOTE: The USB cable must be connected if you want to use the...
... the laser point when it is on. 5 Freeze Press to pause the screen image. 6 Page up Press to increase the volume. 15 Laser Point the remote control at the screen, press and hold the laser button to next page. NOTE: The USB cable must be connected if you want to use the...
User Guide
Page 24
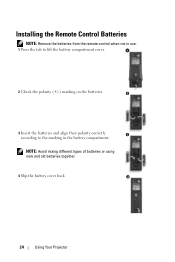
NOTE: Avoid mixing different types of batteries or using new and old batteries together. 4 Slip the battery cover back. 4 24 Using Your Projector Installing the Remote Control Batteries NOTE: Remove the batteries from the remote control when not in use. 1 Press the tab to lift the battery compartment cover. 1 2 Check the polarity (+/-) marking on the batteries. 2 3 Insert the batteries and align their polarity correctly 3 according to the marking in the battery compartment.
NOTE: Avoid mixing different types of batteries or using new and old batteries together. 4 Slip the battery cover back. 4 24 Using Your Projector Installing the Remote Control Batteries NOTE: Remove the batteries from the remote control when not in use. 1 Press the tab to lift the battery compartment cover. 1 2 Check the polarity (+/-) marking on the batteries. 2 3 Insert the batteries and align their polarity correctly 3 according to the marking in the battery compartment.
User Guide
Page 25
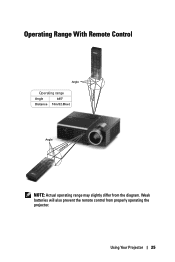
Operating Range With Remote Control Distance Angle Operating range Angle ±45° Distance 10m/32.8feet Angle Distance NOTE: Actual operating range may slightly differ from properly operating the projector. Weak batteries will also prevent the remote control from the diagram. Using Your Projector 25
Operating Range With Remote Control Distance Angle Operating range Angle ±45° Distance 10m/32.8feet Angle Distance NOTE: Actual operating range may slightly differ from properly operating the projector. Weak batteries will also prevent the remote control from the diagram. Using Your Projector 25
User Guide
Page 26
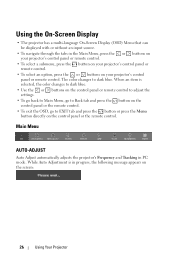
...projector's Frequency and Tracking in the Main Menu, press the or buttons on your projector's control panel or remote control. • To select a submenu, press the button on your projector's control panel or remote control. Using the On-Screen Display • The projector has a multi-language On-Screen ...tab and press the button or press the Menu button directly on your projector's control panel or remote control. • To select an option, press the or buttons on the control panel or the remote control. While Auto Adjustment is selected, the color changes to dark blue. •...
...projector's Frequency and Tracking in the Main Menu, press the or buttons on your projector's control panel or remote control. • To select a submenu, press the button on your projector's control panel or remote control. Using the On-Screen Display • The projector has a multi-language On-Screen ...tab and press the button or press the Menu button directly on your projector's control panel or remote control. • To select an option, press the or buttons on the control panel or the remote control. While Auto Adjustment is selected, the color changes to dark blue. •...
User Guide
Page 35
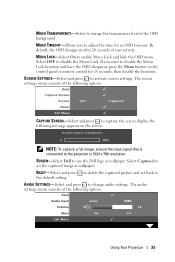
... on the screen. By default, the OSD disappears after 20 seconds of the OSD background. SCREEN-Select Dell to use the Dell logo as wallpaper. The audio settings menu consists of the following options: CAPTURE SCREEN-Select and press to... capture the screen display, the following options: Using Your Projector 35 MENU TRANSPARENCY-Select to change audio settings. The screen settings menu consists of the following message appears on the control panel or remote control...
... on the screen. By default, the OSD disappears after 20 seconds of the OSD background. SCREEN-Select Dell to use the Dell logo as wallpaper. The audio settings menu consists of the following options: CAPTURE SCREEN-Select and press to... capture the screen display, the following options: Using Your Projector 35 MENU TRANSPARENCY-Select to change audio settings. The screen settings menu consists of the following message appears on the control panel or remote control...
User Guide
Page 42
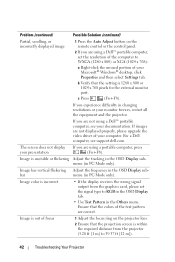
...ft [1 m] to 39.37 ft [12 m]). 42 Troubleshooting Your Projector If you experience difficulty in the OSD Display sub- For a Dell computer, see your documentation. b Verify that the projection screen is within the required distance from the graphics card, please set the resolution of... 800 or 1024 x 768 pixels for the external monitor port. Ensure that the colors of focus 1 Adjust the focus ring on the remote control or the control panel. 2 If you are using a portable computer, press your Microsoft® Windows® desktop, click Properties and then select Settings ...
...ft [1 m] to 39.37 ft [12 m]). 42 Troubleshooting Your Projector If you experience difficulty in the OSD Display sub- For a Dell computer, see your documentation. b Verify that the projection screen is within the required distance from the graphics card, please set the resolution of... 800 or 1024 x 768 pixels for the external monitor port. Ensure that the colors of focus 1 Adjust the focus ring on the remote control or the control panel. 2 If you are using a portable computer, press your Microsoft® Windows® desktop, click Properties and then select Settings ...
User Guide
Page 44
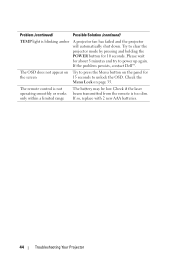
...the projector mode by pressing and holding the POWER button for about 5 minutes and try to power up again. If the problem persists, contact Dell™. Check the Menu Lock on the panel for the screen 15 seconds to press the Menu button on page 35. If so, replace ... Problem (continued) Possible Solution (continued) TEMP light is not operating smoothly or works only within a limited range The battery may be low. The remote control is blinking amber A projector fan has failed and the projector will automatically shut down. The OSD does not appear on Try to unlock the OSD...
...the projector mode by pressing and holding the POWER button for about 5 minutes and try to power up again. If the problem persists, contact Dell™. Check the Menu Lock on the panel for the screen 15 seconds to press the Menu button on page 35. If so, replace ... Problem (continued) Possible Solution (continued) TEMP light is not operating smoothly or works only within a limited range The battery may be low. The remote control is blinking amber A projector fan has failed and the projector will automatically shut down. The OSD does not appear on Try to unlock the OSD...
User Guide
Page 57
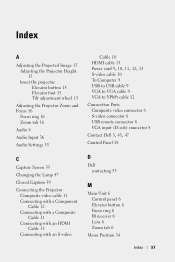
...9 VGA to VGA cable 9 VGA to YPbPr cable 12 Connection Ports Composite video connector 8 S-video connector 8 USB remote connector 8 VGA input (D-sub) connector 8 Contact Dell 5, 43, 47 Control Panel 18 C Capture Screen 35 Changing the Lamp 47 Closed Caption 39 Connecting the Projector Composite video cable 11 Connecting with... a Component Cable 12 Connecting with a Composite Cable 11 Connecting with an HDMI Cable 13 Connecting with an S-video D Dell contacting 53 M Main Unit 6 Control panel 6 Elevator button 6 Focus ring 6 IR receiver 6 Lens 6 Zoom tab 6 Menu Position 34 Index 57
...9 VGA to VGA cable 9 VGA to YPbPr cable 12 Connection Ports Composite video connector 8 S-video connector 8 USB remote connector 8 VGA input (D-sub) connector 8 Contact Dell 5, 43, 47 Control Panel 18 C Capture Screen 35 Changing the Lamp 47 Closed Caption 39 Connecting the Projector Composite video cable 11 Connecting with... a Component Cable 12 Connecting with a Composite Cable 11 Connecting with an HDMI Cable 13 Connecting with an S-video D Dell contacting 53 M Main Unit 6 Control panel 6 Elevator button 6 Focus ring 6 IR receiver 6 Lens 6 Zoom tab 6 Menu Position 34 Index 57
User Guide
Page 58
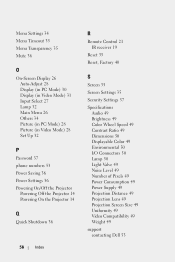
... Saving 36 Power Settings 36 Powering On/Off the Projector Powering Off the Projector 14 Powering On the Projector 14 Q Quick Shutdown 36 58 Index R Remote Control 21 IR receiver 19 Reset 35 Reset, Factory 40 S Screen 35 Screen Settings 35 Security Settings 37 Specifications Audio 49 Brightness 49 Color Wheel Speed... Power Consumption 49 Power Supply 49 Projection Distance 49 Projection Lens 49 Projection Screen Size 49 Uniformity 49 Video Compatibility 49 Weight 49 support contacting Dell 53
... Saving 36 Power Settings 36 Powering On/Off the Projector Powering Off the Projector 14 Powering On the Projector 14 Q Quick Shutdown 36 58 Index R Remote Control 21 IR receiver 19 Reset 35 Reset, Factory 40 S Screen 35 Screen Settings 35 Security Settings 37 Specifications Audio 49 Brightness 49 Color Wheel Speed... Power Consumption 49 Power Supply 49 Projection Distance 49 Projection Lens 49 Projection Screen Size 49 Uniformity 49 Video Compatibility 49 Weight 49 support contacting Dell 53


