
User Guide
Page 4
Adjusting the Projector Focus 20 Adjusting Projection Image Size 21 Using the Control Panel 23 Installing the Remote Control Battery (Optional) . . . . 27 Operating Range with Remote Control 28 Using the On-Screen Display 29 INPUT SOURCE 29 AUTO ADJUST 30 VIDEO MODE 31 VOLUME 31 AUDIO INPUT 31 ADVANCED SETTINGS 32 ... Multi-Media SETUP for USB, Micro SD, and Internal Memory 50 PHOTO SETUP 50 VIDEO SETUP 51 MUSIC SETUP 51 FIRMWARE UPDATE 52 4 Troubleshooting Your Projector 53 Guiding Signals 56 4 Contents
Adjusting the Projector Focus 20 Adjusting Projection Image Size 21 Using the Control Panel 23 Installing the Remote Control Battery (Optional) . . . . 27 Operating Range with Remote Control 28 Using the On-Screen Display 29 INPUT SOURCE 29 AUTO ADJUST 30 VIDEO MODE 31 VOLUME 31 AUDIO INPUT 31 ADVANCED SETTINGS 32 ... Multi-Media SETUP for USB, Micro SD, and Internal Memory 50 PHOTO SETUP 50 VIDEO SETUP 51 MUSIC SETUP 51 FIRMWARE UPDATE 52 4 Troubleshooting Your Projector 53 Guiding Signals 56 4 Contents
User Guide
Page 18
...the Source button on page 10 for 120 seconds. 18 Using Your Projector See "Connecting Your Projector" on the remote control or control panel to locate the Source button. Change the input source of the projector is set to the projector using the appropriate cable. See "Using the Control Panel" on page ...23 and "Using the Remote Control (Optional)" on the screen. NOTE: The "Press Power Button to operate for ...
...the Source button on page 10 for 120 seconds. 18 Using Your Projector See "Connecting Your Projector" on the remote control or control panel to locate the Source button. Change the input source of the projector is set to the projector using the appropriate cable. See "Using the Control Panel" on page ...23 and "Using the Remote Control (Optional)" on the screen. NOTE: The "Press Power Button to operate for ...

User Guide
Page 25
...through the On-Screen Display (OSD) Menu items. Press to mute or un-mute the projector speaker. Using Your Projector 25 Press to activate the OSD. Press to switch between Analog RGB, Composite, and HDMI source. Using the Remote Control (Optional) 1 11 2 12 3 13 4 14 5 15 6 16 7 ...17 8 18 9 19 10 20 1 LED light 2 Source 3 Auto adjust 4 Up 5 Left 6 Enter 7 Menu 8 Down 9 Mute LED indicator. Press to synchronize the projector with the input source.
...through the On-Screen Display (OSD) Menu items. Press to mute or un-mute the projector speaker. Using Your Projector 25 Press to activate the OSD. Press to switch between Analog RGB, Composite, and HDMI source. Using the Remote Control (Optional) 1 11 2 12 3 13 4 14 5 15 6 16 7 ...17 8 18 9 19 10 20 1 LED light 2 Source 3 Auto adjust 4 Up 5 Left 6 Enter 7 Menu 8 Down 9 Mute LED indicator. Press to synchronize the projector with the input source.

User Guide
Page 27
CR2303V2OL TS 3 Replace the battery holder. M CR2302V5OL TS Using Your Projector 27 Installing the Remote Control Battery (Optional) 1 Remove the battery holder by holding down the side release firmly and pulling out the battery holder. NOTE: When you use . Remove the sheet before use the remote control for the first time, there is a plastic sheet between the battery and its contact. TS 2 Insert a CR2032 coin cell battery and align the polarity correctly according to the marking CR2303V2OL in the battery holder.
CR2303V2OL TS 3 Replace the battery holder. M CR2302V5OL TS Using Your Projector 27 Installing the Remote Control Battery (Optional) 1 Remove the battery holder by holding down the side release firmly and pulling out the battery holder. NOTE: When you use . Remove the sheet before use the remote control for the first time, there is a plastic sheet between the battery and its contact. TS 2 Insert a CR2032 coin cell battery and align the polarity correctly according to the marking CR2303V2OL in the battery holder.

User Guide
Page 28
Operating Range with Remote Control Operating range Angle ±20° Distance 7 m/22.97 feet Angle Distance NOTE: Actual operating range may slightly differ from properly operating the projector. 28 Using Your Projector Weak battery will also prevent the remote control from the diagram.
Operating Range with Remote Control Operating range Angle ±20° Distance 7 m/22.97 feet Angle Distance NOTE: Actual operating range may slightly differ from properly operating the projector. 28 Using Your Projector Weak battery will also prevent the remote control from the diagram.
User Guide
Page 29
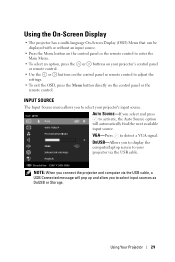
...select an option, press the or buttons on your projector's control panel or remote control. • Use the or buttons on the control panel or remote control to detect a VGA signal. AUTO SOURCE-If you to your projector's input source. Using Your Projector 29 DOUSB-Allows you to display the computer/laptop ...To exit the OSD, press the Menu button directly on the control panel or the remote control. NOTE: When you to activate, the Auto Source option will pop up and allow you connect the projector and computer via the USB cable. INPUT SOURCE The Input Source menu allows you select ...
...select an option, press the or buttons on your projector's control panel or remote control. • Use the or buttons on the control panel or remote control to detect a VGA signal. AUTO SOURCE-If you to your projector's input source. Using Your Projector 29 DOUSB-Allows you to display the computer/laptop ...To exit the OSD, press the Menu button directly on the control panel or the remote control. NOTE: When you to activate, the Auto Source option will pop up and allow you connect the projector and computer via the USB cable. INPUT SOURCE The Input Source menu allows you select ...

User Guide
Page 38
... security feature will be asked to disable the Menu Lock function and have the OSD disappear, press the Menu button on the control panel or remote control for 15 seconds, then disable the function. MENU SETTINGS-Select and press to enable Menu Lock and hide the OSD menu. If you enable... this feature, you want to enter the projector's password after 20 seconds of the OSD background. Select OFF to adjust the time for the projector is inserted into the electrical outlet and the power for an OSD timeout. You can enable this...
... security feature will be asked to disable the Menu Lock function and have the OSD disappear, press the Menu button on the control panel or remote control for 15 seconds, then disable the function. MENU SETTINGS-Select and press to enable Menu Lock and hide the OSD menu. If you enable... this feature, you want to enter the projector's password after 20 seconds of the OSD background. Select OFF to adjust the time for the projector is inserted into the electrical outlet and the power for an OSD timeout. You can enable this...

User Guide
Page 54
...Ensure that the setting is 1280 x 800 pixels for the external monitor port. For a Dell computer, see your monitor freezes, restart all the equipment and the projector. Problem (continued) Possible Solution (continued) Partial, scrolling, or incorrectly displayed image 1 Press ...the Auto Adjust button on the remote control or the control panel. 2 If you are using a Dell™ portable computer, set the signal type...
...Ensure that the setting is 1280 x 800 pixels for the external monitor port. For a Dell computer, see your monitor freezes, restart all the equipment and the projector. Problem (continued) Possible Solution (continued) Partial, scrolling, or incorrectly displayed image 1 Press ...the Auto Adjust button on the remote control or the control panel. 2 If you are using a Dell™ portable computer, set the signal type...

User Guide
Page 55
... the aspect ratio in the OSD. If the problem persists, contact Dell™. The remote control is stretched when displaying a 16:9 DVD The projector automatically detects the input signal format. Check if the LED indication from the projector (3.18 ft [97 cm] to input signal format with a new... CR2032 battery. The image is not operating smoothly or works only within the required distance from the remote is blinking amber If the projector fan fails, the projector will maintain the aspect ratio of the projected image according to 8.48 ft [258 cm]). It will automatically...
... the aspect ratio in the OSD. If the problem persists, contact Dell™. The remote control is stretched when displaying a 16:9 DVD The projector automatically detects the input signal format. Check if the LED indication from the projector (3.18 ft [97 cm] to input signal format with a new... CR2032 battery. The image is not operating smoothly or works only within the required distance from the remote is blinking amber If the projector fan fails, the projector will maintain the aspect ratio of the projected image according to 8.48 ft [258 cm]). It will automatically...

User Guide
Page 66
P Password 38 phone numbers 61 Power Saving 41 Power Settings 41 Powering On/Off the Projector Powering Off the Projector 18 Powering On the Projector 18 R Remote Control 25 Reset, Factory 37 S Specifications Audio 58 Brightness 57 Contrast Ratio 57 Dimensions 58 Displayable Color 57 Environmental 58 I/O Connectors 58 Internal Flash 57 ... 57 Power Supply 57 Projection Distance 57 Projection Lens 57 Projection Screen Size 57 Uniformity 57 66 Index Video Compatibility 57 Weight 58 support contacting Dell 61 T telephone numbers 61 Test Pattern 36 Troubleshooting 53 Contact...
P Password 38 phone numbers 61 Power Saving 41 Power Settings 41 Powering On/Off the Projector Powering Off the Projector 18 Powering On the Projector 18 R Remote Control 25 Reset, Factory 37 S Specifications Audio 58 Brightness 57 Contrast Ratio 57 Dimensions 58 Displayable Color 57 Environmental 58 I/O Connectors 58 Internal Flash 57 ... 57 Power Supply 57 Projection Distance 57 Projection Lens 57 Projection Screen Size 57 Uniformity 57 66 Index Video Compatibility 57 Weight 58 support contacting Dell 61 T telephone numbers 61 Test Pattern 36 Troubleshooting 53 Contact...


