
User Guide
Page 6
Ensure that you have all the items shown below. Package Contents Power cable Universal 24-pin to VGA cable CD User's Guide and Documentation Carrying case Informacion Importante DellTM M110/QMu1i1c0kHSDetPurpojGecutiodre DOCOMENTATION DellTM M110/M110HD Projector oduct IDneflol TrM PmroajteicotnorGs uide AC adapter 6 Your Dell Projector 1 Your Dell Projector Your projector comes with all the items, and contact Dell™ if anything is missing.
Ensure that you have all the items shown below. Package Contents Power cable Universal 24-pin to VGA cable CD User's Guide and Documentation Carrying case Informacion Importante DellTM M110/QMu1i1c0kHSDetPurpojGecutiodre DOCOMENTATION DellTM M110/M110HD Projector oduct IDneflol TrM PmroajteicotnorGs uide AC adapter 6 Your Dell Projector 1 Your Dell Projector Your projector comes with all the items, and contact Dell™ if anything is missing.

User Guide
Page 11
Connecting to a Computer Connecting a Computer Using a VGA Cable 2 3 1 1 Power cord 2 AC adapter 3 Universal 24-pin to VGA cable NOTE: Only one universal 24-pin to VGA and Audio out cable can be purchased on the Dell website at www.dell.com. Connecting Your Projector 11 An additional universal 24-pin to VGA cable or 24-pin to VGA cable is shipped with your projector.
Connecting to a Computer Connecting a Computer Using a VGA Cable 2 3 1 1 Power cord 2 AC adapter 3 Universal 24-pin to VGA cable NOTE: Only one universal 24-pin to VGA and Audio out cable can be purchased on the Dell website at www.dell.com. Connecting Your Projector 11 An additional universal 24-pin to VGA cable or 24-pin to VGA cable is shipped with your projector.

User Guide
Page 12
MOLEX MOLEX Connecting a Computer by USB Cable 2 3 1 1 Power cord 2 AC adapter 3 USB-A to A) cable is not shipped with your projector. The USB (USB A to USB-A cable NOTE: Plug and Play. You can purchase the USB (USB A to A) cable on the Dell website at www.dell.com. 12 Connecting Your Projector
MOLEX MOLEX Connecting a Computer by USB Cable 2 3 1 1 Power cord 2 AC adapter 3 USB-A to A) cable is not shipped with your projector. The USB (USB A to USB-A cable NOTE: Plug and Play. You can purchase the USB (USB A to A) cable on the Dell website at www.dell.com. 12 Connecting Your Projector
User Guide
Page 14
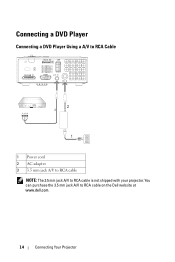
Connecting a DVD Player Connecting a DVD Player Using a A/V to RCA Cable 2 3 1 1 Power cord 2 AC adapter 3 3.5 mm jack A/V to RCA cable NOTE: The 3.5 mm jack A/V to RCA cable on the Dell website at www.dell.com. 14 Connecting Your Projector You can purchase the 3.5 mm jack A/V to RCA cable is not shipped with your projector.
Connecting a DVD Player Connecting a DVD Player Using a A/V to RCA Cable 2 3 1 1 Power cord 2 AC adapter 3 3.5 mm jack A/V to RCA cable NOTE: The 3.5 mm jack A/V to RCA cable on the Dell website at www.dell.com. 14 Connecting Your Projector You can purchase the 3.5 mm jack A/V to RCA cable is not shipped with your projector.

User Guide
Page 15
You can purchase the HDMI cable on the Dell website at www.dell.com. Connecting Your Projector 15 Connecting a DVD Player Using a HDMI Cable 2 3 1 1 Power cord 2 AC adapter 3 HDMI cable NOTE: The HDMI cable is not shipped with your projector.
You can purchase the HDMI cable on the Dell website at www.dell.com. Connecting Your Projector 15 Connecting a DVD Player Using a HDMI Cable 2 3 1 1 Power cord 2 AC adapter 3 HDMI cable NOTE: The HDMI cable is not shipped with your projector.

User Guide
Page 16
Connecting to Multi-Media Connecting Multi-Media Using a USB Flash Disk 3 2 1 1 Power cord 2 AC adapter 3 USB flash disk NOTE: The USB flash disk is not shipped with your projector. 16 Connecting Your Projector
Connecting to Multi-Media Connecting Multi-Media Using a USB Flash Disk 3 2 1 1 Power cord 2 AC adapter 3 USB flash disk NOTE: The USB flash disk is not shipped with your projector. 16 Connecting Your Projector

User Guide
Page 17
Connecting Multi-Media Using a MicroSD Card 3 2 1 1 Power cord 2 AC adapter 3 MicroSD card NOTE: The microSD card is not shipped with your projector. Connecting Your Projector 17
Connecting Multi-Media Using a MicroSD Card 3 2 1 1 Power cord 2 AC adapter 3 MicroSD card NOTE: The microSD card is not shipped with your projector. Connecting Your Projector 17
User Guide
Page 18
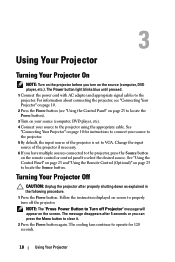
...projector. 5 By default, the input source of the projector is set to clear it. 2 Press the Power button again. For information about connecting the projector, see "Connecting Your Projector" on page 10. 2 Press the Power... page 10 for 120 seconds. 18 Using Your Projector Follow the instruction displayed on the screen. See "Connecting Your Projector" on the source (computer, DVD player, etc... the following procedure. 1 Press the Power button. 3 Using Your Projector Turning Your Projector On NOTE: Turn on the projector before you turn off Projector" message will appear on screen to ...
...projector. 5 By default, the input source of the projector is set to clear it. 2 Press the Power button again. For information about connecting the projector, see "Connecting Your Projector" on page 10. 2 Press the Power... page 10 for 120 seconds. 18 Using Your Projector Follow the instruction displayed on the screen. See "Connecting Your Projector" on the source (computer, DVD player, etc... the following procedure. 1 Press the Power button. 3 Using Your Projector Turning Your Projector On NOTE: Turn on the projector before you turn off Projector" message will appear on screen to ...

User Guide
Page 19
... and hold for 60 seconds to allow the internal temperature to stabilize. 4 Disconnect the power cord and AC adapter from the electrical outlet and the projector. Adjusting the Projected Image Raising the Projector Height 1 Raise the projector to the desired display angle, and use the front tilt adjustment wheel to fine-tune the display angle...
... and hold for 60 seconds to allow the internal temperature to stabilize. 4 Disconnect the power cord and AC adapter from the electrical outlet and the projector. Adjusting the Projected Image Raising the Projector Height 1 Raise the projector to the desired display angle, and use the front tilt adjustment wheel to fine-tune the display angle...
User Guide
Page 44
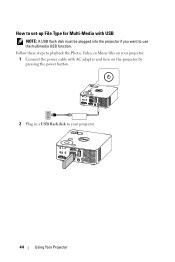
Follow these steps to playback the Photo, Video, or Music files on the projector by pressing the power button. 2 Plug in a USB flash disk to use the multimedia USB function. How to set-up File Type for Multi-Media with USB NOTE: A USB flash disk must be plugged into the projector if you want to your projector: 1 Connect the power cable with AC adapter and turn on your projector. 44 Using Your Projector
Follow these steps to playback the Photo, Video, or Music files on the projector by pressing the power button. 2 Plug in a USB flash disk to use the multimedia USB function. How to set-up File Type for Multi-Media with USB NOTE: A USB flash disk must be plugged into the projector if you want to your projector: 1 Connect the power cable with AC adapter and turn on your projector. 44 Using Your Projector
User Guide
Page 46
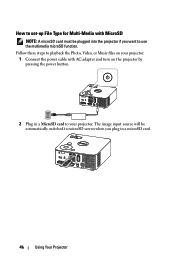
How to set-up File Type for Multi-Media with AC adapter and turn on the projector by pressing the power button. 2 Plug in a microSD card. 46 Using Your Projector Follow these steps to use the multimedia microSD function. The image input source will be automatically switched to microSD screen when you plug in a MicroSD card to your projector: 1 Connect the power cable with MicroSD NOTE: A microSD card must be plugged into the projector if you want to playback the Photo, Video, or Music files on your projector.
How to set-up File Type for Multi-Media with AC adapter and turn on the projector by pressing the power button. 2 Plug in a microSD card. 46 Using Your Projector Follow these steps to use the multimedia microSD function. The image input source will be automatically switched to microSD screen when you plug in a MicroSD card to your projector: 1 Connect the power cable with MicroSD NOTE: A microSD card must be plugged into the projector if you want to playback the Photo, Video, or Music files on your projector.

User Guide
Page 48
The image input source will be automatically switched to playback the Photo, Video, or Music files on your projector: 1 Connect the power cable with AC adapter and turn on the projector by pressing the power button. 2 Access the Input Source menu, select the Internal Memory option and press the button. How to set-up File Type for Multi-Media with Internal Memory Follow these steps to Internal Memory screen when Internal Memory option is selected in this step. 48 Using Your Projector
The image input source will be automatically switched to playback the Photo, Video, or Music files on your projector: 1 Connect the power cable with AC adapter and turn on the projector by pressing the power button. 2 Access the Input Source menu, select the Internal Memory option and press the button. How to set-up File Type for Multi-Media with Internal Memory Follow these steps to Internal Memory screen when Internal Memory option is selected in this step. 48 Using Your Projector

User Guide
Page 57
5 Specifications Light Valve Brightness Contrast Ratio Uniformity Number of Pixels Internal Flash Displayable Color Projection Lens Projection Screen Size Projection Distance Video Compatibility Power Supply Power Consumption 0.45" WXGA S450 DMD, DarkChip3™ 300 ANSI Lumens (Max.) 10000:1 Typical (Full On/Full Off) 80% Typical (Japan Standard - JBMA) 1280 x 800 (WXGA) 1...: 1080i (50/60 Hz), 720p (50/60 Hz), 576i/p, 480i/p HDMI input: 1080p, 720p, 576i/p, 480i/p Universal AC 100-240 50-60 Hz with 65 W power adapter Normal mode: 44 W ± 10% @ 110 Vac Eco mode: 36 W ± 10% @ 110 Vac...
5 Specifications Light Valve Brightness Contrast Ratio Uniformity Number of Pixels Internal Flash Displayable Color Projection Lens Projection Screen Size Projection Distance Video Compatibility Power Supply Power Consumption 0.45" WXGA S450 DMD, DarkChip3™ 300 ANSI Lumens (Max.) 10000:1 Typical (Full On/Full Off) 80% Typical (Japan Standard - JBMA) 1280 x 800 (WXGA) 1...: 1080i (50/60 Hz), 720p (50/60 Hz), 576i/p, 480i/p HDMI input: 1080p, 720p, 576i/p, 480i/p Universal AC 100-240 50-60 Hz with 65 W power adapter Normal mode: 44 W ± 10% @ 110 Vac Eco mode: 36 W ± 10% @ 110 Vac...

