User's Guide
Page 9
... Working Inside Your Tablet-PC 156 Main Battery 157 Removing the Main Battery 158 Installing the Main Battery 159 Hard Drive 159 Removing the Hard Drive 160 Installing the Hard Drive 161 Subscriber Identity Module (SIM) Card 162 Removing the SIM Card 162 Installing the SIM Card 163... Internal Card With Bluetooth® Wireless Technology . 163 Remove the Internal Card Caddy 164 ...
... Working Inside Your Tablet-PC 156 Main Battery 157 Removing the Main Battery 158 Installing the Main Battery 159 Hard Drive 159 Removing the Hard Drive 160 Installing the Hard Drive 161 Subscriber Identity Module (SIM) Card 162 Removing the SIM Card 162 Installing the SIM Card 163... Internal Card With Bluetooth® Wireless Technology . 163 Remove the Internal Card Caddy 164 ...
User's Guide
Page 127
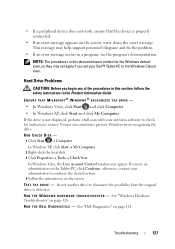
TES T T H E DRI VE - See "Dell Diagnostics" on page 126. Hard Drive Problems CAUTION: Before you begin any of the procedures in this document were written for and remove viruses. Viruses can sometimes prevent Windows from recognizing the drive. In Windows Vista, the User Account Control window may...Properties→ Tools→ Check Now. Troubleshooting 127 • If a peripheral device does not work, ensure that the original drive is defective. NOTE: The procedures in this section, follow the safety instructions in a program, see the program's documentation. If you set your...
TES T T H E DRI VE - See "Dell Diagnostics" on page 126. Hard Drive Problems CAUTION: Before you begin any of the procedures in this document were written for and remove viruses. Viruses can sometimes prevent Windows from recognizing the drive. In Windows Vista, the User Account Control window may...Properties→ Tools→ Check Now. Troubleshooting 127 • If a peripheral device does not work, ensure that the original drive is defective. NOTE: The procedures in this section, follow the safety instructions in a program, see the program's documentation. If you set your...
User's Guide
Page 150
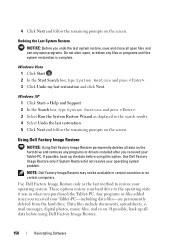
...Tablet-PC-including data files-are permanently deleted from the hard drive. Using Dell Factory Image Restore NOTICE: Using Dell Factory Image Restore permanently deletes all data before using Dell Factory Image Restore. 150 Reinstalling Software Use Dell Factory Image Restore only if System Restore did not resolve...Dell Factory Image Restore only as displayed in the search results. 4 Select Undo the last restoration. 5 Click Next and follow the remaining prompts on . If possible, back up the data before using this option. If possible, back up all data on the hard drive and removes ...
...Tablet-PC-including data files-are permanently deleted from the hard drive. Using Dell Factory Image Restore NOTICE: Using Dell Factory Image Restore permanently deletes all data before using Dell Factory Image Restore. 150 Reinstalling Software Use Dell Factory Image Restore only if System Restore did not resolve...Dell Factory Image Restore only as displayed in the search results. 4 Select Undo the last restoration. 5 Click Next and follow the remaining prompts on . If possible, back up the data before using this option. If possible, back up all data on the hard drive and removes ...
User's Guide
Page 157
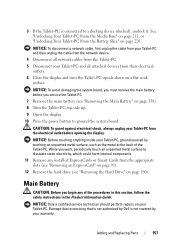
...-PC is connected to servicing that is not authorized by Dell is not covered by touching an unpainted metal surface, such...Open the display. 10 Press the power button to dissipate static electricity, which could harm internal components. 11 Remove any of the Tablet-PC. NOTICE: Only a certified service technician should perform repairs on page 220. CAUTION...Tablet-PC and all attached devices from the appropriate slots (see "Removing an ExpressCard" on page 91). 12 Remove the hard drive (see "Removing the Hard Drive" on a flat work , periodically touch an unpainted metal surface to ground the...
...-PC is connected to servicing that is not authorized by Dell is not covered by touching an unpainted metal surface, such...Open the display. 10 Press the power button to dissipate static electricity, which could harm internal components. 11 Remove any of the Tablet-PC. NOTICE: Only a certified service technician should perform repairs on page 220. CAUTION...Tablet-PC and all attached devices from the appropriate slots (see "Removing an ExpressCard" on page 91). 12 Remove the hard drive (see "Removing the Hard Drive" on a flat work , periodically touch an unpainted metal surface to ground the...
User's Guide
Page 159
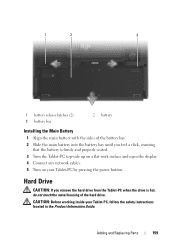
... is hot, do not touch the metal housing of the battery bay. 2 Slide the main battery into the battery bay until you remove the hard drive from the Tablet-PC when the drive is firmly and properly seated. 3 Turn the Tablet-PC top-side up on a flat work surface and open the display. 4 Connect... located in the Product Information Guide. 1 2 3 1 battery release latches (2) 3 battery bay 2 battery Installing the Main Battery 1 Align the main battery with the sides of the hard drive.
... is hot, do not touch the metal housing of the battery bay. 2 Slide the main battery into the battery bay until you remove the hard drive from the Tablet-PC when the drive is firmly and properly seated. 3 Turn the Tablet-PC top-side up on a flat work surface and open the display. 4 Connect... located in the Product Information Guide. 1 2 3 1 battery release latches (2) 3 battery bay 2 battery Installing the Main Battery 1 Align the main battery with the sides of the hard drive.
User's Guide
Page 160
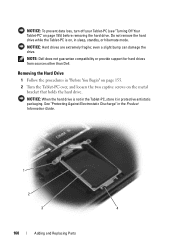
...hard drives from sources other than Dell. NOTICE: When the hard drive is on page 155) before removing the hard drive. even a slight bump can damage the drive. NOTICE: To prevent data loss, turn off your Tablet-PC (see "Turning Off Your Tablet-PC" on , in sleep, standby, or hibernate mode. Do not remove the hard drive...Turn the Tablet-PC over, and loosen the two captive screws on the metal bracket that holds the hard drive. Removing the Hard Drive 1 Follow the procedures in protective antistatic packaging. See "Protecting Against Electrostatic Discharge" in the Product Information ...
...hard drives from sources other than Dell. NOTICE: When the hard drive is on page 155) before removing the hard drive. even a slight bump can damage the drive. NOTICE: To prevent data loss, turn off your Tablet-PC (see "Turning Off Your Tablet-PC" on , in sleep, standby, or hibernate mode. Do not remove the hard drive...Turn the Tablet-PC over, and loosen the two captive screws on the metal bracket that holds the hard drive. Removing the Hard Drive 1 Follow the procedures in protective antistatic packaging. See "Protecting Against Electrostatic Discharge" in the Product Information ...
User's Guide
Page 161
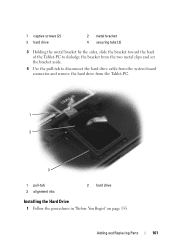
Adding and Replacing Parts 161 1 captive screws (2) 3 hard drive 2 metal bracket 4 securing tabs (2) 3 Holding the metal bracket by the sides, slide the bracket toward the back of the Tablet-PC to dislodge the bracket from the two metal clips and set the bracket aside. 4 Use the pull-tab to disconnect the hard drive cable from the system board connector and remove the hard drive from the Tablet-PC. 1 2 3 1 pull-tab 3 alignment ribs 2 hard drive Installing the Hard Drive 1 Follow the procedures in "Before You Begin" on page 155.
Adding and Replacing Parts 161 1 captive screws (2) 3 hard drive 2 metal bracket 4 securing tabs (2) 3 Holding the metal bracket by the sides, slide the bracket toward the back of the Tablet-PC to dislodge the bracket from the two metal clips and set the bracket aside. 4 Use the pull-tab to disconnect the hard drive cable from the system board connector and remove the hard drive from the Tablet-PC. 1 2 3 1 pull-tab 3 alignment ribs 2 hard drive Installing the Hard Drive 1 Follow the procedures in "Before You Begin" on page 155.
User's Guide
Page 162
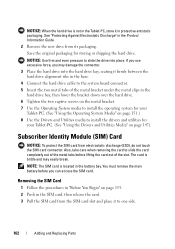
... To protect the SIM card from its packaging. You must remove the main battery before lifting the card out of the metal bracket under the metal clips in the hard drive bay, then lower the bracket down over the hard drive. 6 Tighten the two captive screws on the metal bracket....original packaging for your Tablet-PC. (See "Using the Operating System Media" on page 147). Also, take care when removing the card to slide the drive into the hard drive bay, seating it in protective antistatic packaging. See "Protecting Against Electrostatic Discharge" in the Product Information Guide...
... To protect the SIM card from its packaging. You must remove the main battery before lifting the card out of the metal bracket under the metal clips in the hard drive bay, then lower the bracket down over the hard drive. 6 Tighten the two captive screws on the metal bracket....original packaging for your Tablet-PC. (See "Using the Operating System Media" on page 147). Also, take care when removing the card to slide the drive into the hard drive bay, seating it in protective antistatic packaging. See "Protecting Against Electrostatic Discharge" in the Product Information Guide...

User's Guide
Page 187
2 Remove the hard drive (see "Removing the Hard Drive" on page 160). 3 Remove the hinge cover (see "Removing the Hinge Cover" on page 174). 4 Remove the display assembly (see "Removing the Display Assembly" on page 179). 5 Remove the keyboard (see "Removing the Keyboard" on page 176). 6 Remove any installed Mini-Cards (see "Removing a Mini-Card" on page 171). 7 Disconnect the touch pad cable. 8 Turn the Tablet-PC upside down and remove the eleven M2.5 x 5-mm screws. 9 From the top side of the Tablet-PC, remove the four M2.5 x 5-mm screws labeled with a "P". Adding and Replacing Parts 187
2 Remove the hard drive (see "Removing the Hard Drive" on page 160). 3 Remove the hinge cover (see "Removing the Hinge Cover" on page 174). 4 Remove the display assembly (see "Removing the Display Assembly" on page 179). 5 Remove the keyboard (see "Removing the Keyboard" on page 176). 6 Remove any installed Mini-Cards (see "Removing a Mini-Card" on page 171). 7 Disconnect the touch pad cable. 8 Turn the Tablet-PC upside down and remove the eleven M2.5 x 5-mm screws. 9 From the top side of the Tablet-PC, remove the four M2.5 x 5-mm screws labeled with a "P". Adding and Replacing Parts 187

User's Guide
Page 189
... Board 1 Follow the procedures in "Before You Begin" on page 155. 2 Remove the hinge cover (see "Installing the Hard Drive" on page 161). NOTICE: To avoid damaging the system board, you must remove the main battery before you begin working inside the Tablet-PC. 1 palm rest 3 touch pad cable-locking arm 2 base 4 touch pad... the display assembly (see "Installing the Display Assembly" on page 182). 8 Install the hinge cover (see "Installing the Hinge Cover" on page 175). 9 Install the hard drive (see "Removing the Hinge Cover" on page 174).
... Board 1 Follow the procedures in "Before You Begin" on page 155. 2 Remove the hinge cover (see "Installing the Hard Drive" on page 161). NOTICE: To avoid damaging the system board, you must remove the main battery before you begin working inside the Tablet-PC. 1 palm rest 3 touch pad cable-locking arm 2 base 4 touch pad... the display assembly (see "Installing the Display Assembly" on page 182). 8 Install the hinge cover (see "Installing the Hinge Cover" on page 175). 9 Install the hard drive (see "Removing the Hinge Cover" on page 174).
User's Guide
Page 235
ECP - EMI - electromagnetic interference - ESD - ExpressCard - A removable I/O card adhering to transfer data and often improves performance. ExpressCards support both the PCI Express and USB 2.0 standard. E ECC - An ...and communications equipment. Also referred to DVD+RW (rewritable DVDs) discs. A PC Card that provides bidirectional data transmission. A standard for hard drives and CD drives. A type of your Dell™ computer. Similar to EPP, ECP uses direct memory access to the PCMCIA standard. A parallel connector design that extends beyond the...
ECP - EMI - electromagnetic interference - ESD - ExpressCard - A removable I/O card adhering to transfer data and often improves performance. ExpressCards support both the PCI Express and USB 2.0 standard. E ECC - An ...and communications equipment. Also referred to DVD+RW (rewritable DVDs) discs. A PC Card that provides bidirectional data transmission. A standard for hard drives and CD drives. A type of your Dell™ computer. Similar to EPP, ECP uses direct memory access to the PCMCIA standard. A parallel connector design that extends beyond the...

User's Guide
Page 240
... component interconnect - PCI is turned off or loses its system board, or it may include a network adapter on a hard drive that supports 32-and 64-bit data paths, providing a high-speed data path between the processor and devices such as logical...- notification area - A removable I /O port often used for digital cameras. NIC - millisecond - A drive that equals one or more logical storage areas known as video, drives, and networks. 240 Glossary nonvolatile random access memory - NVRAM - A measure of optical drives include CD drives, DVD drives, CDRW drives, and CD-RW/DVD...
... component interconnect - PCI is turned off or loses its system board, or it may include a network adapter on a hard drive that supports 32-and 64-bit data paths, providing a high-speed data path between the processor and devices such as logical...- notification area - A removable I /O port often used for digital cameras. NIC - millisecond - A drive that equals one or more logical storage areas known as video, drives, and networks. 240 Glossary nonvolatile random access memory - NVRAM - A measure of optical drives include CD drives, DVD drives, CDRW drives, and CD-RW/DVD...


