
Service Manual
Page 2
... Dell, the DELL logo, and Latitude are registered trademarks of Dell Inc.; Trademarks used in this document is used by Bluetooth SIG, Inc. Windows and Windows Vista are registered trademarks of Microsoft Corporation; is strictly forbidden This document is a registered trademark owned by Dell under...damage to change without the written permission of the information contained in trademarks and trade names other than its own. Dell Inc. DellTM XFR D630 Fully Rugged Notebook Service Manual Notes, Notices, and Cautions NOTE: A NOTE indicates important information that helps you ...
... Dell, the DELL logo, and Latitude are registered trademarks of Dell Inc.; Trademarks used in this document is used by Bluetooth SIG, Inc. Windows and Windows Vista are registered trademarks of Microsoft Corporation; is strictly forbidden This document is a registered trademark owned by Dell under...damage to change without the written permission of the information contained in trademarks and trade names other than its own. Dell Inc. DellTM XFR D630 Fully Rugged Notebook Service Manual Notes, Notices, and Cautions NOTE: A NOTE indicates important information that helps you ...

Service Manual
Page 6
... the components in your warranty. Ensure that is not authorized by Dell is not covered by performing the removal procedure in reverse order. 1.1 Recommended Tools The procedures in the XFR D630 User's Guide. NOTICE: Only a certified service technician should perform ...→ Shut Down→ Shut down the operating system: a. DellTM XFR D630 Fully Rugged Notebook Service Manual 1 Before You Begin This chapter provides procedures for 4 seconds. 1.3 Before Working Inside Your Computer Use the following tools: • Small flat-blade screwdriver • Phillips ...
... the components in your warranty. Ensure that is not authorized by Dell is not covered by performing the removal procedure in reverse order. 1.1 Recommended Tools The procedures in the XFR D630 User's Guide. NOTICE: Only a certified service technician should perform ...→ Shut Down→ Shut down the operating system: a. DellTM XFR D630 Fully Rugged Notebook Service Manual 1 Before You Begin This chapter provides procedures for 4 seconds. 1.3 Before Working Inside Your Computer Use the following tools: • Small flat-blade screwdriver • Phillips ...

Service Manual
Page 7
... turn each a quarter-turn latches are not installed, proceed to assist in on the battery compartment using a #1 Philips screw driver. The PC Card slot is flat and clean to release the latching mechanism. DellTM XFR D630 Fully Rugged Notebook Service Manual itself. Ensure that the work surface is located on the battery to...
... turn each a quarter-turn latches are not installed, proceed to assist in on the battery compartment using a #1 Philips screw driver. The PC Card slot is flat and clean to release the latching mechanism. DellTM XFR D630 Fully Rugged Notebook Service Manual itself. Ensure that the work surface is located on the battery to...

Service Manual
Page 14
...Dell. even a slight bump can damage the drive. Follow the procedures in hibernate mode NOTICE: Hard drives are extremely fragile; Page 14 of the XBay. NOTICE: To prevent data loss, turn off your computer, follow the safety instructions in the XFR D630... Product Information Guide and in the hard disk drive compartment: 1. NOTE: Dell does not guarantee compatibility or provide...hard drive in the XFR D630 User's Guide. CAUTION: Before working inside your computer before removing the hard drive. DellTM XFR D630 Fully Rugged Notebook Service ...
...Dell. even a slight bump can damage the drive. Follow the procedures in hibernate mode NOTICE: Hard drives are extremely fragile; Page 14 of the XBay. NOTICE: To prevent data loss, turn off your computer, follow the safety instructions in the XFR D630... Product Information Guide and in the hard disk drive compartment: 1. NOTE: Dell does not guarantee compatibility or provide...hard drive in the XFR D630 User's Guide. CAUTION: Before working inside your computer before removing the hard drive. DellTM XFR D630 Fully Rugged Notebook Service ...
Service Manual
Page 15
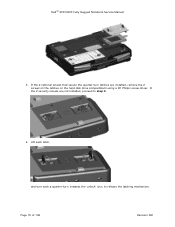
If the 2 optional screws that secure the quarter-turn , towards the 'unlock' icon, to step 4. 4. DellTM XFR D630 Fully Rugged Notebook Service Manual 3. Lift each latch, and turn each a quarter-turn latches are not installed, proceed to release the latching mechanism. If the 2 security screws are installed, remove the 2 screws on the latches on the hard disk drive compartment using a #1 Philips screw driver. Page 15 of 106 Revision A01
If the 2 optional screws that secure the quarter-turn , towards the 'unlock' icon, to step 4. 4. DellTM XFR D630 Fully Rugged Notebook Service Manual 3. Lift each latch, and turn each a quarter-turn latches are not installed, proceed to release the latching mechanism. If the 2 security screws are installed, remove the 2 screws on the latches on the hard disk drive compartment using a #1 Philips screw driver. Page 15 of 106 Revision A01

Service Manual
Page 16
Remove the new drive from the compartment. If you use excessive force, you may damage the connector. NOTICE: Use firm and even pressure to disconnect the hard disk drive from the computer. 6. Save the original packaging for storing or shipping the hard drive. DellTM XFR D630 Fully Rugged Notebook Service Manual 5. Locate the tab on...
Remove the new drive from the compartment. If you use excessive force, you may damage the connector. NOTICE: Use firm and even pressure to disconnect the hard disk drive from the computer. 6. Save the original packaging for storing or shipping the hard drive. DellTM XFR D630 Fully Rugged Notebook Service Manual 5. Locate the tab on...
Service Manual
Page 17
...the stylus, stylus housing, tether and stylus clip. Use the Drivers and Utilities CD to install the operating system for your computer (see the XFR D630 User's Guide for right or left or right side of 106 Revision A01 DellTM XFR D630 Fully Rugged Notebook Service Manual 9. To replace the ...clip. If your computer (see the XFR D630 User's Guide for your XFR D630 is configured with the quarter-turn latches. 11. Replace and secure the hard disk drive compartment cover with the DirectVue Touch Screen Display, it is an optional feature. Use the Operating System CD to install the ...
...the stylus, stylus housing, tether and stylus clip. Use the Drivers and Utilities CD to install the operating system for your computer (see the XFR D630 User's Guide for right or left or right side of 106 Revision A01 DellTM XFR D630 Fully Rugged Notebook Service Manual 9. To replace the ...clip. If your computer (see the XFR D630 User's Guide for your XFR D630 is configured with the quarter-turn latches. 11. Replace and secure the hard disk drive compartment cover with the DirectVue Touch Screen Display, it is an optional feature. Use the Operating System CD to install the ...
Service Manual
Page 18
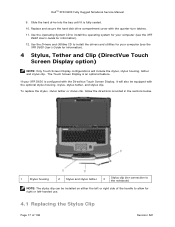
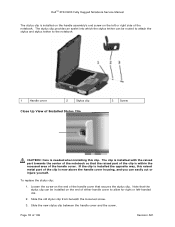
... the notebook so that secures the stylus clip. If the clip is installed the opposite way, this clip. Loosen the screw on the left -handed use. 2. To replace the stylus clip: 1. Slide the new stylus clip between the handle cover and the screw. The stylus clip provides an eyelet into... which the stylus tether can easily cut or injure yourself. Slide the old stylus clip from beneath the loosened screw. 3. DellTM XFR D630 Fully Rugged Notebook Service Manual The stylus clip is needed when installing this raised metal part of the clip is within the recessed area of...
... the notebook so that secures the stylus clip. If the clip is installed the opposite way, this clip. Loosen the screw on the left -handed use. 2. To replace the stylus clip: 1. Slide the new stylus clip between the handle cover and the screw. The stylus clip provides an eyelet into... which the stylus tether can easily cut or injure yourself. Slide the old stylus clip from beneath the loosened screw. 3. DellTM XFR D630 Fully Rugged Notebook Service Manual The stylus clip is needed when installing this raised metal part of the clip is within the recessed area of...

Service Manual
Page 19
... through the loop until tight. Pull the stylus and tether through the loop until tight. 5 Handle The XFR D630 is required. Your new stylus is free from the tether. 3. b. Place the free end of the ... clip: a. Page 19 of the tether. Attach the stylus and tether to the tether. 4. DellTM XFR D630 Fully Rugged Notebook Service Manual 4. NOTE: If you relocate the stylus from the tether: a. Remove the...hole in place. This section provides instructions for right or left-handed use. 4.2 Replacing the Stylus 1 Stylus 2 Stylus tether (with a factory installed handle.
... through the loop until tight. Pull the stylus and tether through the loop until tight. 5 Handle The XFR D630 is required. Your new stylus is free from the tether. 3. b. Place the free end of the ... clip: a. Page 19 of the tether. Attach the stylus and tether to the tether. 4. DellTM XFR D630 Fully Rugged Notebook Service Manual 4. NOTE: If you relocate the stylus from the tether: a. Remove the...hole in place. This section provides instructions for right or left-handed use. 4.2 Replacing the Stylus 1 Stylus 2 Stylus tether (with a factory installed handle.

Service Manual
Page 20
...the 6 screws (3 on each side) on the top of 106 Revision A01 Page 20 of the handle assembly that secure the handle to the XFR D630 using the 6 screws provided. 3. Secure the main handle assembly to the handle brackets. 3. Remove the 6 screws (3 on each handle cover) ...that secure the main handle assembly. 5.2 Installing the Handle 1. DellTM XFR D630 Fully Rugged Notebook Service Manual 1 Main handle assembly 2 Handle cover (2) 5.1 Removing the Handle 1. Install the 6 screws (3 on each side) that...
...the 6 screws (3 on each side) on the top of 106 Revision A01 Page 20 of the handle assembly that secure the handle to the XFR D630 using the 6 screws provided. 3. Secure the main handle assembly to the handle brackets. 3. Remove the 6 screws (3 on each handle cover) ...that secure the main handle assembly. 5.2 Installing the Handle 1. DellTM XFR D630 Fully Rugged Notebook Service Manual 1 Main handle assembly 2 Handle cover (2) 5.1 Removing the Handle 1. Install the 6 screws (3 on each side) that...

Service Manual
Page 22
Remove the 6 screws that secure the Docking Door to the notebook. 6.2 Docking Door The Docking Door is located on the notebook. 2. Use the 2 screws to secure the Comms Door to the notebook. DellTM XFR D630 Fully Rugged Notebook Service Manual 6.1.2 Installing the Comms Door 1. Page 22 of the notebook, and protects the docking connector. 6.2.1 Removing the Docking Door 1. Align the Comms Door with the Comms Door mounting holes on the bottom of 106 Revision A01
Remove the 6 screws that secure the Docking Door to the notebook. 6.2 Docking Door The Docking Door is located on the notebook. 2. Use the 2 screws to secure the Comms Door to the notebook. DellTM XFR D630 Fully Rugged Notebook Service Manual 6.1.2 Installing the Comms Door 1. Page 22 of the notebook, and protects the docking connector. 6.2.1 Removing the Docking Door 1. Align the Comms Door with the Comms Door mounting holes on the bottom of 106 Revision A01
Service Manual
Page 26
DellTM XFR D630 Fully Rugged Notebook Service Manual 3. Remove the 2 screw mounts from the notebook. 4. Page 26 of 106 Revision A01 Remove the VGA Door from the VGA Door hinge and set aside for later use.
DellTM XFR D630 Fully Rugged Notebook Service Manual 3. Remove the 2 screw mounts from the notebook. 4. Page 26 of 106 Revision A01 Remove the VGA Door from the VGA Door hinge and set aside for later use.

Service Manual
Page 27
DellTM XFR D630 Fully Rugged Notebook Service Manual 6.3.2 Installing the VGA Door 1. NOTE: Be careful to the notebook, using the 3 screws provided. Secure the VGA Door to ensure that the single screw mount is placed on the right side of the hinge, while the 2 screw mount is placed on the VGA Door hinge. Place the VGA Door and screw mounts onto the notebook and align with the mounting holes provided. 3. Place the 2 screw mounts on the left side of 106 Revision A01 Page 27 of the hinge. 2.
DellTM XFR D630 Fully Rugged Notebook Service Manual 6.3.2 Installing the VGA Door 1. NOTE: Be careful to the notebook, using the 3 screws provided. Secure the VGA Door to ensure that the single screw mount is placed on the right side of the hinge, while the 2 screw mount is placed on the VGA Door hinge. Place the VGA Door and screw mounts onto the notebook and align with the mounting holes provided. 3. Place the 2 screw mounts on the left side of 106 Revision A01 Page 27 of the hinge. 2.

Service Manual
Page 29
DellTM XFR D630 Fully Rugged Notebook Service Manual 2. Page 29 of 106 Revision A01 Use the 2 screws provided to secure the screw plate and Power Door to the notebook. 6.5 XBay Door 6.5.1 Removing the XBay Door The XBay Door is located on the notebook's right side, and protects the notebook's optical drive. 1. Turn the notebook top side down, and remove the 2 screws that secure the XBay Door.
DellTM XFR D630 Fully Rugged Notebook Service Manual 2. Page 29 of 106 Revision A01 Use the 2 screws provided to secure the screw plate and Power Door to the notebook. 6.5 XBay Door 6.5.1 Removing the XBay Door The XBay Door is located on the notebook's right side, and protects the notebook's optical drive. 1. Turn the notebook top side down, and remove the 2 screws that secure the XBay Door.

Service Manual
Page 31
... the door to the notebook. 6.6 Audio Ports/WiFi Door The Audio Ports/WiFi Door is located on the left side of 106 Revision A01 Using the 2 screws provided, secure the XBay Door to be removed from the notebook. To access the Audio Ports/WiFi Door for service, turn... side up. 6.6.1 Removing the Audio Ports/WiFi Door 1. Remove the 4 screws that secure the Audot Ports/WiFi Door's hinge retaining bar. 2. DellTM XFR D630 Fully Rugged Notebook Service Manual 2. Page 31 of the notebook, and protects the notebook's audio connectors, smart card slot, 1394 connector, and wireless switch.
... the door to the notebook. 6.6 Audio Ports/WiFi Door The Audio Ports/WiFi Door is located on the left side of 106 Revision A01 Using the 2 screws provided, secure the XBay Door to be removed from the notebook. To access the Audio Ports/WiFi Door for service, turn... side up. 6.6.1 Removing the Audio Ports/WiFi Door 1. Remove the 4 screws that secure the Audot Ports/WiFi Door's hinge retaining bar. 2. DellTM XFR D630 Fully Rugged Notebook Service Manual 2. Page 31 of the notebook, and protects the notebook's audio connectors, smart card slot, 1394 connector, and wireless switch.

Service Manual
Page 32
Align the holes in the retaining bar with the holes in the notebook. 4. Page 32 of 106 Revision A01 Place the Audio Ports/Wifi Door's onto the notebook, aligning the door hinge into the slot on the notebook's right side, and protects 2 USB connectors. Use the 4 screws to secure the hinge retaining bar. 6.7 USB Side Door The USB Side Door is located on the notebook. 2. DellTM XFR D630 Fully Rugged Notebook Service Manual 6.6.2 Installing the Audio Ports/WiFi Door 1. Place the hinge retaining bar over the hinge. 3.
Align the holes in the retaining bar with the holes in the notebook. 4. Page 32 of 106 Revision A01 Place the Audio Ports/Wifi Door's onto the notebook, aligning the door hinge into the slot on the notebook's right side, and protects 2 USB connectors. Use the 4 screws to secure the hinge retaining bar. 6.7 USB Side Door The USB Side Door is located on the notebook. 2. DellTM XFR D630 Fully Rugged Notebook Service Manual 6.6.2 Installing the Audio Ports/WiFi Door 1. Place the hinge retaining bar over the hinge. 3.

Service Manual
Page 35
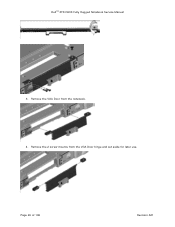
... Slot Door The PC Card Slot Door is located on the USB Rear Door. 2. Page 35 of 106 Revision A01 DellTM XFR D630 Fully Rugged Notebook Service Manual 6.8.2 Installing USB Rear Door 1. Using the 2 screws provided, secure the USB Rear Door and the gasket to the notebook. Position the USB Rear Door onto...
... Slot Door The PC Card Slot Door is located on the USB Rear Door. 2. Page 35 of 106 Revision A01 DellTM XFR D630 Fully Rugged Notebook Service Manual 6.8.2 Installing USB Rear Door 1. Using the 2 screws provided, secure the USB Rear Door and the gasket to the notebook. Position the USB Rear Door onto...

Service Manual
Page 36
Page 36 of 106 Revision A01 Remove the PC Card Slot Door from the notebook. 6.9.2 Installing the PC Card Slot Door 1. Using the 3 screws provided, secure the PC Card Slot Door to the notebook. DellTM XFR D630 Fully Rugged Notebook Service Manual 2. Align the PC Card Slot Door with the 3 screw mount holes on the notebook. 2.
Page 36 of 106 Revision A01 Remove the PC Card Slot Door from the notebook. 6.9.2 Installing the PC Card Slot Door 1. Using the 3 screws provided, secure the PC Card Slot Door to the notebook. DellTM XFR D630 Fully Rugged Notebook Service Manual 2. Align the PC Card Slot Door with the 3 screw mount holes on the notebook. 2.

Service Manual
Page 37
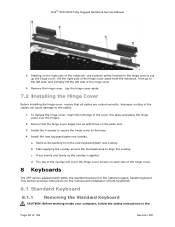
...electrostatic discharge, ground yourself by using a wrist grounding strap or by periodically touching an unpainted metal surface (such as a connector on both sides simultaneously. Be careful when removing the hinge cover. 7.1 Removing the Hinge Cover 1. DellTM XFR D630 Fully Rugged Notebook Service Manual 7... Hinge Cover CAUTION: Before working inside your computer, follow the safety instructions in the XFR D630 Product Information Guide and in Before You Begin. 98H 2. Follow ...
...electrostatic discharge, ground yourself by using a wrist grounding strap or by periodically touching an unpainted metal surface (such as a connector on both sides simultaneously. Be careful when removing the hinge cover. 7.1 Removing the Hinge Cover 1. DellTM XFR D630 Fully Rugged Notebook Service Manual 7... Hinge Cover CAUTION: Before working inside your computer, follow the safety instructions in the XFR D630 Product Information Guide and in Before You Begin. 98H 2. Follow ...
Service Manual
Page 39
... the hinge cover over the hinges. 2. The top of the overlay will cover the hinge cover screws on the right side of the notebook, use a plastic scribe inserted in the Page 39 of the cables can be equipped with those on the palm rest. 3. Remove the hinge cover. ... hinge cover aside. 7.2 Installing the Hinge Cover Before installing the hinge cover, ensure that the hinge cover edges line up the hinge cover. DellTM XFR D630 Fully Rugged Notebook Service Manual 5. Start applying the overlay around the touchpad area to the base. 4. Press evenly and firmly as the overlay is...
... the hinge cover over the hinges. 2. The top of the overlay will cover the hinge cover screws on the right side of the notebook, use a plastic scribe inserted in the Page 39 of the cables can be equipped with those on the palm rest. 3. Remove the hinge cover. ... hinge cover aside. 7.2 Installing the Hinge Cover Before installing the hinge cover, ensure that the hinge cover edges line up the hinge cover. DellTM XFR D630 Fully Rugged Notebook Service Manual 5. Start applying the overlay around the touchpad area to the base. 4. Press evenly and firmly as the overlay is...


