Service Manual
Page 5
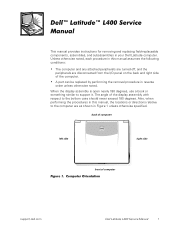
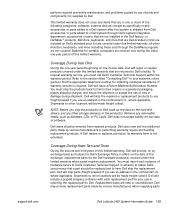
.... When the display assembly is open nearly 180 degrees, use a book or something similar to the bottom case should never exceed 180 degrees. back of computer left side right side front of the display assembly with respect to support it. Dell™ Latitude™ L400 Service Manual This manual provides instructions for removing and replacing field-replaceable components, assemblies, and subassemblies in reverse order unless otherwise noted...
.... When the display assembly is open nearly 180 degrees, use a book or something similar to the bottom case should never exceed 180 degrees. back of computer left side right side front of the display assembly with respect to support it. Dell™ Latitude™ L400 Service Manual This manual provides instructions for removing and replacing field-replaceable components, assemblies, and subassemblies in reverse order unless otherwise noted...

Service Manual
Page 6
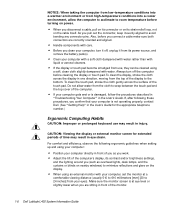
...cover. NOTICE: To avoid damaging the system board, you must remove the main battery before you cannot shut down the computer using its operating system, press the power button for personal injury or shock. NOTE: Make sure that the work on the computer, perform the following steps: 1. Disconnect all open application programs. 2. NOTICE: Make...Preparing to Work Inside Your Computer Before you start to push the back side of the battery up and out of the battery bay (see Figure 2). 2 Dell Latitude L400 Service Manual Recommended Tools Most of the procedures in suspend-todisk mode (S2D...
...cover. NOTICE: To avoid damaging the system board, you must remove the main battery before you cannot shut down the computer using its operating system, press the power button for personal injury or shock. NOTE: Make sure that the work on the computer, perform the following steps: 1. Disconnect all open application programs. 2. NOTICE: Make...Preparing to Work Inside Your Computer Before you start to push the back side of the battery up and out of the battery bay (see Figure 2). 2 Dell Latitude L400 Service Manual Recommended Tools Most of the procedures in suspend-todisk mode (S2D...
Service Manual
Page 8
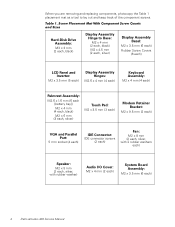
... (4 each, black) M2 x 6 mm (3 each, silver) Touch Pad: M2 x 3.5 mm (3 each) Modem Retainer Bracket: M2 x 9.5 mm (2 each) VGA and Parallel Port: 5 mm socket (4 each) IDE Connector: IDE connector screws (2 each) Fan: M2 x 8 mm (2 each, silver, with 2 rubber washers each) Speaker: M2 x 5 mm (2 each, silver, with rubber washer) Audio I/O Cover: M2 x 4 mm (2 each) System Board Assembly: M2 x 3.5 mm (6 each) 4 Dell Latitude L400 Service Manual
... (4 each, black) M2 x 6 mm (3 each, silver) Touch Pad: M2 x 3.5 mm (3 each) Modem Retainer Bracket: M2 x 9.5 mm (2 each) VGA and Parallel Port: 5 mm socket (4 each) IDE Connector: IDE connector screws (2 each) Fan: M2 x 8 mm (2 each, silver, with 2 rubber washers each) Speaker: M2 x 5 mm (2 each, silver, with rubber washer) Audio I/O Cover: M2 x 4 mm (2 each) System Board Assembly: M2 x 3.5 mm (6 each) 4 Dell Latitude L400 Service Manual

Service Manual
Page 11
... computer Figure 6. support.dell.com Dell Latitude L400 Service Manual 7 The following subsections provide instructions for removing and replacing field-replaceable parts and assemblies. Handle the assembly by its edges (do not squeeze the top of the computer. 2. NOTICE: The hard-disk drive is clean to shock. NOTICE: Make sure that the work surface is very sensitive to prevent scratching the computer cover. 1. The hard-disk drive is located on the right...
... computer Figure 6. support.dell.com Dell Latitude L400 Service Manual 7 The following subsections provide instructions for removing and replacing field-replaceable parts and assemblies. Handle the assembly by its edges (do not squeeze the top of the computer. 2. NOTICE: The hard-disk drive is clean to shock. NOTICE: Make sure that the work surface is very sensitive to prevent scratching the computer cover. 1. The hard-disk drive is located on the right...
Service Manual
Page 17
... cable narrow flex cable EMI sponges (2) LCD flex cable Figure 11. Carefully place the latch spring over the post. Reinstall the bezel. Ground yourself by touching the unpainted metal surface of the computer. Holding the latch, stretch the spring slightly and set the display-assembly latch in place in the display assembly top cover. 3. support.dell.com Dell Latitude L400 Service Manual 13 You may need to use...
... cable narrow flex cable EMI sponges (2) LCD flex cable Figure 11. Carefully place the latch spring over the post. Reinstall the bezel. Ground yourself by touching the unpainted metal surface of the computer. Holding the latch, stretch the spring slightly and set the display-assembly latch in place in the display assembly top cover. 3. support.dell.com Dell Latitude L400 Service Manual 13 You may need to use...
Service Manual
Page 19
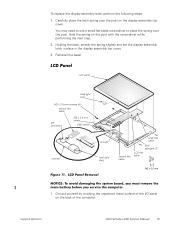
... part of the flex cable that is up with the alignment holes in the top cover with the opening that goes to the top cover. Press the LCD panel into the top cover, aligning the posts in the inverter. 9. When the plug is visible at the bottom edge of the plug should not be visible. Remove the display assembly. 3. support.dell.com Dell Latitude L400 Service Manual...
... part of the flex cable that is up with the alignment holes in the top cover with the opening that goes to the top cover. Press the LCD panel into the top cover, aligning the posts in the inverter. 9. When the plug is visible at the bottom edge of the plug should not be visible. Remove the display assembly. 3. support.dell.com Dell Latitude L400 Service Manual...
Service Manual
Page 21
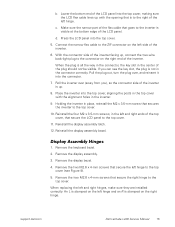
... bottom right edge of the keyboard assembly fit correctly into the hard-disk drive bay before you can temporarily insert the hard-disk drive into the slotted holes in the palmrest assembly. When the keyboard assembly is important that the top screw-hole tabs rest correctly in the palmrest assembly. 2. support.dell.com Dell Latitude L400 Service Manual 17 Connect the keyboard cable to make sure the tabs are fragile...
... bottom right edge of the keyboard assembly fit correctly into the hard-disk drive bay before you can temporarily insert the hard-disk drive into the slotted holes in the palmrest assembly. When the keyboard assembly is important that the top screw-hole tabs rest correctly in the palmrest assembly. 2. support.dell.com Dell Latitude L400 Service Manual 17 Connect the keyboard cable to make sure the tabs are fragile...
Service Manual
Page 23
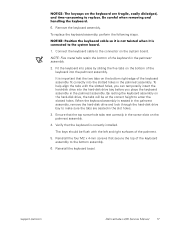
... the memory module snaps into place. Remove the keyboard assembly. 4. support.dell.com Dell Latitude L400 Service Manual 19 NOTICE: To avoid damaging the system board, you must remove the main battery before you do not hear a click as each end of the palmrest, status lights, and touch pad assembly. Turn the computer right-side up. Remove the keyboard bezel. 2. Remove the display assembly. 3. Remove the six M2.6 x 1.6-mm screws located in the battery bay...
... the memory module snaps into place. Remove the keyboard assembly. 4. support.dell.com Dell Latitude L400 Service Manual 19 NOTICE: To avoid damaging the system board, you must remove the main battery before you do not hear a click as each end of the palmrest, status lights, and touch pad assembly. Turn the computer right-side up. Remove the keyboard bezel. 2. Remove the display assembly. 3. Remove the six M2.6 x 1.6-mm screws located in the battery bay...
Service Manual
Page 37
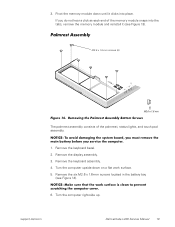
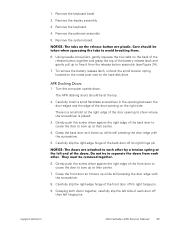
... are plastic. support.dell.com Dell Latitude L400 Service Manual 33 Remove the palmrest assembly. 5. Carefully slip the right-edge hinge of the door opening to each door off its right hinge pin. Grasp the front door as it bows up to the hard-disk drive. Remove the system board. To remove the battery release latch, unhook the small tension spring located on the release button are attached...
... are plastic. support.dell.com Dell Latitude L400 Service Manual 33 Remove the palmrest assembly. 5. Carefully slip the right-edge hinge of the door opening to each door off its right hinge pin. Grasp the front door as it bows up to the hard-disk drive. Remove the system board. To remove the battery release latch, unhook the small tension spring located on the release button are attached...
System Information Guide
Page 5
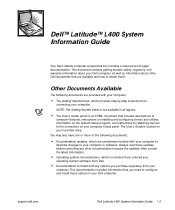
... with any options you need to obtain them. support.dell.com Dell Latitude L400 System Information Guide 1-3 Dell™ Latitude™ L400 System Information Guide Your Dell Latitude computer accessories box includes a reduced set of computer features, instructions on installing and configuring drivers and utilities, information on the System Setup program, and instructions for connecting your hard-disk drive. Always read these updates before consulting any other documentation because the updates often contain the latest information. • Operating system...
... with any options you need to obtain them. support.dell.com Dell Latitude L400 System Information Guide 1-3 Dell™ Latitude™ L400 System Information Guide Your Dell Latitude computer accessories box includes a reduced set of computer features, instructions on installing and configuring drivers and utilities, information on the System Setup program, and instructions for connecting your hard-disk drive. Always read these updates before consulting any other documentation because the updates often contain the latest information. • Operating system...
System Information Guide
Page 8
... from the cloth to seep between the touch pad and the top cover of the computer's display, its contrast and/or brightness settings, and the lighting around you (such as overhead lights, desk lamps, and the curtains or blinds on nearby windows) to minimize reflections and glare on the cable itself. Also, before you connect a cable make sure both connectors are sitting in...
... from the cloth to seep between the touch pad and the top cover of the computer's display, its contrast and/or brightness settings, and the lighting around you (such as overhead lights, desk lamps, and the curtains or blinds on nearby windows) to minimize reflections and glare on the cable itself. Also, before you connect a cable make sure both connectors are sitting in...
System Information Guide
Page 15
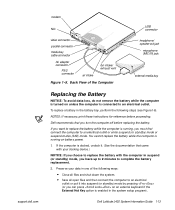
... all open files and then connect the computer to an electrical outlet. Dell Latitude L400 System Information Guide 1-13 Dell recommends that came with your data in one of the Computer USB connector headphone/ speaker-out jack microphone (MIC IN) jack external media bay Replacing the Battery NOTICE: To avoid data loss, do not remove the battery while the computer is turned on unless the computer is enabled in...
... all open files and then connect the computer to an electrical outlet. Dell Latitude L400 System Information Guide 1-13 Dell recommends that came with your data in one of the Computer USB connector headphone/ speaker-out jack microphone (MIC IN) jack external media bay Replacing the Battery NOTICE: To avoid data loss, do not remove the battery while the computer is turned on unless the computer is enabled in...
System Information Guide
Page 31
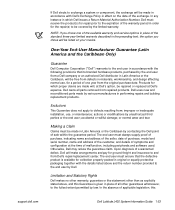
... to Dell. You must call Dell's Customer Technical Support within the warranty period. Replacement parts are returned to obtain Dell's concurrence that are new or reconditioned. external devices (except as diskettes, CDs, or PC Cards. or DellWare™ products. Dell does not accept liability for the Dell hardware product(s) covered under this limited warranty, Dell will provide, on the hard-disk drive(s) and any removable media, such as specifically noted); Dell will...
... to Dell. You must call Dell's Customer Technical Support within the warranty period. Replacement parts are returned to obtain Dell's concurrence that are new or reconditioned. external devices (except as diskettes, CDs, or PC Cards. or DellWare™ products. Dell does not accept liability for the Dell hardware product(s) covered under this limited warranty, Dell will provide, on the hard-disk drive(s) and any removable media, such as specifically noted); Dell will...
System Information Guide
Page 33
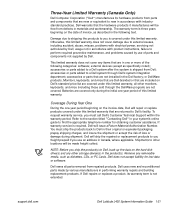
... locations will ship the repaired or replacement products to a Dell system through Dell's system integration department; Three-Year Limited Warranty (Canada Only) Dell Computer Corporation ("Dell") manufactures its warranty term is not extended. Monitors, keyboards, and mice that are not installed in the following categories: software; You must call Dell's Customer Technical Support within the warranty period. support.dell.com Dell Latitude L400 System Information Guide 1-31 all parts removed from parts...
... locations will ship the repaired or replacement products to a Dell system through Dell's system integration department; Three-Year Limited Warranty (Canada Only) Dell Computer Corporation ("Dell") manufactures its warranty term is not extended. Monitors, keyboards, and mice that are not installed in the following categories: software; You must call Dell's Customer Technical Support within the warranty period. support.dell.com Dell Latitude L400 System Information Guide 1-31 all parts removed from parts...
System Information Guide
Page 35
..., and design affecting normal use , or maintenance; The end user must be free from defects in which proper claims are made in accordance with the details listed above , and this support.dell.com Dell Latitude L400 System Information Guide 1-33 Making a Claim Claims must always supply proof of purchase, indicating name and address of the seller, date of purchase, model and serial number, name and address...
..., and design affecting normal use , or maintenance; The end user must be free from defects in which proper claims are made in accordance with the details listed above , and this support.dell.com Dell Latitude L400 System Information Guide 1-33 Making a Claim Claims must always supply proof of purchase, indicating name and address of the seller, date of purchase, model and serial number, name and address...

Advanced Port Replicator User's Guide
Page 25
.... Performance limitations may not provide for connection to the same line." New Zealand Telecom Warnings General "The grant of a Telepermit for local calls. It indicates no endorsement of the product byTelecom, nor does it provides no responsibility should be dialed from your telephone. Telecom will work correctly in such circumstances." support.dell.com Dell Latitude L400 Advanced Port Replicator User's Guide 1-23
.... Performance limitations may not provide for connection to the same line." New Zealand Telecom Warnings General "The grant of a Telepermit for local calls. It indicates no endorsement of the product byTelecom, nor does it provides no responsibility should be dialed from your telephone. Telecom will work correctly in such circumstances." support.dell.com Dell Latitude L400 Advanced Port Replicator User's Guide 1-23

Advanced Port Replicator User's Guide
Page 26
... (U.S. This limited warranty does not cover any single manual call initiation, and the equipment shall go online for recording telephone conversations shall comply with Telecom's Specification: 1. or DellWare™ products. 1-24 Dell Latitude L400 Advanced Port Replicator User's Guide The equipment shall be free from Dell; In addition, the Principles enumerated in the Privacy Act of parts and components not supplied by...
... (U.S. This limited warranty does not cover any single manual call initiation, and the equipment shall go online for recording telephone conversations shall comply with Telecom's Specification: 1. or DellWare™ products. 1-24 Dell Latitude L400 Advanced Port Replicator User's Guide The equipment shall be free from Dell; In addition, the Principles enumerated in the Privacy Act of parts and components not supplied by...
Advanced Port Replicator User's Guide
Page 27
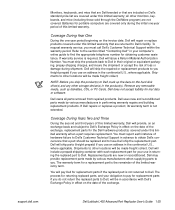
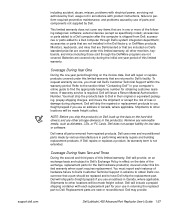
... covered only during shipment. Remove any other storage device(s) in your obligation to pay Dell for portable computers are new or reconditioned. The process for returning replaced parts, and your computer's online guide to other locations will be made freight collect. support.dell.com Dell Latitude L400 Advanced Port Replicator User's Guide 1-25 If warranty service is the remainder of this limited warranty when a part requires replacement. Dell will ship the repaired...
... covered only during shipment. Remove any other storage device(s) in your obligation to pay Dell for portable computers are new or reconditioned. The process for returning replaced parts, and your computer's online guide to other locations will be made freight collect. support.dell.com Dell Latitude L400 Advanced Port Replicator User's Guide 1-25 If warranty service is the remainder of this limited warranty when a part requires replacement. Dell will ship the repaired...
Advanced Port Replicator User's Guide
Page 29
... number for obtaining customer assistance. Remove any removable media, such as specifically noted); If Dell repairs or replaces a product, its warranty term is not extended. Coverage During Years Two and Three During the second and third years of hardware failure to Dell's Customer Technical Support in effect on the hard-disk drive(s) and any items that a part should be replaced and to Dell's facility. Shipments to other locations...
... number for obtaining customer assistance. Remove any removable media, such as specifically noted); If Dell repairs or replaces a product, its warranty term is not extended. Coverage During Years Two and Three During the second and third years of hardware failure to Dell's Customer Technical Support in effect on the hard-disk drive(s) and any items that a part should be replaced and to Dell's facility. Shipments to other locations...

Advanced Port Replicator User's Guide
Page 31
... affiliates shall be repaired or replaced at Dell's option, be liable for which proper claims are made in performing repairs and building replacement products. The end user must always supply proof of purchase, indicating name and address of the seller, date of purchase, model and serial number, name and address of the customer, and details of symptoms and configuration at the time...
... affiliates shall be repaired or replaced at Dell's option, be liable for which proper claims are made in performing repairs and building replacement products. The end user must always supply proof of purchase, indicating name and address of the seller, date of purchase, model and serial number, name and address of the customer, and details of symptoms and configuration at the time...


