User Manual
Page 2
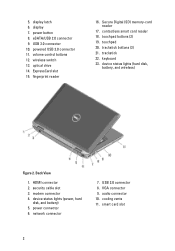
display 7. USB 3.0 connector 10. optical drive 14. contactless smart card reader 18. trackstick buttons (3) 21. keyboard 23. security cable slot 3. device status lights (power, hard disk, and battery) 5. power connector 6. ExpressCard slot 15. trackstick 22...1. HDMI connector 2. network connector 7. display latch 6. power button 8. powered USB 3.0 connector 11. touchpad 20. smart card slot 2 5. eSATA/USB 2.0 connector 9. volume control buttons 12. fingerprint reader 16. cooling vents 11. modem connector 4. wireless switch 13. Secure Digital (SD) memory-card...
display 7. USB 3.0 connector 10. optical drive 14. contactless smart card reader 18. trackstick buttons (3) 21. keyboard 23. security cable slot 3. device status lights (power, hard disk, and battery) 5. power connector 6. ExpressCard slot 15. trackstick 22...1. HDMI connector 2. network connector 7. display latch 6. power button 8. powered USB 3.0 connector 11. touchpad 20. smart card slot 2 5. eSATA/USB 2.0 connector 9. volume control buttons 12. fingerprint reader 16. cooling vents 11. modem connector 4. wireless switch 13. Secure Digital (SD) memory-card...
User Manual
Page 3
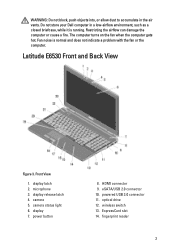
Restricting the airflow can damage the computer or cause a fire. Latitude E6530 Front and Back View Figure 3. display release latch 4. camera status light 6. eSATA/USB 2.0 connector 10. Front View 1. HDMI connector 9. powered USB 3.0 connector 11....is running. display latch 2. power button 8. The computer turns on the fan when the computer gets hot. display 7. optical drive 12. wireless switch 13. fingerprint reader 3 microphone 3. WARNING: Do not block, push objects into, or allow dust to accumulate in a low-airflow environment, such as a closed briefcase, while it...
Restricting the airflow can damage the computer or cause a fire. Latitude E6530 Front and Back View Figure 3. display release latch 4. camera status light 6. eSATA/USB 2.0 connector 10. Front View 1. HDMI connector 9. powered USB 3.0 connector 11....is running. display latch 2. power button 8. The computer turns on the fan when the computer gets hot. display 7. optical drive 12. wireless switch 13. fingerprint reader 3 microphone 3. WARNING: Do not block, push objects into, or allow dust to accumulate in a low-airflow environment, such as a closed briefcase, while it...
User Manual
Page 5
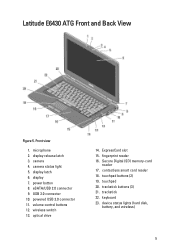
.... Secure Digital (SD) memory-card reader 17. contactless smart card reader 18. keyboard 23. volume control buttons 12. fingerprint reader 16. trackstick buttons (3) 21. microphone 2. display release latch 3. camera 4. optical drive 14. trackstick 22. powered USB 3.0 connector 11. device status lights (hard disk, battery, and wireless) 5 power button 8. Latitude E6430 ATG Front and Back View...
.... Secure Digital (SD) memory-card reader 17. contactless smart card reader 18. keyboard 23. volume control buttons 12. fingerprint reader 16. trackstick buttons (3) 21. microphone 2. display release latch 3. camera 4. optical drive 14. trackstick 22. powered USB 3.0 connector 11. device status lights (hard disk, battery, and wireless) 5 power button 8. Latitude E6430 ATG Front and Back View...
Latitude E-Family Re-Imaging Guide
Page 10
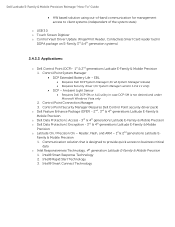
... solution that is not desired and under Microsoft Windows Vista only 2. Dell Latitude E-Family & Mobile Precision Reimage "How-To" Guide HW based solution using out-of the system state) o USB 3.0 o Touch Screen Digitizer o Control Vault Driver Update (FingerPrint Reader, Contactless Smart Card reader tied in case DCP-SM is designed to provide quick access...
... solution that is not desired and under Microsoft Windows Vista only 2. Dell Latitude E-Family & Mobile Precision Reimage "How-To" Guide HW based solution using out-of the system state) o USB 3.0 o Touch Screen Digitizer o Control Vault Driver Update (FingerPrint Reader, Contactless Smart Card reader tied in case DCP-SM is designed to provide quick access...
Latitude E-Family Re-Imaging Guide
Page 20
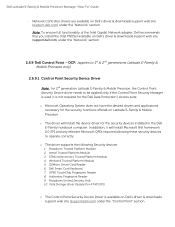
... notebook computer. Atmel Trusted Platform Module 3. STMicroelectronics Trusted Platform Module 4. Authentec Fingerprint Reader 9. Dell Latitude E-Family & Mobile Precision Reimage "How-To" Guide - In addition, it is available on Dell's driver & downloads support web site (support.dell.com) under the "Network" section 2.6.9 Dell Control Point - O2Micro Smart Card Reader 6. Broadcom Trusted Platform Module 2. Network Controller drivers are available on...
... notebook computer. Atmel Trusted Platform Module 3. STMicroelectronics Trusted Platform Module 4. Authentec Fingerprint Reader 9. Dell Latitude E-Family & Mobile Precision Reimage "How-To" Guide - In addition, it is available on Dell's driver & downloads support web site (support.dell.com) under the "Network" section 2.6.9 Dell Control Point - O2Micro Smart Card Reader 6. Broadcom Trusted Platform Module 2. Network Controller drivers are available on...
Latitude E-Family Re-Imaging Guide
Page 21
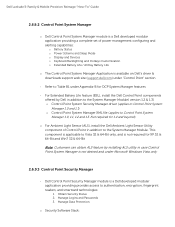
... System Manager features - Obtain Security Status 2. Manage Logins and Passwords 3. Dell Latitude E-Family & Mobile Precision Reimage "How-To" Guide 2.6.9.2 Control Point System Manager o Dell Control Point System Manager module is a Dell developed modular application providing a complete set of Control Point in addition to authentication, encryption, fingerprint readers, and smartcard technologies: 1. Manage Data Protection o Security Software Stack...
... System Manager features - Obtain Security Status 2. Manage Logins and Passwords 3. Dell Latitude E-Family & Mobile Precision Reimage "How-To" Guide 2.6.9.2 Control Point System Manager o Dell Control Point System Manager module is a Dell developed modular application providing a complete set of Control Point in addition to authentication, encryption, fingerprint readers, and smartcard technologies: 1. Manage Data Protection o Security Software Stack...

Latitude E-Family Re-Imaging Guide
Page 23
...encryption, fingerprint readers, and smartcard technologies: Obtain Security Status Manage Logins and Passwords Manage Data Protection - It also contains the NTRU Trusted Software Stack (TSS) that provides TPM access Application Installer - The following components should be installed in order for Dell Data Protection... relevant Microsoft QFEs - Please ignore Drivers and Middleware Installer on the system, so the installation order is important Dell Latitude E-Family & Mobile Precision Reimage "How-To" Guide o The DFEP Application is available on...
...encryption, fingerprint readers, and smartcard technologies: Obtain Security Status Manage Logins and Passwords Manage Data Protection - It also contains the NTRU Trusted Software Stack (TSS) that provides TPM access Application Installer - The following components should be installed in order for Dell Data Protection... relevant Microsoft QFEs - Please ignore Drivers and Middleware Installer on the system, so the installation order is important Dell Latitude E-Family & Mobile Precision Reimage "How-To" Guide o The DFEP Application is available on...
Latitude E-Family Re-Imaging Guide
Page 39
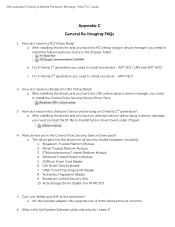
...manager, you have an unknown device yellow bang in the Chipset folder: b. a. STMicroelectronics Trusted Platform Module 4. Dell Smart Card Keyboard 7. Broadcom Unified Security Hub 10. Dell Latitude E-Family & Mobile Precision Reimage "How-To" Guide Appendix C General Re-Imaging FAQs 1. How do I...Update (for all security related hardware, including: 1. What is the Dell System Software utility and why do I need to install two drivers - How do I resolve a PCI Yellow Bang? a. a. Authentec Fingerprint Reader 9. For E-Family 2nd generation you need to install the Control ...
...manager, you have an unknown device yellow bang in the Chipset folder: b. a. STMicroelectronics Trusted Platform Module 4. Dell Smart Card Keyboard 7. Broadcom Unified Security Hub 10. Dell Latitude E-Family & Mobile Precision Reimage "How-To" Guide Appendix C General Re-Imaging FAQs 1. How do I...Update (for all security related hardware, including: 1. What is the Dell System Software utility and why do I need to install two drivers - How do I resolve a PCI Yellow Bang? a. a. Authentec Fingerprint Reader 9. For E-Family 2nd generation you need to install the Control ...
Owners Manual
Page 39
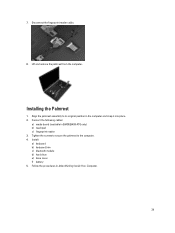
7. Disconnect the fingerprint reader cable. 8. Lift and remove the palmrest from the computer. Align the palmrest assembly to the computer. 4. Tighten the screws to secure the palmrest to its original position in E6430/E6430 ATG only) b) touchpad c) fingerprint reader 3. Installing the Palmrest 1. Install: a) keyboard b) keyboard trim c) bluetooth module d) hard drive e) base cover f) battery 5. Connect the following cables: a) media board (available in the computer and snap it into place. 2. Follow the procedures in After Working Inside Your Computer. 39
7. Disconnect the fingerprint reader cable. 8. Lift and remove the palmrest from the computer. Align the palmrest assembly to the computer. 4. Tighten the screws to secure the palmrest to its original position in E6430/E6430 ATG only) b) touchpad c) fingerprint reader 3. Installing the Palmrest 1. Install: a) keyboard b) keyboard trim c) bluetooth module d) hard drive e) base cover f) battery 5. Connect the following cables: a) media board (available in the computer and snap it into place. 2. Follow the procedures in After Working Inside Your Computer. 39


