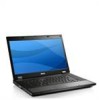
Dell Latitude E5510 Support Question
Dell Latitude E5510 Support Question
Find answers below for this question about Dell Latitude E5510.Need a Dell Latitude E5510 manual? We have 2 online manuals for this item!
Question posted by Helenjmwe on July 4th, 2014
How To Setup Fingerprint Reader On Dell Latitude E5410
The person who posted this question about this Dell product did not include a detailed explanation. Please use the "Request More Information" button to the right if more details would help you to answer this question.
Current Answers
Answer #1: Posted by waelsaidani1 on July 5th, 2014 1:04 PM
waelsaidani1

Member since:
May 12th, 2013 Points: 19,501,797

Member since:
May 12th, 2013 Points: 19,501,797
1. Turn on computer and go into bios by hitting F2 at startup.
2. Click on the plus button to the left of security.
3. Select TPM Security.
4. Check the box on the right hand screen and check the box for TPM Security and make sure activate is selected.
Hit exit.
5. When computer reboots, Log into windows.
6. Click on start, then all programs.
7. Click on the folder named 'Dell ControlPoint'.
8. Click on the Dell ControlPoint icon.
9. Once in the control point program- click on the Security Manager button on the bottom left.
10. Click on the Manage Security button on the right side.
11. Once into Security Manager click on Settings beside Trusted Platform Module. Click continue.
12. Click on the Manage tab. Click on Enable to Enable the TPM Security Chip. Reboot computer.
13. Click on modify when a “request to change configuration is pending” screen comes up.
14. Go back into Trusted Platform Module settings. Go to manage tab and click establish button next to Ownership.
Create Owner password and confirm. You should see “Accessing security chip. Please wait…” and later a
window indicating that the “Ownership of the TPM security chip was established successfully”.
15. Go back into ControlPoint Security Manager and click on settings next to Fingerprint Reader.
16. When pop up window comes up click Next. Go through wizard to set up fingerprint reader. Skip create system
password.
17. Creating system password is not necessary, if you don't want to put a password in for your bios just click on skip.
Enter windows password and click next.
18. Select which finger you want to use by clicking on it. Swipe finger 4 times to enroll.
19. If failed to enroll fingerprint error message comes up- follow instructions on the bottom of the the page.
20. Once finger is enrolled go back to Security Manager window and click on Logins and Passwords on the left side.
21. Click on Settings to the right of 'Require a fingerprint or password for windows logon'. Click continue.
22. Click on windows login on the left hand side.
23. Check the box that says Enable Secure Windows Login. Change the drop down box for authentication for Secure
Windows login to password or biometric.
24. Uncheck the box that says Replace Ctrl+Alt+Delete with biometric authentication. Click Apply and restart
computer.
25. Authenticate Using Biometric screen will come up- slide finger. Proceed normally.
If fingerprints will not enroll, reboot computer and try enrolling again. If you keep getting an enrollment failed error,
download the ControlPoint Security Manager Application from support.dell.com
Related Dell Latitude E5510 Manual Pages
Setup and Features Information Tech Sheet - Page 1
Dell™ Latitude™ E5410/E5510
Setup and Features Information
About Warnings
WARNING: A WARNING indicates a potential for
property damage, personal injury, or death. Latitude E5410 - Front View
1 2 3
4 5 6
23...12 USB 2.0 connectors (2) 13 optical drive 14 optical drive eject button 15 fingerprint reader (optional) 16 keyboard 17 touchpad buttons 18 wireless switch 19 touchpad 20 ...
Setup and Features Information Tech Sheet - Page 3
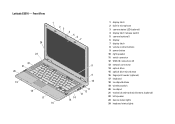
Latitude E5510 - Front View
1 23 4 5 6 7
24
23
22 21 20
19
18 17 16
8
9 10
14 15
11 12 13
1 ... 10 right speaker 11 serial connector 12 USB 2.0 connectors (2) 13 network connector 14 optical drive 15 optical drive eject button 16 fingerprint reader (optional) 17 keyboard 18 touchpad buttons 19 wireless switch 20 touchpad 21 trackstick and trackstick buttons (optional) 22 left speaker 23 ...
Service Manual - Page 1
... to change without the written permission of Zvetco Biometrics, LLC; disclaims any manner whatsoever without notice. © 2010 Dell Inc. Dell™ Latitude™ E5510 Discrete Service Manual
Working on Your Computer Adding and Replacing Parts Specifications Diagnostics System Setup
Notes, Cautions, and Warnings
NOTE: A NOTE indicates important information that helps you purchased...
Service Manual - Page 2
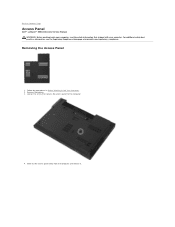
... Access Panel
1. Loosen the screw that shipped with your computer, read the safety information that secures the access panel to Contents Page
Access Panel
Dell™ Latitude™ E5510 Discrete Service Manual WARNING: Before working inside your computer.
Back to the computer.
4. Follow the procedures in Before Working Inside Your Computer. 2. Slide out...
Service Manual - Page 4
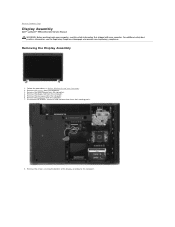
.... 5. Follow the procedures in Before Working Inside Your Computer. 2. Remove the screws securing the bottom of the display assembly to Contents Page
Display Assembly
Dell™ Latitude™ E5510 Discrete Service Manual WARNING: Before working inside your computer, read the safety information that shipped with your computer.
For additional safety best practices information...
Service Manual - Page 8
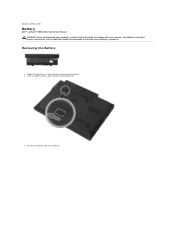
... Your Computer. 2. For additional safety best practices information, see the Regulatory Compliance Homepage at www.dell.com/regulatory_compliance. Removing the Battery
1.
Remove the battery from the computer. Back to Contents Page
Battery
Dell™ Latitude™ E5510 Discrete Service Manual WARNING: Before working inside your computer, read the safety information that shipped with...
Service Manual - Page 10
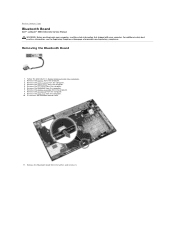
Remove the LED board from the computer. 3. Disconnect the Bluetooth board cable.
11. Back to Contents Page
Bluetooth Board
Dell™ Latitude™ E5510 Discrete Service Manual WARNING: Before working inside your computer, read the safety information that shipped with your computer. For additional safety best practices information, see ...
Service Manual - Page 12
... are no configurable options in this menu. Back to Contents Page
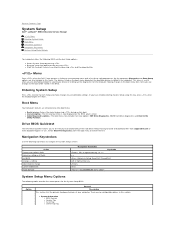
System Setup
Dell™ Latitude™ E5510 Discrete Service Manual
Menu Entering System Setup Boot Menu Drive BIOS Quicktest Navigation Keystrokes System Setup Menu Options
Your computer offers the following BIOS and System Setup options:
l Access System Setup by pressing l Bring up the diagnostics for the System...
Service Manual - Page 17
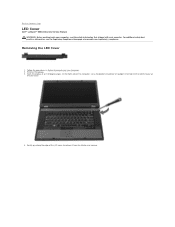
... cover.
4. Removing the LED Cover
1. On the right side of the LED cover to Contents Page
LED Cover
Dell™ Latitude™ E5510 Discrete Service Manual WARNING: Before working inside your computer, read the safety information that shipped with your computer.
For .... 2. Back to release it from the latches and remove. Open the display at www.dell.com/regulatory_compliance.
Service Manual - Page 19
Back to Contents Page
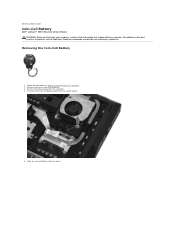
Coin-Cell Battery
Dell™ Latitude™ E5510 Discrete Service Manual WARNING: Before working inside your computer, read the safety information that shipped with your computer.
Remove the access panel from the computer. 3. ...
Service Manual - Page 21
... the LCD cable. 2. Reseat the processor. 2. Back to Contents Page
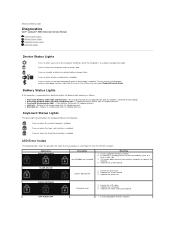
Diagnostics
Dell™ Latitude™ E5510 Discrete Service Manual
Device Status Lights Battery Status Lights Keyboard Status Lights LED Error ...An unauthenticated or unsupported non-Dell AC adapter is in full charge mode with AC adapter present. To turn on steadily or blinks to your laptop. Turns on - Turns on...
Service Manual - Page 23
... access panel. 4.
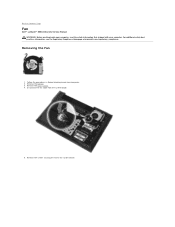
Follow the procedures in Before Working Inside Your Computer. 2. Remove the battery. 3. Remove the screws securing the fan to Contents Page
Fan
Dell™ Latitude™ E5510 Discrete Service Manual WARNING: Before working inside your computer, read the safety information that shipped with your computer. Disconnect the fan cable from the...
Service Manual - Page 25
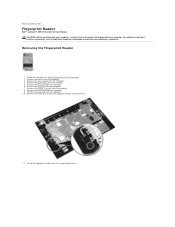
... practices information, see the Regulatory Compliance Homepage at an angle and remove. Removing the Fingerprint Reader
1. Remove the optical drive from the computer. 7. Remove the screw that secures the fingerprint reader to Contents Page
Fingerprint Reader
Dell™ Latitude™ E5510 Discrete Service Manual WARNING: Before working inside your computer, read the safety information that...
Service Manual - Page 28
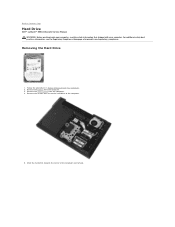
... additional safety best practices information, see the Regulatory Compliance Homepage at www.dell.com/regulatory_compliance. Remove the screws that shipped with your computer, read the safety information that secure the hard drive to Contents Page
Hard Drive
Dell™ Latitude™ E5510 Discrete Service Manual WARNING: Before working inside your computer. Back to the...
Service Manual - Page 31

... Regulatory Compliance Homepage at an angle and remove it from the computer. 3. Loosen the screws securing the heat sink to Contents Page
Heat Sink
Dell™ Latitude™ E5510 Discrete Service Manual WARNING: Before working inside your computer, read the safety information that shipped with your computer. Back to the system board.
6. Follow...
Service Manual - Page 33
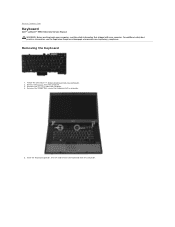
... lift and remove the keyboard from the computer. 3. Back to the computer.
5. For additional safety best practices information, see the Regulatory Compliance Homepage at www.dell.com/regulatory_compliance. Remove the battery from the computer.
Remove the LED cover from the computer. 4. Remove the screws that shipped with your computer, read the...
Service Manual - Page 35
... the procedures in Before Working Inside Your Computer. 2. Removing the Display Bezel
1. Remove the screws securing the display bezel to Contents Page
Display Bezel
Dell™ Latitude™ E5510 Discrete Service Manual WARNING: Before working inside your computer, read the safety information that shipped with your computer. For additional safety best practices information...
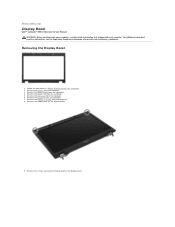
Service Manual - Page 38
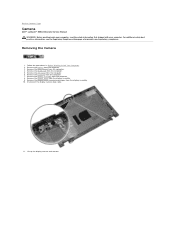
... and hinges from the computer. 4. Remove the LED cover from the computer. 8. Remove the display assembly from the computer. 6. Back to Contents Page
Camera
Dell™ Latitude™ E5510 Discrete Service Manual WARNING: Before working inside your computer, read the safety information that shipped with your computer. Follow the procedures in Before Working...
Service Manual - Page 60
...
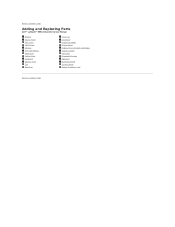
Adding and Replacing Parts
Dell™ Latitude™ E5510 Discrete Service Manual
Battery Access Panel LED Cover WLAN Card Memory Coin-Cell Battery Hard Drive Optical Drive Keyboard Memory Card Fan Heat Sink
Processor LED Board Display Assembly Display Bezel Display Panel, Bracket and Hinges Display Camera Palm Rest Fingerprint Reader Speakers Bluetooth Board System...
Service Manual - Page 63
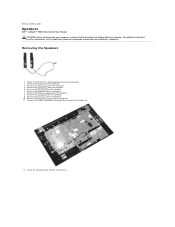
...see the Regulatory Compliance Homepage at www.dell.com/regulatory_compliance. Removing the Speakers
1. ...Dell™ Latitude™ E5510 Discrete Service Manual WARNING: Before working inside your computer, read the safety information that shipped with your computer. Remove the optical drive from the computer. 8. Remove the palm rest from the computer. 11. Remove the fingerprint reader...
Similar Questions

How Do I Get The Keyboard Out Of My Dell Laptop Latitude E5510
(Posted by loCLSDIS 9 years ago)

How To Activate Fingerprint Reader On Dell Latitude E5510
(Posted by Damagoon 9 years ago)

How To Turn Off Fingerprint Reader Latitude E6320
(Posted by arMasat 10 years ago)


Instructions On How To Get To The Processor For A Dell Latitude E5510 Laptop
(Posted by WILkataj 10 years ago)