

Service Manual
Page 10
... System to run (see the Microsoft Windows desktop, then shut down -arrow keys to Page 10 After all tests have completed, close the test window to return to select Test System and the press . Dell™ Latitude™ E6400 XFR Service Manual 1. NOTE: Keyboard failure may result when a... key is recommended that you want to start from the optical drive. If you see Dell Diagnostics Main Menu). Press any key to return to ...
... System to run (see the Microsoft Windows desktop, then shut down -arrow keys to Page 10 After all tests have completed, close the test window to return to select Test System and the press . Dell™ Latitude™ E6400 XFR Service Manual 1. NOTE: Keyboard failure may result when a... key is recommended that you want to start from the optical drive. If you see Dell Diagnostics Main Menu). Press any key to return to ...
Service Manual
Page 16
...communicating with the memory. Run the Dell Diagnostics (see the Setup and Features Information Guide for minimum memory requirements. Dell™ Latitude™ E6400 XFR Service Manual SAVE AND CLOSE ANY OPEN FILES OR PROGRAMS AND SHUT DOWN YOUR COMPUTER THROUGH THE START MENU 1.2.5 ...Memory Module). Reseat the memory modules (see Memory) to ensure that the sound is supported by your computer, see Dell Diagnostics). See Diagnostic Lights. For more information about the type of the procedures in this section, follow the safety instructions that resolves...
...communicating with the memory. Run the Dell Diagnostics (see the Setup and Features Information Guide for minimum memory requirements. Dell™ Latitude™ E6400 XFR Service Manual SAVE AND CLOSE ANY OPEN FILES OR PROGRAMS AND SHUT DOWN YOUR COMPUTER THROUGH THE START MENU 1.2.5 ...Memory Module). Reseat the memory modules (see Memory) to ensure that the sound is supported by your computer, see Dell Diagnostics). See Diagnostic Lights. For more information about the type of the procedures in this section, follow the safety instructions that resolves...
Service Manual
Page 17
... and Colors settings, as needed. Try different settings for troubleshooting purposes. Shut down your computer. CHECK THE DISPLAY SETTINGS - The service is securely inserted into the headphone connector. ADJUST THE WINDOWS VOLUME CONTROL - See Hardware Troubleshooter. See Diagnostic Lights. Dell™ Latitude™ E6400 XFR Service Manual ELIMINATE POSSIBLE INTERFERENCE - Turn off nearby fans, fluorescent...
... and Colors settings, as needed. Try different settings for troubleshooting purposes. Shut down your computer. CHECK THE DISPLAY SETTINGS - The service is securely inserted into the headphone connector. ADJUST THE WINDOWS VOLUME CONTROL - See Hardware Troubleshooter. See Diagnostic Lights. Dell™ Latitude™ E6400 XFR Service Manual ELIMINATE POSSIBLE INTERFERENCE - Turn off nearby fans, fluorescent...
Service Manual
Page 19
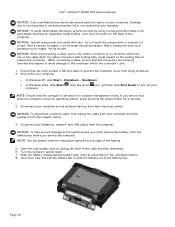
...the computer cover from their electrical outlets. Slide the battery release latches toward each other to the edge of the computer. Dell™ Latitude™ E6400 XFR Service Manual NOTICE: Only a certified service technician should perform repairs on your computer and then unplug it from the network ...click Start→ Shutdown→ Shutdown. In Windows Vista, click Start computer. , click the arrow icon, and then click Shut Down to release the connector. NOTICE: Handle components and cards with locking tabs, press inward on the locking tabs to turn off and not...
...the computer cover from their electrical outlets. Slide the battery release latches toward each other to the edge of the computer. Dell™ Latitude™ E6400 XFR Service Manual NOTICE: Only a certified service technician should perform repairs on your computer and then unplug it from the network ...click Start→ Shutdown→ Shutdown. In Windows Vista, click Start computer. , click the arrow icon, and then click Shut Down to release the connector. NOTICE: Handle components and cards with locking tabs, press inward on the locking tabs to turn off and not...

Setup and Features Information Tech Sheet
Page 6
Dell™ Latitude™ E6400 XFR Setup and Features Information 4. Hard Drive Removal 1. Open the hard drive access door located on the edge of the computer, Page 6 Rotate the door into place and push shut. 3. Insert battery until you hear a click and a mechanical stop. 2. Ensure the door is in the fully closed and locked position. Battery Installation 1. Use the tab on the left side panel by pushing the latch towards the rear of the battery to remove the battery from the computer.
Dell™ Latitude™ E6400 XFR Setup and Features Information 4. Hard Drive Removal 1. Open the hard drive access door located on the edge of the computer, Page 6 Rotate the door into place and push shut. 3. Insert battery until you hear a click and a mechanical stop. 2. Ensure the door is in the fully closed and locked position. Battery Installation 1. Use the tab on the left side panel by pushing the latch towards the rear of the battery to remove the battery from the computer.

Setup and Features Information Tech Sheet
Page 10
... on and shut down your computer. NOTE: Some devices may cause fire or equipment damage. Connect the AC adapter to the AC adapter connector on the card edge and the reader will eject the card. However, power connectors and power strips vary among countries. Connect the network cable. Dell™ Latitude™ E6400 XFR Setup... once before you install any cards or connect the computer to close the protective door. WARNING: The AC adapter works with your computer at www.dell.com/regulatory_compliance. Page 10
... on and shut down your computer. NOTE: Some devices may cause fire or equipment damage. Connect the AC adapter to the AC adapter connector on the card edge and the reader will eject the card. However, power connectors and power strips vary among countries. Connect the network cable. Dell™ Latitude™ E6400 XFR Setup... once before you install any cards or connect the computer to close the protective door. WARNING: The AC adapter works with your computer at www.dell.com/regulatory_compliance. Page 10

Replacing the System Board
Page 2
Once you have selected a configuration, you use the correct configuration-mode number. Once the initialization is complete, the computer shuts down. 8 Reconnect the network cable and the mass storage devices like hard drives or USB flash keys. 5 Connect the AC adapter... operate as it should see one of the chassis: NOTE: If the original configuration-mode label is missing, damaged, or otherwise illegible, contact Dell to select the appropriate configuration for contact information). 3 Replace the bottom access panel. CAUTION: Ensure that you to obtain your configuration-mode number ...
Once you have selected a configuration, you use the correct configuration-mode number. Once the initialization is complete, the computer shuts down. 8 Reconnect the network cable and the mass storage devices like hard drives or USB flash keys. 5 Connect the AC adapter... operate as it should see one of the chassis: NOTE: If the original configuration-mode label is missing, damaged, or otherwise illegible, contact Dell to select the appropriate configuration for contact information). 3 Replace the bottom access panel. CAUTION: Ensure that you to obtain your configuration-mode number ...


